Friday, January 12, 2024

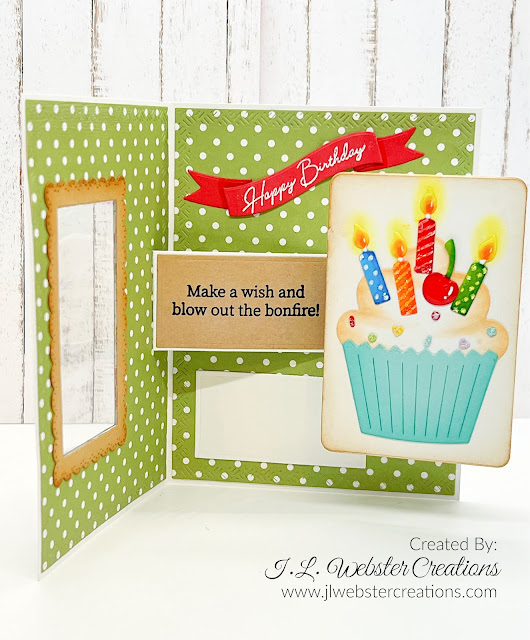
Birthday Cupcakes using Karen Burniston's Rockin' Rectangle!

 Hello Crafty Friends and welcome! I am trying really hard to replenish my birthday card supply and was trying to come up with a card idea. I decided to use Karen Burniston's Rockin' Rectangle die set and then came up with the idea to incorporate her Cupcake Pop-Up as well!!

For this card, I started with an A2 sized card base using smooth heavy weight white cardstock. Then, using Karen Burniston's Rectangles - Crossshatch dies in the largest size, I cut three rectangles from a green polka dot patterned paper. For the front and inside rectangle, I adhered the patterned paper with a small piece of double sided adhesive at the top of each rectangle. Then I die cut the window. I added a piece of acetate to create a window and then glued both rectangles down. 

I die cut two scalloped borders using a kraft cardstock and added them to the front and inside of the card. I added some Distress Ink in Vintage Photo around the edges before adhering them. 

I then die cut the pop-up mechanism from heavy weight white cardstock. I assembled the pieces and glued them into my card. 

I die cut two pieces from the same kraft cardstock to cover the pop-up mechanism. I stamped the sentiment "make a wish and blow out the bonfire!" to the longer piece, using VersaMark Ink, Honey Bee Stamps Inside: Snarky Birthday Sentiments and black embossing powder. 

Then I cut out all my cupcakes. I used the cupcakes dies from Karen Burniston's Cupcake Pop-Up set. There is one large and one small cupcake in this set. I used three smaller cupcakes on the front of my card and the large one on the inside. 

I die cut the wrappers from green, yellow and blue scraps of cardstock, then added some detail to them using my Distress Oxide Inks in Peacock Feathers, Mustard Seed and Mowed Lawn

I then die cut the frosting tops from white cardstock and added detail to them with Copic markers. 

I die cut the cherries that come with the Cupcake Pop-Up set. I also used Karen Burniston's Cupcake Add-On die set to make the sprinkles on top of some of the cupcakes. 

For the inside cupcake, I added candles from Karen Burniston's Cake Pop-Up die set. 

I added a sentiment to the front from the same Honey Bee Stamps set as I used on the inside. Then I added glossy accents to the cherries and glitter gel to the sprinkles. 

Lastly, I stamped the Happy Birthday sentiment on to a red cardstock banner that I die cut from MFT - Elegant Folded Banner die set. I also die cut a small rectangle and added it to the inside for a place to sign the card. 

I love how bright and cheerful this Birthday card turned out. Thank you so much for stopping by and Happy Crafting!


Tuesday, January 9, 2024

Coffee Shop Cards with My Favorite Things Card Kit

 Hello Crafty Friends and welcome! About a year ago (has it really been that long? I can't really remember when this card kit came out) I purchased the My Favorite Things Coffee Shop card kit. I just loved all the little details that this kit came with. Over time, I also bought some of the extras, like the plants and the industrial finishes. But until now, I haven't even touched it!! I know, I know, shame! Lol. Well I was having a hard time deciding what to create and gave the decision making over to my 8 year old son. He was so excited about the coffee shop stuff, so I made two different coffee shop cards for you (and him). 

For my first card, I went with an A2 sized card base in the dark brown cardstock provided in the card kit. I added some of the patterned paper that also came with the kit called Floor to Ceiling. I also added a thin piece of white cardstock to create trim between the wall and the floor. 

Then I began die cutting out all the fun little coffee shop pieces. I started with MFT - Bistro Basics and die cut the counter. I used a kraft cardstock to create the counter, adding some of the dark brown cardstock to give the counter some dimension. I added some details using Copic markers and set the counter aside. 

I used the MFT - Be Your Own Barista die set to die cut the expresso machine, coffee cups, coffee bags, etc. I added some detail to my die cuts using Copic markers. I like making these small die cuts because they use up all my saved scraps. 

I then used MFT - Make a Sign die set and Coffee Shop stamp set to create the sign over the counter. I used a scrap of black cardstock and then cut it out of dark brown cardstock. I added the dark brown frame around the black frame to give the sign some dimension. I stamped the coffee board using VersaMark Ink and white embossing powder. 

I then die cut a second counter from dark brown cardstock. I added this to the back. Then added the expresso machine, pumps and the cupcakes. I put some foam squares on the back of the first counter I made and then added that on top of the plain counter. I added the take out coffees and the cake to the front. This gives the card some dimension! I also added the shelf along with the cups, mugs and coffee bags. I stamped the coffee bean from the Coffee Shop stamp set on to the coffee bags using VersaMark ink and white embossing powder. 

Lastly, I added the sentiment from MFT - Coffee Order stamp set. I used a red cardstock as the base and with VersaMark ink and white embossing powder to create the sentiment. I added this to the front of the counter. I will warn you, this card kit is ADDICTING!!!

For my second card, I went with an A2 top fold card, using a light gray cardstock that came with my kit. I went with bright, calming colors for this card. I chose some pretty patterned paper from the same paper pad as before. 

I die cut the counter from Lawn Fawn's White Woodgrain cardstock. Then I used a smooth white cardstock to add the top and bottom sections. I added the same light gray to the top and bottom as the card base. 

I chose some scrap blue cardstock that closely resembled the blue in the patterned paper and die cut the chairs and pots from MFT - Bistro Basics and Pots and Plants. I die cut the light and fixtures from MFT - Industrial Finishes, coloring the lightbulb in with Copic markers. I die cut the plants from smooth white cardstock and colored them in with Copic markers. 

I die cut and stamped the coffee board, like I did in the first card, only changed the layout. I didn't add all the extras like I did in the first card because I wanted this card to be clean and simple. I did add some glossy accents to the cupcakes to make them look like they are under glass. 

I really enjoyed working with this card kit and the extras. There is really no end to the ideas you can come up with to create amazing coffee shop cards for that coffee lover in your life. Thank you so much for stopping by and Happy Crafting. 


Monday, January 8, 2024

Beach Vibes with Karen Burniston's Palm Tree Pop-Up

 Hello Crafty Friends and welcome! It's dreary and gray here in Ontario and cold! We haven't really had snow yet, but I'm sure it's coming. So to make things a little brighter, I created this beach themed card using Karen Burniston's Palm Tree Pop-Up!


For this card, I started with a top fold A2 sized card base using heavy weight 110lb cardstock. I then cut two rectangles from smooth white cardstock to fit 1/8 of an inch smaller then the card base. These two rectangles create the beach and ocean for the top and bottom of my card. 

To create the ocean/beach, I took a piece of removable tape and tore it down the center length ways. I placed it on the background where I wanted the ocean to be. Then using Distress Oxide ink in Tumbled Glass, Salty Ocean and Chipped Sapphire, I created the ocean, being careful not to go over my taped area and leaving the edge white. I sprayed some water on the ocean areas using my mister to create a water effect. I did this with both rectangle pieces. I also used Copic Opaque paint and dabbed that on to create a ocean wave splash effect. 

I removed the tape and replaced it with the other half of the torn tape piece, adding it to the edge of the ocean. Now I can create the beach area. I used Distress Ink in Antique Linen and Vintage Photo. Then I used my Distress spray in the same colors to add spots to my sand area to give it some dimension. I did this to both rectangle pieces. 

I set these two pieces aside to dry. While they were drying, I die cut all my other pieces. I started with the palm trees from the Palm Tree Pop-Up. I die cut the trunks and bases using Ground Coffee Cardstock from Lawn Fawn, but cut the palm tree leaves from smooth white cardstock. Then using my Copic markers, I colored the palm tree tops in. 

I then die cut all my sea creatures using Karen Burniston's Sea Animals and Sea Charms die sets. I die cut most of these from smooth white cardstock and colored them in with Copic markers. I added some shine lines on the creatures using my white Gelly Pen. I added some glitter gel to the Jelly Fish tentacles. 

Using a scrap piece of smooth white cardstock, I added a blend of Distress Oxide ink in Mustard Seed and Carved Pumpkin, the die cut the "Beach Please!" sentiment using Karen Burniston's Word Set 16 - Beach Happy Hour

I used Karen Burniston's Short Rectangles - Crosshatch to die cut a small rectangle to add the stamped sentiment to. For the sentiment I used Honey Bee Stamps - Inside: Snarky Birthday Sentiments stamp set. 

I then placed the two background pieces on the card base and measured out where to place my palm trees. I carefully taped the backgrounds together and added the die cut to cut out the two tabs for the palm tree base. I ran this through my die cut machine twice, one for each palm tree. 

I glued the two background pieces in place, being careful not to get glue to close to the tabs that hold the palm tree. Then I added the two base pieces for the palm tree. I added the two palm trees to the bases and then with bakers twine, I added the hammock between the two palm trees. This hammock comes with the Palm Tree Pop-Up!

I added all my sea creatures and sentiments and the inside of the card was finished. I wanted to carry on the same theme to the front of the card, so for the front of the card, I created the same beach/ocean background. I used My Favorite Things: Clouds stencil to create some clouds in the background and used Distress Ink in Peacock Feathers for the sky. 

Then using the smaller palm tree from the Palm Tree Pop-Up and the palm tree from the Beach Charms, I added a couple of palm trees to my beach area. 

I also added the Flamingo from the Beach Charms set. I placed some sea shells using the shells from Karen Burniston's Tropical Scene die set. I also used her Beach Borders to create some small crabs for my beach. 

Using Karen Burniston's Word Set 2 - Birthday Die Set, I die cut the "celebrate" sentiment and added it to the front of my card. 

Lastly, I stamped a sentiment from Pink Fresh Studios - Happy Birthday Sentiments stamp set using Lawn Fawn's Jet Black Ink. I just love how bright and cheerful this card is. It definitely brings some sunshine to these gloomy winter days. Thank you so much for stopping by and Happy Crafting!


Tuesday, January 2, 2024

Karen Burniston January 2024 Designer Challenge - Raise It Up!

 Hello Crafty Friends and welcome to a brand new year!!! I wish you all the best for 2024 and hope that you all had a wonderful holiday season. My family and I spent our Christmas Day sick at home, but we were all together and still managed to have a nice dinner (despite the sniffles and coughing). 

For our first Designer Challenge of the new year, Karen challenged us to create a card using the new Raising Platform Pop-Up! For my card, I decided to create a New Years celebration card. I can honestly say, I've never made a New Years card before. I went with gold, black, silver and white for my card colors. I thought these looked like classic New Years party favors.

I started with an A2 sized card base using a heavy weight black cardstock. I then used the largest sized die in the Rectangles - Crosshatch die set and cut three rectangles from a mirrored gold light weight cardstock I got from Michaels. Then using the next die size down in the Rectangles - Crosshatch, I die cut three rectangles using white cardstock. 

I then die cut the pop-up mechanism from the same black cardstock as the card base. Karen recommends using a light weight cardstock for this particular pop-up mechanism and yes, a heavy weight cardstock makes it very bulky, but I really wanted to stick with black, and I only had the heavy weight black cardstock. I added gold accents to the base of the pop-up. 

I then die cut the fancy label that shows when the pop-up raises up, using the same gold cardstock, adding a secondary label in white cardstock. I added the pop-up mechanism and the label to the card. 

I then began die cutting all the little bits and pieces I wanted to use with this card. I die cut a martini glass from the Happy Hour Charms, using white cardstock, vellum and Copic markers to create the fancy drink. Once glued into the card, I covered the glass in Glossy Accents to add more detail to the glass and make it stand out. 

I die cut several stars and streamers from the same colors I was using in the card. I added these all over the card, including behind the pop-up! 

I went with the same theme for the front of the card, adding lots of stars and streamers (these come with the Raising Platform Pop-Up!). 

I also added the sentiment "Celebrate" to the front of the card using a sparkly silver cardstock. Same as the numbers in the pop-up on the inside. 

Thank you so much for stopping by on our first Designer Challenge for 2024! I wish you all the very best. Thank you again and Happy Crafting!


Spook-tacular Halloween Card using Karen Burniston's Lorna Label and Explosion Pop-Up

  Hello Crafty Friends and welcome! I have a fun Halloween card for you today, using Karen Burniston's Lorna Label Pop-Up and Explosion...