Monday, October 30, 2023

Craft Roulette Episode 187 - Christmas Mice Stamps

 Hello Crafty Friends and Welcome!! My card today was created for Craft Roulette Episode 187. The parameters for this episode were:

Project - Cardstock + Not Cardstock

Colors - Santa's Workshop

Element - Collar(s)

Random - Zig Zag

So for my card, I got out my new Waffle Flower Postage stamp die and my favorite Lawn Fawn stamp set A Creature Was Stirring to create this super cute Christmas postage stamp card. 


For this card, I started with an A2 sized card using heavy weight (110lb) smooth white cardstock. I then picked out a pretty pink patterned paper to create a background. 

I die cut the stamp background using the same heavy weight cardstock as the card base. Then I placed the stamps where I wanted them, using masking paper to create each scene. I stamped the images using Lawn Fawn's Jet Black ink. 

Once I had all my images stamped and masked, I used my coordinating stencil to add ink to the backgrounds. Then I removed the masking paper. I colored all the images using Copic markers. 

I then added glossy accents to some of the images and glitter gel to others. I set the card aside to dry. Once dry, I then added the stamp marks using Waffle Flower Postage Collage stamp set. I stamp the "Christmas" sentiment on to black cardstock and used white embossing powder. 

I really like this postage stamp die and I look forward to creating more cards with it. Thank you so much for stopping by today and Happy Crafting!

Thursday, October 26, 2023

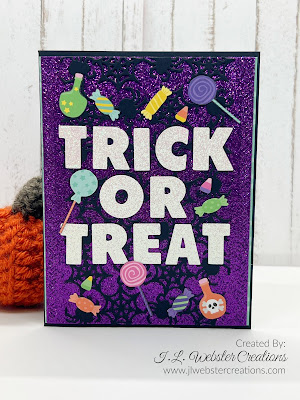
Trick or Treat Card using Karen Burniston's Christmas Tree Pop-Up!

 Hello Crafty Friends and welcome! My card for you today uses Karen Burniston's Christmas Tree Pop-Up along with several other of her dies to create this fun Halloween Tree pop-up card!


For this card, I started with an A2 sized card using smooth black heavy weight cardstock. I recently purchased some fun Halloween patterned paper so I used this great Halloween treats paper. The other side was the pretty blue, so I also used that as well. I die cut the patterned paper using the Rectangles - Crosshatch dies in the largest size. Then I added some purple glitter cardstock trim to the edges along with the teal patterned paper. 

For the tree, I die cut the entire tree and base from the same heavy weight cardstock as the card base. Then I die cut a "tree skirt" using some other Halloween patterned paper I have in my scrap. I cut the pieces down the middle and used this to attach the tree, instead of die cutting right into the card base. 

For the tree decorations, I die cut a row of skulls using the new Halloween Borders, using the die to color in the eyes and nose on the skulls. Then using the ornaments die that comes with the Christmas Tree Pop-Up, I die cut several ornaments from glitter orange, blue, green and purple cardstock. 

I die cut the pumpkins also from the Halloween Borders and created a tree topper with the pumpkins. I double checked the height by measuring the size of the pumpkin to the size of the star that would normally go on top. 

Then I die cut two skeletons using the Skeleton and Bat die set. I decided to have one falling apart and one standing up. Then using some dies from the Spinner Square Pop-Up die set, I die cut a speech bubble and a place to sign the card. I used Lawn Fawn's Costume Party stamp set for the sentiments. 

For the front of the card, I continued with the same color scheme. I added a tiny strip of blue patterned paper to the sparkly purple cardstock. 

Then I die cut a patterned piece to go over the purple background using the Slim Pattern Plate - Spiders die. 

Once I had the background glued together, I die cut the sentiment "Trick or Treat" using the Alphabet die set. I used a glitter white cardstock to make it really stand out. 

Lastly, I fussy cut some of the treats from the patterned paper I used on the inside of the card and glued them all over the front!

Such a fun card!! Thank you so much for stopping by and Happy Crafting!


Friday, October 20, 2023

Christmas Cupcakes using Karen Burniston's Landscape Rectangle Accordion

 Hello Crafty Friends and Welcome! My card today was inspired by Karen Burniston's August Designer Challenge card. I loved how she cut out the circles on either side of the Landscape Rectangle Accordion and added the Cupcake Add-On's to the center of the pop-up! For my card, I went with a Christmas cupcake theme. 


To make this card, I started with three Landscape Rectangle Accordion panels. I cut these from heavy weight (110lb) smooth white cardstock. 

I then dug through my stash and found a pretty candy cane patterned paper. One side had candy canes and one side was candy cane striped. Using Karen Burniston's Short Rectangles - Crosshatch dies in the largest and second largest sizes, I die cut borders for the front and back of my card. 

Then I followed Karen Burniston's instructions for creating the circle windows in the left and right panels. Click here to watch that instructional video. Before I added my patterned paper and red rings to each panel, I added a piece of invisible thread to each window. Once that was glued down, I then added my paper and red rings. 

I die cut two gingerbread men charms from Karen Burniston's Winter Charms. I trimmed the charm ring off and then colored them using Copic markers. With a white Gelly Pen, I added the "frosting" to the gingerbread men. Then I glued them back to back with the invisible thread down the center of both backs. Now it looks like my gingerbread men are floating! 

I die cut the background for the cupcakes using the same heavy weight cardstock as the card base. Then I die cut each cupcake piece from the same cardstock. I colored the cupcakes in using Copic markers and white Gelly Pen. I added some glitter gel to two cupcakes and then added the toppings using Karen Burniston's Christmas Borders 1 and Christmas Borders 2. I trimmed them out and then colored them in before adding them to the cupcakes. 

I set the cupcakes aside to dry. While they were drying I die cut the sentiment "Merry Christmas" using Karen Burniston's Word Set 3 - Holiday. I cut this twice, once from heavy weight black cardstock and once from a glitter white cardstock. 

I added the sentiment to the card using my Lineco Neutral pH glue

Once the cupcakes were dry, I glued everything together for my card. I just love the Cupcake Add-On. There are so many things you can do with the cupcakes. It's perfect for any occasion too!

Thank you so much for stopping by and Happy Crafting!


Monday, October 16, 2023

Wicked Witch Card Using Karen Burniston's Spinner Square Pop-Up

 Hello Crafty Friends and Welcome! While creating my previous Spinner Square Pop-Up card, I came up with another idea using that pop-up die set. My card today features Karen Burniston's Spinner Square Pop-Up along with her Witch and Cauldron die set. 


For this card, I started with an A2 sized side fold card base using heavy weight (110lb) black cardstock. I recently picked up some great Halloween patterned paper from Echo Park called Monster Mash. I used the green bubbly paper and the scary eyes paper for my card. I added a border of skulls using Karen Burniston's Halloween Borders die set. 

If you would like to see how to put this pop-up card together, click here to watch Karen Burniston's assembly video on YouTube. 

I die cut all the pieces from the Witch and Cauldron set using heavy weight smooth white cardstock and a shiny black cardstock. For the white pieces, I colored everything in using Copic markers. 

When I created the cauldron with the green bubbling goo, I wanted to add some ruby slippers, like the Witch actually caught Dorothy! I know, I know....that's just evil, but then, so is the Witch! 

So I used the Witches books and drew out the ruby slippers. Then I colored them in with Copic markers. I cut them out and added them to the cauldron, adding Glitter Gel after to give them a sparkly look.

I die cut the monkey from Karen Burniston's Monkey and Lion die set. I looked up what colors to use for the Witches flying monkey and from the original Wizard of Oz, they appeared to have a blue looking face with a grayish brown body. So that's what I went with. Of course my monkey needed wings, so I used Karen Burniston's Knight and Dragon die set and cut the monkey wings from the Dragon die set. I added some glitter gel to the wings to add a little dimension. 

For the front of my card, I wanted to create the sign from the Haunted Forest. I measured how much space I was going to have on the wider side of the front of the card. Then I cut out a piece of cardstock that size. 

I trimmed smaller pieces out and cut little triangles from both sides of each piece. 

Then using my Copic markers, I added the color and detail to each wooden panel of the sign. I then took my paper distress tool and scraped up the sides of the wooden pieces. With a size 10 white Gelly Pen, I added the words to each wood panel. The I cut a thin piece of black cardstock for the sign post and glued each sign piece to the post. 

Once I had the sign complete, I added the witches broom to the side of the card. 

I used Karen Burniston's Mini Alphabet and Numbers and a sparkly red cardstock to cut out the word "Witching". Then using some sentiment stamps I had on hand, I stamped the sentiment "you a" and heat embossed it with white embossing powder. 

Lastly, I added the Happy Halloween to the inside using Karen Burniston's new Small Script Halloween and the same sparkly red cardstock as the front. Then I die cut a small square to add a place to sign the card. 

I just love how this card turned out. That flying monkey is so cute! I can't wait to send this card out to my friend for her favorite holiday....Halloween! Thank you so much for stopping by and Happy Crafting!


Thursday, October 12, 2023

Bake the World with Karen Burniston and Clearly Besotted!

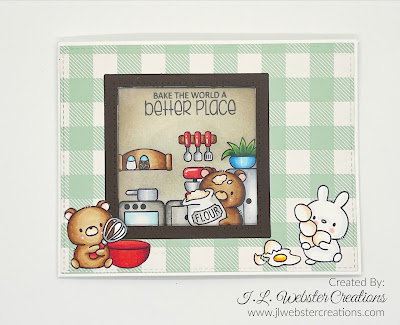
 Hello Crafty Friends and Welcome! My card today is a combination of Karen Burniston and Clearly Besotted. I used Karen Burniston's Spinner Square Pop-Up die and paired it with this adorable stamp set by Clearly Besotted called Bake Off. 


For this card, I started with an A2 sized side fold card using smooth white heavy weight (110lb) cardstock. I then added a patterned paper I had in my stash. Once I had my patterned paper cut out, I added the window on the front of the card. To see how to do this, click here to watch Karen Burniston's assembly video. 

I then die cut out the square and rectangle for the inside of the pop-up. I used the Bake Off stamp set and masking paper to create the scene on the inside of the card. Then I once I added a background to the square using Simon Says Stamps Pawsitively Saturated Ink in Latte, Cappuccino and Mocha, I removed the masking paper and colored the images in with Copic markers. 

I then stamped out the other images using Lawn Fawn Jet Black ink. I colored them in with Copic markers then fussy cut each little critter out. 

I die cut the word bubble and stamped the "all you knead is love" sentiment. 

I also die cut a second square and added that to the inside of the card to give the sender a place to sign. 

I added some gloss lines to my stamped images to add a little dimension. 

I added some more stamped critters to the front of the card. I just love these little plushie critters that Clearly Besotted created. They go so well with Karen Burniston's awesome Spinner Square Pop-Up!

Get ready, because I am going to be showing a whole series of Spinner Square cards in the next week. 

Thank you so much for stopping by and Happy Crafting!


Thursday, October 5, 2023

Alice in Wonderland Book Card - Clearly Besotted!

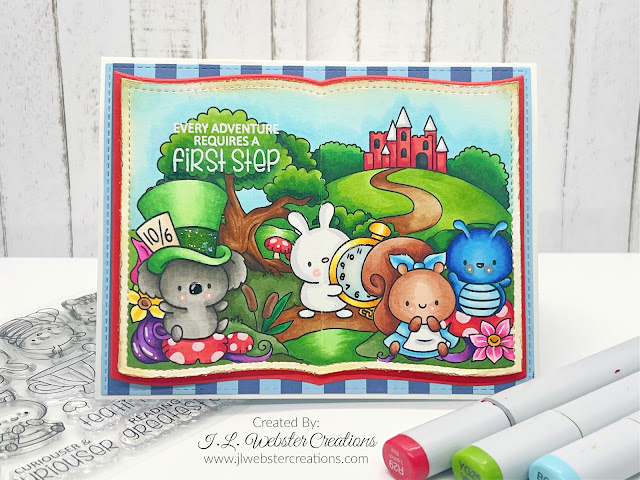
 Hello Crafty Friends and Welcome! My card today is something different. I recently purchased a few stamp sets from Clearly Besotted. They were themed like Alice in Wonderland, which was one of my very favorite movies as a child. I love the Disney cartoon, I loved the old black and white movie from 1933 featuring Charlotte Henry as Alice and I even love the newer versions with Johnny Depp. So when I saw this stamp set, I had to have it. The stamp set is called Plushies in Wonderland. I also bought Picture it Wonderland. I used both these stamp sets along with Mama Elephants amazing Turn the Page die to create this super cute book card. 


I started with an A2 sized card using heavy weight (110lb) smooth white cardstock. I then used a striped patterned paper as the background for my card. 

I die cut the book from Mama Elephants Turn the Page die using red cardstock. I cut three pages from a light weight cardstock for the inside of the book. I used my Tim Holtz tool that creates frayed edges to paper on each page, then used Distress Ink in Antique Linen to make the pages look old. 

I die cut one more page from heavy weight (110lb) smooth white cardstock. I stamped and masked all my images first. This took a few tries, but once done, they looked great! I then removed the masks and began to color the images with Copic markers. 

Once I had everything colored, I used my paper edge frayer to fray the edges of my pages and added Distress Ink as before. I stamped my sentiment using VersaMark ink and white embossing powder and that finished off my card!

I just love these little plushies!! I can't wait to get some more wonderful stamp sets from Clearly Besotted!! 

Thank you so much for stopping by and Happy Crafting!

Wednesday, October 4, 2023

Spooky Fun with Karen Burniston's Barn Pop-Up!!

 Hello Crafty Friends and Welcome!! My son is soon going to a local pumpkin farm on a class trip and that got me thinking.....what if it was a night trip and it was a haunted pumpkin farm! So I created this Haunted Pumpkin Farm card using Karen Burniston's Barn Pop Stand along with several other of her fantastic dies!


For this card, I started with a 5 x 7 card base using heavy weight black cardstock. I then die cut a rectangle (4.875 x 6.875) from heavy weight smooth white cardstock and another rectangle the same size from a olive green cardstock. 

I started by creating the background and base of the card. I wanted to create a night scene, so I used my Tim Holtz Moon stencil. I placed the smallest moon stencil on to my card using repositionable tape runner. Then using Distress Oxide ink in Tumbled Glass, Salty Ocean, Chipped Sapphire and Black Soot, I created my night sky! Once done, I added some white paint flecks to create stars. I used Copic Opaque white paint (is it paint or ink?) mixed with a little bit of water. I set this aside to dry.

For the ground area, I used Distress Oxide ink in Rustic Wilderness and Black Soot to create this dark grassy area. I set this aside to dry.

I then die cut out the barn from heavy weight smooth white cardstock. I die cut all the pieces from the same cardstock. I began by tracing out the wood panel on the barn, making sure the wood wasn't straight and there were lots of areas that would look like it was falling apart. I then began to color the panels in using Copic markers. Once I had the barn the way I wanted it, I added some Black Soot Distress Oxide ink to the edges and set it aside. I colored the rest of the pieces of the barn in the same way, then began to glue everything together. When I added the barn doors, I put them on crooked so it looked really dilapidated. 

I then die cut the small ghost from the Haunted Tiny House Add-Ons and added it to the little window at the top of the barn. I added some glow in the dark ink to the ghost. 

I also cut out a ghost from the Halloween Elements die set from heavy weight vellum and added it to the back of the barn. 

I die cut the platform from the House and Fence Pop-Up die using heavy weight black cardstock. 

I glued down the background and grass base to the card base. Then I glued in the platform. To see how this platform fits into a card click here to watch Karen Burniston's assembly video.

I then die cut two trees from the Tree Pop-Up die set. I just cut these from black cardstock and fitted them to the background of the card. I die cut the little fence from the Haunted Tiny House Pop-Up to the background and to the front of the platform. I cut this from smooth white cardstock and used Copic markers to color it. 

I die cut the small pumpkins from the new Halloween Borders and added them around my Haunted Pumpkin Farm. I cut a little path way to fit on the platform and colored that using Copic markers. 

Last but not least, I needed to add some Trick or Treaters! So I die cut the Lamb and Pig and added costumes to them using the Tiny Accessory dies. Lastly, I die cut some black leaves from the Tree Pop-Up and glued them around the ground.

For the front of my card, I kept it really simple. I die cut some panels from patterned paper and glued them together. With so much detail on the inside, I wanted to keep it simple on the front. 

I just love how this Haunted Barn came out. I think creating Halloween cards are my new favorite cards! 

Thank you so much for stopping by today and Happy Crafting!


Tuesday, October 3, 2023

Karen Burniston Designer Challenge October 2023 - Jack-o-Lantern!

 Hello Crafty Friends and Welcome! It's Designer Challenge time once again and this month we have been challenged to create a card with a Jack-o-Lantern!! For my card, I used the Bitty Ball Pop-Up along with the Autumn Elements and the Character Add-Ons 1 die set. 


For this card, I started with a 5.5 x 5.5 sized card base using light weight kraft cardstock. I didn't want to use a heavy weight cardstock because I knew that the pop-up would have a lot of bulk. 

I added a fall themed patterned paper to the background and a green cardstock to the bottom. Then I die cut a scalloped border using the same green cardstock and added that to the background. 

I die cut all the pieces from the Autumn Elements from smooth white heavy weight cardstock and colored them using Copic markers. I added them to the background, then added some Glossy Accents and Stickles glitter gel to give the leaves and pumpkins some dimension. I set that aside to dry. 

I then started to create my Jack-o-Lantern scarecrow. To be honest, I created the pumpkin head first then had no idea what to do with it. Then I thought about a scarecrow! 

I die cut the pumpkin head from a dark orange and a light orange cardstock. I glued everything together to create the pop-up ball. For the instructional video on how to do this click here

I die cut the jack-o-lantern face using the Character Add-On 1 die set using a glossy black cardstock. I glued the face on and then cut the leaves for the top. I used green cardstock and added some detail using Copic markers. 

I then die cut half a bitty ball with red cardstock and half with dark blue cardstock. I added a checkered patterned paper to the red ball and the same dark blue cardstock to the bottom ball. I glued them together to create the body. I die cut the arms from the Bitty Ball Pop-up, added the shirt and frayed hay bits to the arms. Then I added little shoes to the bottom. With a white Gelly Pen, I added some details to the overalls. I had to die cut a piece of bitty ball and cut out the bib part of the overalls and glued it to the shirt part. 

Before I added my scarecrow to the card base, I die cut the Happy Thanksgiving sentiment to the background using black cardstock and gold glitter cardstock. 

Then I positioned my scarecrow where I wanted him and glued him down. 

Lastly I die cut a small white rectangle to add a place to sign the card. 

I kept the front of the card simple, using the same patterned paper as the inside. I will be adding a magnetic clip in the future to keep the card closed. 

Thank you so much for stopping by for Designer Challenge and Happy Crafting!


Monday, October 2, 2023

Craft Roulette Episode 182 - Fuzzy Bees!

 Hello and Welcome! First, I must apologize for my absence this past week. I have been fighting a lung infection and even doing regular things like taking laundry downstairs or cleaning a bathroom exhausts me. So I haven't had the energy to create in my office. But with antibiotics and a puffer, I am slowly getting there. 

My card today was from Craft Roulette Episode 182. The parameters for this card were:

1. Card with Circle(s)

2. Vegetable Garden (colors)

3. Screen(s)

4. Fuzz

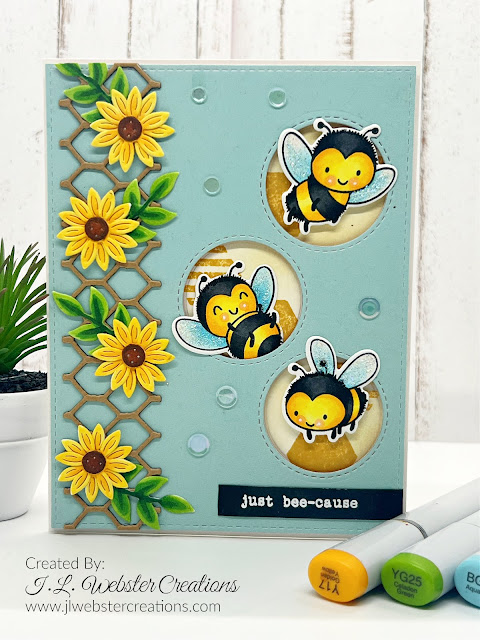
For this card, I created an A2 sized card using MFT - Stitched Triple Peek-a-Boo Window and Edges, Karen Burniston's Farm Edges and Hello Bluebird Bee Happy stamp set. 


For the card base, I used a heavy weight smooth white cardstock cut for an A2 sized card. I then die cut two rectangular pieces, one from smooth white cardstock and one from a pretty blue color. 

I die cut the three circles on to the blue background using the peek-a-boo window die from MFT. I then die cut the screen using the fence die from Karen Burniston's Farm Edges die set. I cut this twice, once from Kraft cardstock and once from black cardstock and glued them together. This added some dimension to the screen. 

I then used the leaf die from Karen Burniston's Fun Flowers and the sunflower die from Spellbinders Wagon Full of Fall die set to create flowers going up the screen. I colored these using "corn" and "veggie" colors. 

I then added some hexagon shapes in the background of each circle. I used Lawn Fawn's No. 2 Pencil ink for this. Then I stamped and die cut the bees from Hello Bluebirds Bee Happy stamp set. I colored the bees using Copic markers. I added "fuzz" to the bees with my black Copic marker. 

I added some foam tape to the back of the blue rectangle and then added it to the white rectangle I cut. I added the bees to the circular areas. 

Lastly, I stamped and embossed the "just bee-cause" sentiment and added it to the bottom. Once I was done, I felt it needed something extra, so I used some embellishments to the front. 

Those little bees are one of my favorite stamp sets. They're just so adorable!! Thank you so much for stopping by and Happy Crafting!

Sending Sunshine Birthday Card

Hello Crafty Friends and welcome!! My card for you today was created using Karen Burniston's Spinner Square Pop-Up. I made this card for...