Sunday, July 31, 2022

Houston, We’ve Got a Birthday!

 Hello and Welcome! Todays card features Karen Burniston's Pop 'n Swap die and the Rocket Pop-Up  die set. It also features My Favorite Things Space Explorer stamp set. This was another fun card to make, especially the backgrounds. 

The card base is an A2 size card cut from 110lb black cardstock. 

The backgrounds of this card were made using Alcohol Inks in various colors. Once they were dry, I splatter white acrylic paint and white alcohol ink to make stars on the backgrounds. 

I die cut the rocket ship from the Rocket Pop-Up set and colored the pieces using Copic markers. I added shine lines with a Gelly Pen in size 10. 

I stamped and colored the images from the MFT Space Explorer stamp set and cut them out. 

I used the same heavy weight black cardstock to make the mechanism that goes inside the card that makes the little space explorers pop up when you open the card. 

I stamped both sentiments from the MFT Space Explorers stamp set. 
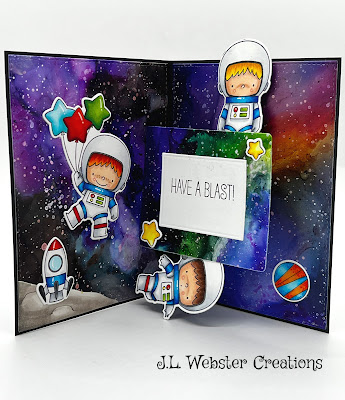
The sentiment on the front of the card is stamped with VersaMark ink and white embossing powder. 

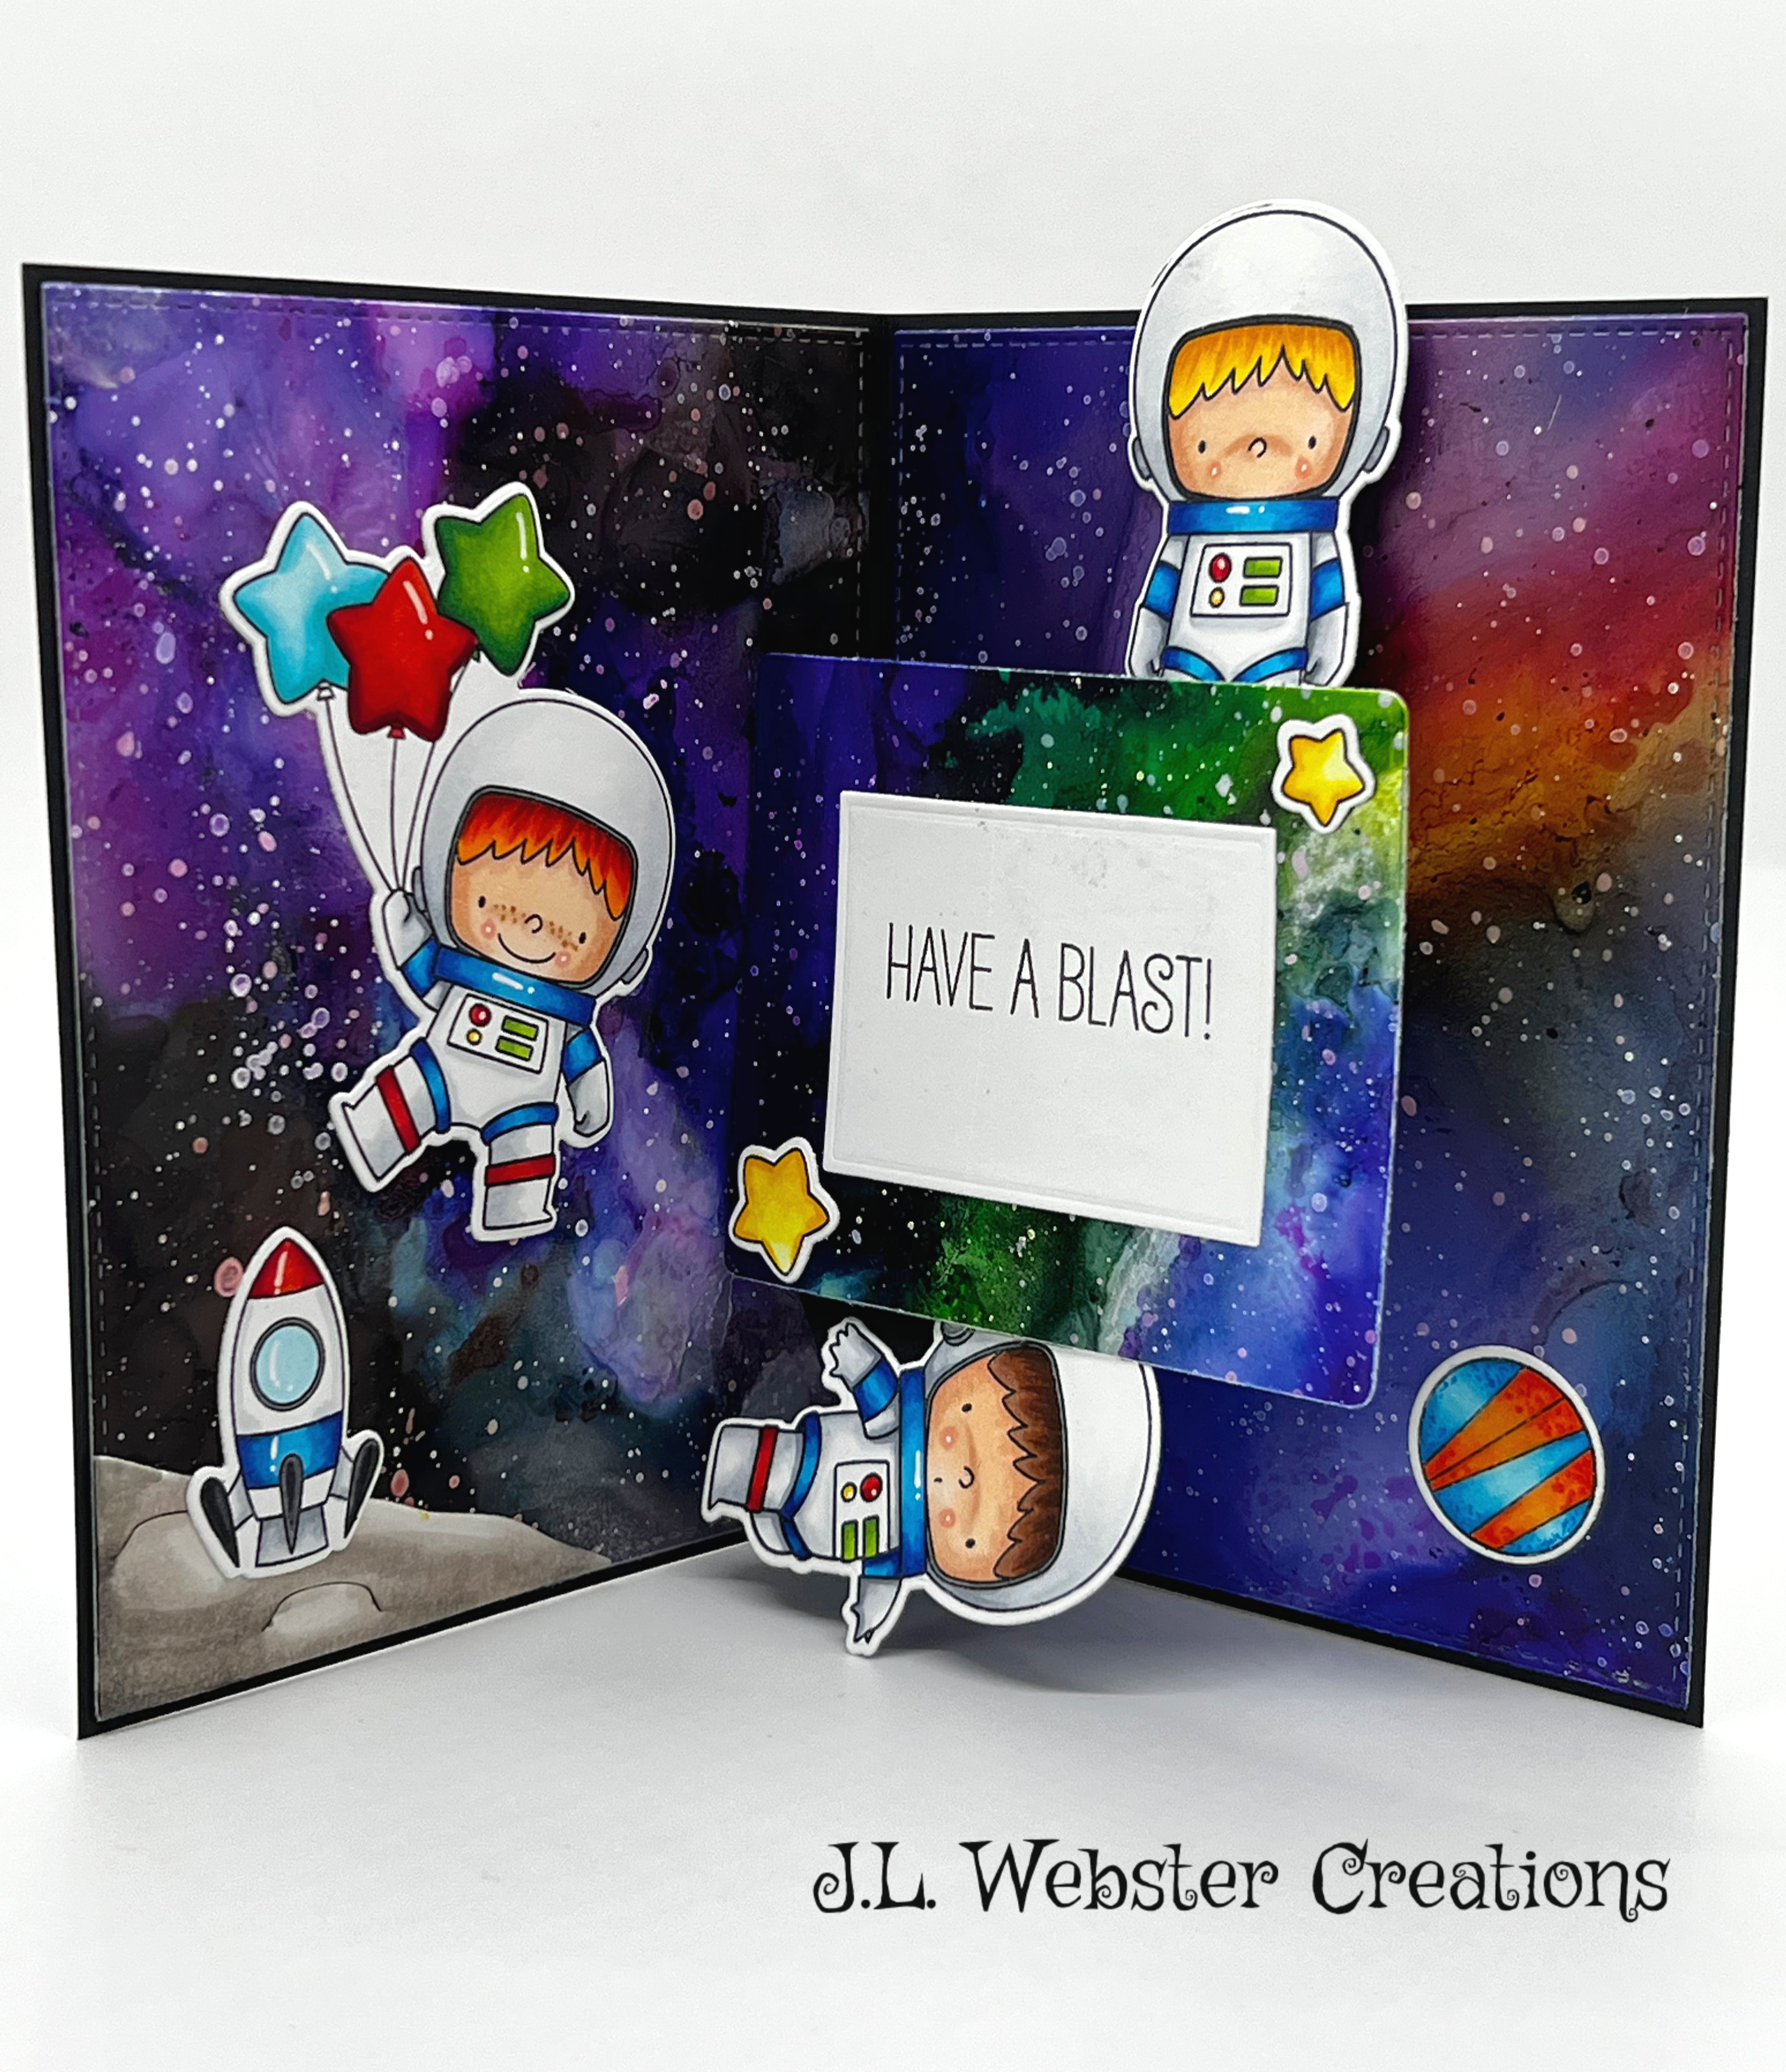
I die cut the moon base from the Karen Burniston's Rocket Pop-Up and added it to the bottom corner of the card. 

I changed the pop-up mechanism so both images pop up when you open the card. To see how to make this type of pop-up card, check out Karen Burniston's how to video here.

I am so happy with how this card came out. I had a blast making it. :)

As always, thank you so much for stopping by and Happy Crafting!


Monday, July 25, 2022

From My Barn to Yours! Barn Pop-Up Card.

 Hello and welcome! Today's card uses the Karen Burniston's Barn Pop Stand, Farm Edges and Chicken, Pig and Lamb die sets. This is one of my favorite pop-up card sets from Karen Burniston. I just love all the small details, from the sliding barn doors to the open window in the top of barn. Then add the cute farm animals and you've got yourself one super fun card!

For this card, I started with an A2 card base using a kraft cardstock. For the front of the card, I die cut out a rectangle from 110lb white cardstock using MFT A2 Stitched Rectangle die. I die cut out the tractor and land from the farm edges and colored the tractor in using my Copic markers. With my blending brush and Vintage Photo distress ink, I made the dirt ground the tractor is on. 

I used the grass die from Karen Burniston's Nature Edges die set and cut out grass with green cardstock. I brushed the edges with Distress Oxide Ink in Mowed Lawn. 

I die cut the fence from the Farm Edges die set and added some shadow to the fence with a cool gray Copic marker. 

I die cut the sentiment "Just popping up to say" from Karen Burniston's Word Set 4 - Just a Note dies, using red cardstock. I added shine lines with a white Gelly Pen in size 8.
For the inside, I made the barn using the instructions from Karen Burniston's super helpful video on YouTube, which you can see here

I die cut out the animals and added dimension with my Copic markers. I made small square shaped holders to keep the pig and chicken up and glued invisible thread from the back of the animals to the barn so when you opened the card, the animals popped up as well. Update: The thread is not shown here as it hasn’t shipped yet when I took the photos, but see below the card with the thread added.

For the background, I die cut out two rectangle panels with the MFT A2 Stitched Rectangles and created dirt and grass using Distress Oxide inks in Mowed Lawn and Vintage Photo. I added flecks of color from water color paints and water to give the ground some dimension. 

I used Karen Burniston's Rectangles - Crosshatch in the smallest rectangle to stamp the "From my barn to yours" sentiment. This came from MFT BB The Whole Herd stamp set. 

I die cut the "Happy Birthday" sentiment from Karen Burniston's Happy Birthday die. I added gloss lines using my Gelly Pen in size 8. I just love how this card came out, I hope you like it too. As always, thank you for stopping by and Happy Crafting!


Thursday, July 21, 2022

Birthday Sundae Surprise!

 Hello and welcome! I have a super fun card for you today. This card uses the Karen Burniston Ice Cream Sundae Pop-Up die set. This die set comes with everything you need to make an ice cream cone or a pop-up ice cream sundae! It's sure to put a smile on anyone's face when they open up a card to see a yummy sundae.

For this card, I started with an A2 card base in aqua blue cardstock. I had some fun birthday paper that was perfect for an ice cream card and I die cut out 3 rectangles using MFT A2 Stitched Rectangle STAX dies in the largest size. 

I die cut out the sentiment "You're Sweet" using Karen Burniston's You're Sweet die in aqua cardstock and again using sparkly blue cardstock. I glued them together to give the sentiment some dimension. I die cut out the scalloped circle using MFT Stitched Mini Scallop Circle STAX dies twice, once with white cardstock and once with a pale purple cardstock. I trimmed just the scalloped edge from the pale purple cardstock and added it to the front of the white scalloped circle. 

For the ice cream cone, I die cut a chocolate and vanilla from scrap cardstock. I die cut out the sauce topping as well as the whipped cream and cherry toppings. I added some dimension to the ice cream using my Copic markers. I added glossy accents to the chocolate sauce on the vanilla ice cream. I also added glossy accents to the cherry then added a shine line using my Gelly Roll pen in size 8. I added some dimension to the whipped cream with my E40 Copic marker. 

For the inside of the card, I die cut the sundae bowl from white cardstock and colored it to look like glass with cool gray Copic markers. 

I die cut the strawberry, chocolate and vanilla ice cream from scrap cardstock and added details using Copic markers and water color paints. I added glossy accents to the chocolate sauce and cherry. 

I added the whipped cream and took the ice cream cone die cut out and turned it around to look like a wafer biscuit sticking out. 

I die cut out the spoon using a mirrored cardstock and added it to the front of the dish. 

I added the scalloped top and bottom and stamped the sentiments using MFT Sugar Coated Sentiments and MFT Bitty Birthday Wishes.

As always, thank you so much for stopping by and Happy Crafting!


Wednesday, July 20, 2022

Happily Ever After with Spellbinders Wedding Dress and Tux

Hello and welcome! Today's card features the Wedding Dress and Tux die from Spellbinders. This super detailed die set comes with everything you need to make a wedding dress, tux and small details. 


 To make this card, I started with A2 card base using 110lb white cardstock. I die cut two rectangles using the largest of the MFT A2 Stitched Rectangle STAX dies, using a dark blue cardstock. I got out my Spellbinders Glimmer machine and used the Spellbinders Glimmer - Essential Duo Lines Rectangles with silver hot foil to create a beautiful border around the dark blue cardstock. 

For the dress and tux, I die cut the bottom of the dress using scrap white sparkle cardstock. I cut the top of the dress and trim out of white cardstock. The tux was cut from black cardstock with white for the shirt, collar and white sleeves coming out of the arms. I die cut the bowtie in red. The pieces are very simple to put together, but if you need a better idea of how all the pieces go together, Nichol Spohr has a great video using this die set that you can check out here

I die cut the Mr. & Mrs. sentiment from the Mr. & Mrs. Wedding Cake die set also from Spellbinders. The top layer uses the same sparkly cardstock as the wedding dress and I die cut two additional layers using white cardstock and glued the layers together to give the sentiment some dimension. I stamped the Happily Ever After sentiment from MFT Essential Sentiments on black cardstock using VersaMark Ink and white embossing powder.  

I am so happy with how this card turned out. A simple, clean but elegant card to give to the happy couple on their special day! Thank you so much for stopping by and Happy Crafting!


Thursday, July 14, 2022

Getting Artsy Fartsy with Lawn Fawn's Summer Release!

Hello and welcome! Todays card features several products from Lawn Fawn's Summer Release! I couldn't wait to try these sets out, what crafty person wouldn't? This cards uses Lawn Fawn's Just Add Glitter stamp set, Canvas and Easel die set and the Art Supplies die set. This card also features Lawn Fawn's Magic Picture Changer die and the Magic Picture Changer Add-On. I was inspired to make this card by Kelly Marie Alvarez who created a card similar for Lawn Fawn. 

To make this card, I started with a A2 card base, using 110lb cardstock. I die cut the largest rectangle from the MFT Stitched A2 Rectangle die set from the same cardstock. I also die cut out another piece using the Magic Picture add-on die using the same white cardstock. 

Using my MFT Small Brick Wall Stencil and a blending brush, I made the multi-colored wall background. I used Distress Oxide Inks in Tumbled Glass, Spun Sugar, Shaded Lilac and Cracked Pistachio

I die cut the easel and stool from some scrap kraft cardstock and added some details using my Copic markers. I stamped the two small mice with MFT Extreme Black ink and colored them in with my Copic Markers. 

I die cut the Art Supplies from various scraps of cardstock and added details using Copic Markers and Glossy Accents. I added some paint coming out of the yellow paint tube using Liquid Pearls. 

 I die cut the glass jars of paint with Heavyweight Translucent Vellum. I then die cut the same jar out of a blue and green cardstock. I cut the colored pieces smaller and glued them on the back of the vellum to look like paint in the jars. I then added Glossy Accents to make the jars look like glass. 

I used Lawn Fawn's Magic Messages stamp to make the Magic Picture. I only colored in the second sentiment. 

I absolutely can't wait to give this card to my crafty friend for her birthday! This is such a great set if you have a crafty friend, or even just a friend that likes art! As always, thank you so much for stopping by today and Happy Crafting!


Tuesday, July 12, 2022

Flower Pot Birthday Card Surprise!

 Hello and welcome! Todays card was made for someone very special and important to me, my Mom! It is her 73rd Birthday today, so a extra special card had to be made. For this card, I used Karen Burniston's Twist Panel Pop-Up die set as well as Karen Burniston's Flowers and Bee die set and the Flower Pots from the Flower Pot Pop-Up die set.

I started with an A2 size card using Kraft Cardstock from My Favorite Things. I die cut three rectangles using MFT A2 Stitched Rectangles and Lawn Fawn Dandy Day cardstock in the light pink. 

For the front of the card, I cut out a rectangle frame using MFT Rectangle Frames and with my blending brush, Gina K Sweet Corn and Lawn Fawn No.2 Pencil inks, gave the frame some detail and color.

I left the center of the rectangle white. I die cut several flowers, leaves and bees from the Flowers and Bee die set from 110lb white cardstock. Then I hand colored the flowers with my Copic markers. I added Mini Prills in black and brown to the centers of the bigger flowers and for the small white and yellow flowers, a small dot of orange Liquid Pearls. 

Using a darker shade of pink cardstock, I die cut the Happy Birthday to You twice using Karen Burniston's Word Set 2: Birthday and glued both sentiments together to give the wording some dimension. I also added glossy accents to the words. 

For the inside of the card, I die cut the pop-up in the middle of the card using 110lb white cardstock. I added a cloud and grass background using MFT Mini Cloud Edges Stencil and Grassy Edges Stencil. I used Distress Ink in Peacock Feathers and Mowed Lawn for this piece.

I die cut the pots from scrap yellow cardstock and ran the pot bottoms through my Cricut Cuttlebug and embossed a fancy design. Then using the same ink colors as the frame on the front of the card, I added some dimension to the pots. 

I had to trim the pots down to fit the center pop-up. I glued on the flowers using Neutral PH Lineco Adhesive (honestly the best glue I've ever used!) and my Karen Burniston's fine tip bottle. I die cut the "make a wish" sentiment from the same word set birthday dies and added glitter stickles to make the sentiment pop! 

I die cut two pieces for the top and bottom of my card using 110lb white cardstock and MFT Stitched Scalloped Edges. I stamped the "You are loved" sentiment from MFT Essential Sentiments. 

This card went over very well! My Mom loves flowers and has some very beautiful gardens around their house, so this card was perfect for her! Thank you so much for stopping by and Happy Crafting!

Sunday, July 10, 2022

My First Bitty Ball Pop-Up!

 Hello and welcome! Todays card is extra special to me because it's inspiration comes from my big fuzzy Bernese Mountain Dog, Angus! I finally bought myself the Bitty Ball Pop-Up from Karen Burniston and let me tell you, I kick myself for not getting it sooner! 

As soon as I seen the how to video on YouTube and Karen Burniston made a dog using the Bitty Ball, I knew I had to make Angus. But a Bernese Mountain Dog isn't just one solid color. They are black, tan and white in different areas of their bodies, so I got out my Copic markers to help me out. 

First step was to cut out 4 black pieces to make two bitty balls. From there I needed to plan out where his face was going to go. I cut out four trapezoids and one hexagon using the dies in the set and 110lb white cardstock. I glued these on to the head of my dog. Then with a pencil, I lightly sketched out where the white stripe on his head runs down to his face and nose. He has a bit of tan on his face, around his mouth so I sketched that out as well. Then with a black Copic marker, I began filling in with the colors I needed. 

I die cut the four pie shaped pieces to make the nose out of black cardstock and I cut the eyes out of white cardstock and colored them brown with Copic markers. I die cut the arms and feet out of white cardstock and added black and tan fur to the arms and 

black fur to the feet. For the tail I die cut two pieces, one black and one white. Bernese Mountain Dogs have long haired tails that kind of look like a fan. So I added a white end to the black tail and with my scissors added little cuts to look like fur. 

I die cut out two pieces with black cardstock to make the ears and with my scissors added little snips to make the ends of the ears look like hair. 

I used white paint and carefully painted between the trapezoids where the black cardstock shows through so that his face looks solid white. 

I added glossy accents to the eyes and nose, then once that was dry I added white highlights with a white Gel Pen. I die cut out the mouth with black cardstock and using the smaller oval, cut out a pink tongue. I had to trim it down to fit the mouth. 

I cut an A2 card base using Kraft cardstock from My Favorite Things. I had a small 6x6 paper pack from Doodlebug Designs called Puppy Love and used the orange cardstock with little dog bones on it for the background paper. I used a piece from the same pack with had grass on it and cut that out using the MFT Slimline Grassy Hills Die-namics. I added the Happy Birthday sentiment from Karen Burniston using a glitter blue cardstock. 

I have to say, I am super proud with how this little guy turned out. I hope you find him as super cute as I do. Thank you so much for stopping by and Happy Crafting!

Thursday, July 7, 2022

Pies Galore using Spellbinders

Hello and welcome! Today I have two cards for you using the Spellbinders Perfect Pies Etched Dies. As soon as I seen these dies, I knew I had to have them. The best part is the ideas are endless! Lemon Meringue, Blueberry, Apple...what ever your favorite pie is, you can create it! 

For this first card, I cut the A2 card base using 110lb cardstock. Then using my MFT A2 Stitched Rectangle die in the largest size, I cut out two rectangles with the same 110lb cardstock. 

I used my MFT Basket Weave Stencil and Distress Ink in Peacock Feathers to create the background. Then I die cut out the white frame from MFT A2 Rectangle Frames dies. I took the inside piece and stamped the sentiments from the Spellbinders Perfect Pie Sentiments stamps in Distress Oxide Ink in Tumbled Glass

For the pie, I die cut the pie plate using a matte aluminum looking cardstock. I die cut the pie crust with kraft cardstock and shaded it with Distress Ink in Vintage Photo. Then I die cut the pie filling with a scrap piece of dark blue cardstock. 

I used the Spellbinders Delicious Decorations and die cut the flowers, leaves and blueberries. I added some dimension and color using my Copic markers. I stamped the sentiment on black cardstock and embossed it using white embossing powder. 

 For the apple pie card, I cut an A2 sized card out of a dark red cardstock. Then using my MFT A2 Stitched Rectangles in the largest size, I die cut two rectangles to use as the backgrounds. 

I used my Concord & 9th plaid background stamp and a dark red ink pad to make the plaid background. Then I die cut out another rectangle in white 110lb cardstock and used my MFT Stitched Scalloped Edges die and cut part of it away, leaving this super cute scalloped edge. 

For the pie, I die cut the pie plate in the same aluminum cardstock as the blueberry pie. I made the crust the same, only this time I die cut steam holes into the top of the crust and added a red cardstock behind to show the pie through the steam holes. 

Using the Spellbinders Delicious Decorations, I die cut out an apple slice and the half apple. I also die cut out the flower and leaves. I added some glossy accents to the edges of the apples and I added some glitter to the top edge of the pie crust to make it look like sugar on top. I stamped the sentiment from the Perfect Pie Sentiments with MFT Extreme Black Hybrid Ink.

I just love when you can get a die set that has so many uses! I can't wait to make more pies using this set. If you plan to get this set, be sure to get the decorations! As always, thank you for stopping by and Happy Crafting! 

Saturday, July 2, 2022

Beautiful Butterfly Sympathy Card with Sizzix

Hello and welcome. Todays card features the Sizzix Detailed Butterflies die. This set feature two beautifully detailed butterfly dies. 

For this card, I wanted to keep things simple, so I started with a A2 card base on 110lb cardstock. I die cut out the largest A2 Stitched Rectangle die from My Favorite Things using the same white cardstock. I die cut out an oval in the center of the rectangle using an MFT Stitched Oval die. I saved the cut out and set it to the side. I then ran the rectangular piece through my Cricut Cuttlebug with a Cuttlebug embossing folder called Geometric Rings. 

To make the butterflies, I took a scrap piece of cardstock and with my blending brush and different colors of Distress Oxide Ink, I made rows of different colors. I die cut out the detailed part of the butterfly using a sparkling white cardstock. 

I die cut out the word Sympathy using SugarPea Designs Sympathy Word Sugarcut. I cut it out twice using 110lb black cardstock, then once using a glossy black cardstock I got from Michaels. I stamped the word with on the same black cardstock with white embossing powder. 

I love these beautiful butterflies and I think this is a die set that is going to get a lot of use in the future. Thank you for stopping by and as always Happy Crafting!


Friday, July 1, 2022

Penguins in Paradise From My Favorite Things - Part Two

Hello and Welcome! Todays post is part two of the Penguins in Paradise from My Favorite Things. These two cards use the MFT Outside the Box Die, along with the Outside the Box Waves add-on and the Outside the Box Snow Drifts add-on. 

For this first card, I die cut the actual Outside the Box card from 110lb white cardstock. Then I measured and cut 110lb black cardstock to add a border between the box and the panels. 

I die cut the two waves from blue cardstock (this is why I save all my scraps :)) and cut out two snow drifts from white cardstock. Then I added some detail to the waves with Distress Ink in Peacock Feathers. I used my blending brush and Distress Ink in Antique Linen and Vintage Photo.

For the back panel, I used my blending brush and Distress Ink in Peacock Feathers with my MFT Mini Cloud Edges stencil and added clouds for the background. 

I die cut the front and side panels using Echo Park: Endless Summer pattern paper pack and added them on. Then I stamped out the sentiment on to 110lb black cardstock and used white embossing powder.

Once I had the card all put together, I added my little penguins where I wanted them. I repeated the same process for the second card. I just used a different sentiment and different pattern paper from the same paper pack. 

I stamped a small sentiment on the back so that there is place for someone to write a message to the recipient. 

I so love a good pop-up card. It's just such a neat surprise when someone opens the envelope and they get a pop-up! 

Thank you for stopping by today for Part Two and as always Happy Crafting!

Easter Scene using Karen Burniston's Landscape Rectangle Accordion!

 Hello Crafty Friends and welcome! My card for you today uses Karen Burniston's Landscape Rectangle Accordion, along with the Fence Add-...