Wednesday, September 28, 2022

Winter Bouquet Cards with Honey Bee Stamps

 Hello and welcome! Today's cards feature the Winter Bouquet die set from Honey Bee Stamps as well as the Wooden Crate die. The Winter Bouquet die set comes with everything you will need to make a beautiful winter floral scene, including a candle, greenery and poinsettias. I added the Wooden Crate to my scene, and I think it fit beautifully. 

For both these cards, I started with an A2 sized card using red cardstock. 

I die cut a rectangle using MFT A2 Stitched Rectangle STAX dies in the largest size from heavy weight smooth white cardstock. 

I used my Glimmer Hot Foil machine and Spellbinders Essential Duo Lines Glimmer Rectangles in the largest plate to create a gold foil border around the background. 

Using red hot foil, I also added the sentiment "Making Spirits Bright" using Spellbinders Elegant Holiday Glimmer Sentiments

I die cut all the pieces from Honey Bee Stamps - Winter Bouquet out of various colors of cardstock and added dimension to them with Copic markers. On the first card, I added white snow to the pinecones, using Nuvo Crystal Drops in Simply White. I also added Glossy Accents to the berries and once dry, I added shine lines using a Gelly Pen. 

I repeated the same steps for the second card, only this time I added a different sentiment from the same Spellbinders Elegant Holiday Glimmer Sentiments. I also added glitter gel to the pinecones instead of the Nuvo drops in white. 

I love how versatile the Winter Bouquet die set is. Add more greenery, don't add the candle, add more poinsettias. It's entirely up to you. 

I added the Wooden Crate because I thought it would be a nice added touch to the winter florals. All in all, I am very pleased with how beautifully this card came out. It's always nice when I can get my Glimmer Hot Foil machine out, I find this adds just that little bit extra to your cards. It's well worth the money! 

As always, thank you so much for stopping by and Happy Crafting!


Saturday, September 24, 2022

Snow Mice with a Twist!

 Hello and welcome. Today's card features Karen Burniston's Twist Panel Pop-Up along with Lawn Fawn's new Snowball Fight stamp set. 

For this card, I made a top fold A2 sized card from heavy weight smooth white cardstock. I cut a panel to fit the inside of the card using Lawn Fawn's Let It Shine: Starry Skies patterned paper. I cut the mechanism from Karen Burniston's Twist Panel Pop-Up from the middle of the panel. For detailed step-by-step instructions on how to make this very versatile pop-up die set, check out Karen Burniston's video on YouTube here

I die cut the middle panels and with Distress Oxide ink in Tumbled Glass and a blending sponge, I created the sky background. I used a very light weight white cardstock to create the snow on the bottom of the pop-up panels and cut out the snow hills using Karen Burniston's Long Nature Edges

I die cut two pieces of cardstock and gave them both a scalloped decorative edge from MFT Stitched Scalloped Edges. I added a decorative banner to the top of the card using the two little flags dies that come with the Twist Panel Pop-Up die set. I added a light blue twine and added two blue gems to secure the twine to the card. 

I stamped the "we have snow much fun together" sentiment from the Snowball Fight stamp set. I stamped the images using Pink Fresh Studio Detail black ink and colored the cute little mice with Copic markers. 

For the front of the card, I cut the background from the same patterned cardstock as the inside and added two snow hills. 

I die cut the word "winter" from Karen Burniston's Word Set 3 - Holiday die set. I cut it twice from dark blue cardstock and once from dark blue glitter cardstock to give it some dimension. 

I stamped the word happy from the Snowball Fight stamp set on to heavy weight black cardstock and used white embossing powder. 

I added the little mice images to the front panel as well. These little mice just bring a smile to my face, they are just so cute! I hope this card inspires you to make your own pop-up creation! Thank you for stopping by and Happy Crafting!

Friday, September 23, 2022

Lawn Fawnatics Challenge #133 - Awesome Autumn

 Hello and welcome! Today's card features Lawn Fawn's Apple-solutely Awesome stamp set. This card was made for the Lawn Fawnatics Awesome Autumn Challenge. How adorable are those little mice? I just love the little mice from Lawn Fawn and these little mice picking and eating apples do not disappoint!

For this card, I started with an A2 sized card using a kraft cardstock. I cut a piece of fall themed patterned paper from Doodlebug: Pumpkin Spice paper pack for the background. I cut a smaller piece of smooth glittery dark orange-brown cardstock to go behind the white panel. 

I cut the white panel from smooth white heavy weight cardstock. I used the MFT Watercolor Wash Free Form stencil to create the fall-colored background on the white panel. I used Distress Oxide ink in Mustard Seed, Spiced Marmalade and Carved Pumpkin

I stamped the Apple-solutely Awesome images on Neenah Classic Crest smooth white cardstock using PinkFresh Studio Detail Black ink. I colored them with Copic markers. I tried to make the apples look like my families' favorite apples, Royal Gala. 

I added glossy accents to the apples and stamped the little apple picking sentiment to the sign. I stamped the "Have an Apple-solutely Awesome Day" sentiment on to heavy weight black cardstock and used white embossing powder. I added the images to the front of the card using Lineco Neutral PH glue. 

This card turned out so great, I just love the fall feel of this card. I hope you are inspired to create some amazing fall themed cards with this super cute apple card. Thank you for stopping by and Happy Crafting!


Thursday, September 22, 2022

Happy 50th Birthday with Karen Burniston's Cake Pop-Up

 Hello and welcome! Today's card features Karen Burniston's Cake Pop-Up die set and Cake Trims add-on die set. This was a special request card for a very special 50th birthday card. 

For this card, I started with an A2 sized card base. Then I used a gray patterned cardstock for the background. For the cake pop-up, I went with a cream and pink color with gold and white glitter cake trims. 

I die cut the 50 from Karen Burniston's Mini Alphabet and Numbers and added it to the top of the cake. 

I added gold ribbons to the second tier of the cake. I had a sticker sheet from a cardstock pack I had that was for wedding paper. I used some of these stickers on the inside of the card to add some extra details. 

I die cut a rectangle from the same cream cardstock as the card base and added it to the inside of the card. The rectangle came from Karen Burniston's Rectangles - Crosshatch

I used Karen Burniston's Happy Birthday die and cut it twice, once from gold glitter cardstock and once from black cardstock. I added the black cardstock to the back to give the sentiment some detail. 

For the front of the card, I used Karen Burniston's Celebrate die and did the same as I did for the Happy Birthday. 

I die cut flowers using the flowers from Karen Burniston's Flowerpot Pop-Up and added some detail using Copic markers. 

I die cut an oval to put behind the flowers using Karen Burniston's Ovals - Crosshatch from the same cream-colored cardstock as the base of the card. 

For step-by-step instructions on how to put this pop-up card together, check out Karen Burniston's how to video on YouTube here


Thank you so much for stopping by, I hope you will gain some inspiration from this card and check out all the other amazing pop-up dies at karenburniston.com. Happy Crafting!

Wednesday, September 21, 2022

Riley & Co STAMPtember 2022 - It's Your Day!

 Hello and welcome! I am super excited to share with you, my card for the Riley & Co. STAMPtember 2022 It's Your Day stamp and die release. This release is for a limited time only, so be sure to visit Simon Says Stamps to get one today! To check out the SSS Blog click here!

For this card, I used an A2 sized card from a dark blue cardstock. I used a fun birthday patterned paper as the background. This paper came from a paper pack with a sticker sheet, so I used some of the coordinating stickers as well. 

This card also features Karen Burniston's Katherine Label Pop-Up. This is a fun, generic pop-up that can be used for any occasion! 

I colored the Riley & Co. "It's Your Day" new stamp (that is just for STAMPtember!) using Copic markers. How cute is that moose and Simon on that little mushroom? 

I die cut an opening on the front of the card using one of dies from the Katherine Label Pop-Up die set and created a frame to go around the outside using the same dark blue cardstock as the card base. 

I could have put a piece of acetate into the opening, but I wanted it to look like it was all part of the front of the card. 


I continued the same theme on the inside of the card, adding more coordinating stickers. 

I die cut a similar frame as the pop-up in smooth white cardstock to add a place to sign the card.

What a super fun birthday card, bright, vibrant with that patterned paper. The element of surprise from the pop-up and that super cute stamp set!

Thank you so much for stopping by for the Riley & Co. STAMPtember 2022 "It's Your Day' release. Happy Crafting!


Monday, September 19, 2022

Up in the Air with Karen Burniston and My Favorite Things

 Hello and welcome! Today's card uses Karen Burniston's Rockin' Rectangle die set and My Favorite Things Up in the Air stamp set. 

For this card, I started with an A2 size card base cut from heavy weight smooth white cardstock. I die cut three rectangle panels using the largest rectangle from the MFT A2 Stitched Rectangle STAX die set. I created the sky background on each rectangle die cut using Distress Oxide ink in Tumbled Glass and Salty Ocean

I stamped the images using Pink Fresh Studios Detail Black Ink and colored them in with Copic markers, then die cut them out with the coordinating dies. 

For the front of the card, I cut the panel for the window with one of the rectangles that comes in the set for the Rockin' Rectangle. I die cut two different grass hills using Karen Burniston's Long Nature Edges from two different colors of green cardstock. I colored in the trees with Copic markers to give them some detail. 

I die cut the stitched clouds from Karen Burniston's Outdoor Scene die set.

I stamped the You're Growing UP, UP, UP sentiment from the stamp set. 


I continued the same theme throughout the card for the background. I added a piece of thick acetate to the window and covered the edges with a scalloped stitched border that can be created with the dies that come in the Rockin' Rectangle die set. 

For step-by-step instructions on how to use the Rockin' Rectangle die set, check out Karen Burniston's instructional video here

The little bear and elephant riding in the balloon just make me smile! This will be a fun birthday card for a child! Thank you so much for stopping by and Happy Crafting!

Thursday, September 15, 2022

Lawn Fawn Challenge #132 - Color Inspiration

 Hello and welcome! Today's card was made for the Lawn Fawnatics Challenge - Color Inspiration. So I dug out all the colors to make this cute card. This card also features mice from Lawn Fawn's Merry Mice, Dandy Day, A Creature was Stirring, Just Add Glitter and Berry Special

I made a slim line card (3.5 x 8.5) and used Lawn Fawn's Scalloped Slimline with Heart: Portrait die set. With several different Distress Oxide inks, I created the rainbow background using the scalloped die and smooth heavy weight cardstock. 

I left the smaller panel white and removed the hearts from it. I added splatters from some purple and blue spray inks I had, onto the rainbow background. 

I stamped the mice and all the small little pieces using Pink Fresh Studios Detail Black hybrid ink and colored everything in using Copic markers. 

I die cut the paint blobs from Lawn Fawn's Art Supplies die set and used the same color Distress Oxide inks on them as I did the background. 

I added glitter gel to the paint bottles, paint brushes and paint splatters. 

I stamped the "Hope Your Day Sparkles" sentiment from the Just Add Glitter stamp set. 
This card is just so bright and colorful! What a wonderful way to wish someone a happy birthday than with a card that just bursts with color! As always, thank you so much for stopping by and Happy Crafting!


Monday, September 12, 2022

Happy Grandparents Day - Karen Burniston Photo Collage Pop-Up

 Hello and welcome! Todays card features not only my amazing parents and amazing kiddos, but it also features Karen Burniston's Photo Collage Pop-Up! I've had this die set in my collection for a while and to be honest, it kind of intimidated me. All those little photos, I thought for sure it would be complicated. Boy, was I wrong! This was actually a pretty easy mechanism to make and the end result is just WOW! It certainly made my parents day!


For this card, I started with an A2 sized card using a dark gray cardstock. I die cut patterned paper using Karen Burniston's Rectangle - Crosshatch dies in the largest rectangle. 

Where I live, we don't have a place that you can print the small little photos like she shows in her how-to videos, so I printed them from home and sized the photos down so they would fit into the little polaroid looking frames. 

I wanted to keep this card a simple as possible, so I just went with smooth white cardstock for the photo frames. I die cut the mechanism from the same cardstock as the card base. 

I die cut the word Happy from the Happy Birthday word die from Karen Burniston and I also cut the hugs and kisses from Karen Burniston's Word Set 9 - Love. I added some sparkle gel to both words. I had to print out the "Grandparent's Day" sentiment, which I cut and added to my card.

For the front of the card, I used the same background patterned paper, but added a pink strip of patterned paper as well. I added some white ribbon to hide the seam between the two different pattered papers. 

I added three additional photos to the front and also added some of the fun clip and pins die cuts that also comes with the Photo Collage Pop-Up. 

I used the xoxo from the Word Set 9 - Love die set and cut that twice to add down the side. I used glitter gel on both of these to add some dimension. 

The final product is a very beautiful card for two wonderful Grandparents. My parents were thrilled with this card and just loved how the pictures popped out. This would be great for a Mother's or Father's Day card. 

Thank you for stopping by and Happy Crafting!


Thursday, September 8, 2022

MFT Color Challenge - New Best Friend

 Hello and welcome! Today's card was created for the My Favorite Things Color Challenge. For this card I used the MFT New Best Friend stamp set, Distress Ink in Twisted Citron and Picked Raspberry

For this card, I made an A2 sized card, using MFT Gravel Gray Cardstock. I die cut a white background using Neenah Classic Crest 110lb smooth cardstock and MFT A2 Stitched Rectangle STAX dies in the largest size die. 

I used the MFT Watercolor Wash Free Form Stencil and with a blending brush added the Distress Ink in Twisted Citron and Picked Raspberry. 

I stamped the images from the New Best Friend stamp set using Pink Fresh Studio Detail black ink. I colored the images in using Copic markers. 

I stamped the sentiment from the New Best Friend stamp set on heavy weight black cardstock using VersaMark ink and white embossing powder. 

I added some glossy accents to the hearts and added some bright green confetti in different shapes. 

As always, thank you for stopping by and Happy Crafting!


Wednesday, September 7, 2022

Mini Slimline Card using Karen Burniston's Rockin' Rectangle!

 Hello and welcome! Today's card features Karen Burniston's Rockin' Rectangle Pop-Up, Word Set 3 - Holiday and Holiday Charms. Usually when I come up with an idea for a pop-up card, I think about the inside first, but with this card, I focused on the outside and then decided to make the inside a pop-up. I wanted to use the ornaments from the Holiday Charms die set and have them hanging from the branch that is also part of the Holiday Charms die set. 

This card is a Mini Slimline card (3.5x6) I cut using red cardstock. I used Karen Burniston's Short Rectangles - Crosshatch and die cut a smaller piece for the front using some scrap white sparkle cardstock. I die cut a smaller short rectangle out of heavy weight smooth white cardstock and blended the background with Distress Oxide ink in Broken China and Chipped Sapphire. 

I die cut the branches and ornaments from heavy weight smooth white cardstock and colored them in with Copic markers. I die cut the tops of the ornaments with mirrored silver cardstock. 

I die cut the Happy Holidays sentiment twice from green cardstock and once from a mirrored green cardstock. 

Once I added everything to the front, I made snowflakes using my Gelly Pen in size 10. 


The Rockin' Rectangle die set will not fit properly in a mini slim line card, so I cut 3/4 in off the long arm and glued it back on to the remaining tab (see below for how I did this). 

With the short rectangles in the largest die, I cut two pieces from the background cardstock. I die cut a smaller white piece for a place to write a sentiment or sign your name. 

I cut a small piece of green cardstock and stamped and embossed the "have yourself a merry little Christmas" sentiment and added it to the now smaller arm of the mechanism. 

I used Lawn Fawn's Christmas Dreams stamp set to create the Christmas tree and gifts on the pop out rectangle. 


Thank you so much for stopping by today and Happy Crafting!


Tuesday, September 6, 2022

September 2022 Karen Burniston Designer Challenge

 Hi Everyone and welcome! Today's card is my second designer challenge card with the Karen Burniston Design Team and the theme this month is "Just". So here is just the card for any dog lover!


This card uses the new Label Charm Pop-Up die and Word Set 15 - Just Because. Both these dies are from the new September release. I also used MFT BB Lucky Dog stamps. 

For this card, I used 110lb heavy weight cardstock to make an A2 base. I used patterned cardstock from Echo Park - My Favorite Summer paper pack for the front and inside of the card. I had an old Doodlebug Designs paper pack called Dragon Tails and used the striped paper to make a border around the outside of the center mechanism. To make this, I die cut the mechanism out and with a pencil, sketched a border around the die cut, then with my scissors I cut it out. I cut two out and used the second frame for the inside of the card. 

From the same Dragon Tails paper pack, I used a stone path patterned paper for the background of the Label Charms. I die cut the word Just from the Just Because word set twice and glued them together to give the word some dimension. I stamped the "Woofing You" sentiment from the Lucky Dog stamp set.

I stamped and colored with Copic markers the different dogs and accessories for the dogs, then added them to the front and inside of the card. 


I stamped the "A Happy Birthday" sentiment on the inside, which was also from the Lucky Dog stamp set. This is a really fun die set from Karen Burniston! When you open the card, the front turns to face the inside. It's a simple yet fun way to make a card! To see how to use the Label Charm Pop-Up die, click here for Karen Burniston's how to video on YouTube. 

As always thank you so much for stopping by and Happy Crafting!


Monday, September 5, 2022

Karen Burniston - KB Riley LLC September 2022 New Release Blog Hop


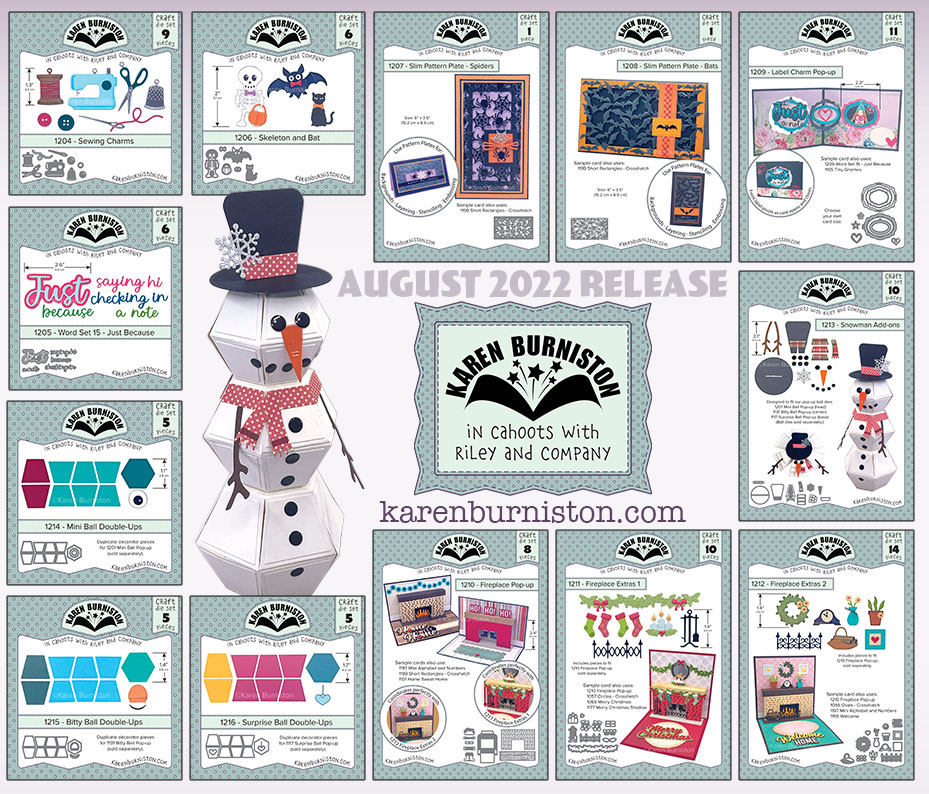
Hi Crafty Friends! Welcome to our Karen Burniston Products - KB Riley LLC September Release Blog Hop. The Design Team have come together with Karen today for a fun blog hop to celebrate the release of 13 new dies. Sneak peeks of the new release started last week and the dies are available to order NOW!


This release includes:
  • 1 new charm die set
  • 1 new word set
  • 1 new Halloween die set
  • 2 new Halloween Pattern Plates
  • 2 new pop-up die sets
  • 2 new pop-up extra sets to coordinate with one of the new die sets
  • 1 new "Ball" add-ons set
  • 3 new "Ball" Double-Ups sets
Die are available to order now on the website karenburniston.com

Giveaway:

To celebrate the new release, Karen Burniston and each of the Karen Burniston - KB Riley LLC Design Team members will be giving away a $25 Gift Certificate to some lucky person who comments on our blog posts, so make sure you join the hop and comment on everyone's blog post. Winners will be randomly chosen from ALL of the blog hop comments received on our blog posts by Monday, 12th September 2022. There are lots of chances to win some goodies, so just leave a comment on this post or any other blog hop posts to enter! Don't forget to leave some way for us to contact you, in case you are a lucky winner!

My card today features the new Fireplace Pop-Up, Fireplace Extras, Skeleton and Bat and Slim Pattern Plate - Bats. As soon as I seen the fireplace and the skeleton I wanted to make a Halloween card that was inspired by the Haunted Mansion at Disney World. I loved that ride so much! 

For the front of the card, I used the house from the House and Fence Pop-Up, the tower from the Castle Pop-Up, the cemetery from the Halloween Scene, the pumpkins, cobweb and BOO! from the Halloween Elements. The bats are from the new release Slim Pattern Plate - Bats. I used glow in the dark embossing powder and VersaMark ink to create the glow in the dark elements on the front of 

this card. I used Distress Oxide ink to create the background. 

For the inside of this card, I made the floor by hand. I wanted it to look old and worn so with pencil I drew out the floor boards and then colored them in with Copic markers. I printed out a free download of the wallpaper from the Haunted Mansion for the back of the fireplace. I used a glow in the dark marker to all the eyes on the wallpaper.

For the fireplace, I die cut it out using 110lb black cardstock and I used Ranger paste over the fireplace die and once it was dry, I colored over each brick with Copic markers to add the gray brick details. I die cut out the small details such as the grate, the vase, the clock and mantel and colored them using Copic markers. I die cut the ghost, skeleton, cobweb, clock face and Happy Halloween sentiment and used glow in the dark embossing powder with VersaMark ink.  


For the fireplace, I die cut it out using 110lb black cardstock and I used Ranger paste over the fireplace die and once it was dry, I colored over each brick with Copic markers to add the gray brick details. I die cut out the small details such as the grate, the vase, the clock and mantel and colored them using Copic markers. I die cut the ghost, skeleton, cobweb, clock face and Happy Halloween sentiment and used glow in the dark embossing powder with VersaMark ink. For the pictures on the wall, I found the "Family Pictures" that are on the walls in the Haunted Mansion and printed them out. I colored the frames to look weathered and old and added the family photos. I did the same for the "Tomb Sweet Tomb" over the fireplace. 

For the fire in the fireplace, I colored it in with green Copic markers. I was going to use green lights inside the fireplace, but with the foam it would take to place the lights where I wanted them, I wouldn't be able to close the card (and yes I figured that out the hard way lol). So I tried putting the lights inside the mechanism for the fireplace, but again I couldn't get it just right. So I scrapped that idea before I ended up ruining all my hard work. I wish now I had made the fire in the fireplace glow in the dark, but that's ok. I really love how this card came out and with all the new extras in this new release, there are so many little details you can add, which I think is my favorite thing to do. 

Thank you so much for stopping by my blog for the Karen Burniston - KB Riley LLC September 2022 New Release Blog Hop! I hope you are enjoying and finding inspiration from all of the amazing design team members. 

To continue on the Blog Hop, click on the next design team member on the list which is the incredibly talented Karen Aiken!

If you need the list of the Karen Burniston design team Blog Hop Blogs, see below. Thank you for stopping by!

Jennifer Webster        <<  you are here

Sunday, September 4, 2022

My Favorite Things Weekly Sketch Challenge 609 - Cats!

 Hello and welcome! Today's card was made for the My Favorite Things Weekly Sketch Challenge 609. I decided to use the MFT Housecats stamp set with coordinating dies. I have been dying to try this stamp set out and along with the MFT Cat and Plant Perches, I decided to make this card. 


For this card, I started with a A2 sized card using heavy weight black card stock. I used Lawn Fawn's Let it Shine - Cream Sprinkle 'n Shine paper for the background. This is a two sided pattern paper, so I used the back side to create the bar across the bottom. 

I stamped the sentiment "I've Got Some Great Mews: I Love You!" from the Housecats stamp onto the diagonal pattern paper using Pinkfresh Studios Hybrid Detail Black Ink

I stamped the cats using the same ink and using my best friends pictures of her cats and some pictures online I could find, I colored the cats using Copic markers. I did the same with the plants. I die cut everything out and then before gluing, decided where I wanted everything. 

I die cut the shelf from the MFT Cats & Plant Perches from scrap woodgrain pattern paper and added the shelf for the sleeping cat to lay on. All and all this is a very simple card, but those cats are just so super cute! 

Thank you so much for stopping by and Happy Crafting!

Saturday, September 3, 2022

Lawn Fawnatics Challenge #131 - Change the Scene - Christmas Magic Picture Changer.

 Hello and welcome! Today's card is for the Lawn Fawnatics Challenge #131 "Change the Scene". So for this challenge I decided to use the Magic Picture Changer die set and the Oven Add-On, to make a Christmas card with the A Creature was Stirring and Baked with Love Stamp sets.


For this card, I started with an A2 sized card on heavy weight 110lb smooth white cardstock. Using Lawn Fawn's Let it Shine - Cream Sprinkle 'n Shine paper, I die cut two rectangular pieces using MFT A2 Stitched Rectangle STAX in the largest size. Using the same rectangular dies, I cut another piece of wood grain paper from Carta Bella "Letters to Santa" paper pack and cut it down to make a floor piece. Using a scrap piece of brown card stock, I made a wall trim piece. 

For the magic picture changing oven, I die cut the oven from red cardstock and the small oven pieces, such as the handles, dials, etc from a silver mirrored cardstock. I die cut the oven elements from black cardstock and I cut the oven mitt from white cardstock. I cut the Magic Picture Changer from heavy weight smooth white cardstock and stamped the cookies and tray on it from the A Creature was Stirring stamp set. I colored it in with Copic markers. 


I stamped the mice and baking items from A Creature was Stirring and Baked with Love and colored them all in with Copic markers. I die cut them from the coordinating dies and added some glitter gel to the top of the cake and the top of the gingerbread house and candies. I also added glossy accents to the holly berries. 

I added a small piece to the pull tab in the same paper as the background so that it would match. I stamped the "We whisk you a Merry Christmas" sentiment from A Creature was Stirring on green cardstock with VersaMark Ink and embossed it with white embossing powder. I also used the same green cardstock to make the pull tab. 

The little mice that Lawn Fawn uses in a lot of their stamp sets are just so darn cute! I also love all the extra little details they put into their stamps, including the small die piece to cut a slot in the mixing bowl so you can fit the wooden spoon or whisk in. I also love how you have different choices for what goes in the oven, including a loaf of bread or cookies that have been cut into different shapes. 

Thank you so much for stopping by and Happy Crafting!

Thursday, September 1, 2022

Sneak Peek Week - Day 4: Happy Halloween with the new Skelton and Bat!

 Hello and welcome to day 4 of the Karen Burniston Sneak Peek Week! Today's card features the new Skeleton and Bat die set. This little set comes with a very cool Skeleton, Bat and Cat. It also has a small pumpkin candy bucket for the Skeleton to carry! This card also uses Karen Burniston's Paper Frames Pop-Up, Happy Halloween sentiment and Halloween Elements


I started with an A2 sized card using heavy weight (110lb) black cardstock. I cut three rectangle pieces, using the largest die from MFT A2 Stitched Rectangle STAX set and PhotoPlay "Fright Night" paper pack. This paper pack also came with a 12x12 sticker sheet and I used some of the stickers from it as well to add extra elements. 


For the front of the card, I used Karen Burniston's Happy Halloween sentiment and background. I used black cardstock for the background and orange for the sentiment. I glued them together and added some glitter gel to the sentiment and set it aside to dry. 

I added the two different pattern papers to the card and added the sticker border down the center. I added the cauldron, candy apple and candy stickers to the front as well. 

For the inside of the card I die cut out two of the skeletons from the new Skeleton and Bat die set. I also die cut the ghost from the Halloween Elements die set as well as the word BOO! I die cut the BOO! sentiment twice, once with black cardstock and once with green cardstock. I glued them so some of the black showed through from the back and added glitter gel to the green BOO!.


I cut the main mechanism from orange cardstock and die cut a second piece in black to add some elements to the orange piece. If I did this again, I would use a thinner cardstock but it still works great. 

I die cut the pumpkin candy bucket for the skeleton to hold. I also die cut the bat from the new die set. I added these to the card and used glossy accents on the eyes for the bat and the skeletons. I added some sticker elements around the inside of the card. 

From the Paper Frames Pop-Up die set I used some of the smaller pieces to make a place to sign the card when you send it. 

Thank you so much for stopping by on day 4 of Sneak Peek Week! Happy Crafting!

Easter Scene using Karen Burniston's Landscape Rectangle Accordion!

 Hello Crafty Friends and welcome! My card for you today uses Karen Burniston's Landscape Rectangle Accordion, along with the Fence Add-...