Monday, September 18, 2023

Karen Burniston - KB Riley LLC September 2023 New Release Blog Hop!

 Hi Crafty Friends,

Welcome to our Karen Burniston Products - KB Riley LLC September Release Blog Hop. The Design Team have come together with Karen today for a fun blog hop to celebrate the release of 9 new dies. Sneak peeks of the new release started last week, and the dies are available to order NOW!


This release includes:
  • 2 new Script Sentiment Die Sets
  • 3 new Border Die Sets
  • 2 new Pop-up Die Sets
  • 1 new Add-on Die Sets
  • 1 stand alone Die Set
Dies are available to order now on the website.
GIVEAWAY:
To celebrate the release Karen Burniston and each of the Karen Burniston - KB Riley LLC Design Team members will be giving away a $25 Gift Certificate to some lucky person who comments on our blog posts, so make sure you join the hop and comment on everyone's blog post. Winners will be randomly chosen from ALL of the blog hop comments received on our blog posts by Monday,25th September 2023. Lots of chances to win some goodies, so just leave a comment on this post or any other blog hop posts to enter! Don't forget to leave some way for us to contact you, in case you are a lucky winner!
My Blog Hop card features the new Oven Pop-Up and Oven Extras!! 

For my card, I started with a 5x7 card base using Neenah Classic Crest 110lb smooth white cardstock. I found this great patterned paper from Michaels and used that for the floor and the brick wall background. 
I began by die cutting the pop-up mechanism. Because I wanted to expand my counters, I die cut two pop-up mechanisms. One was glued into the middle of the card. The second, I used to create additional pop-up area, as shown below. 
First, I butted the second mechanism up to the first. Then with my pencil, I traced the outline of the mechanism onto the bottom piece. I did the same for the other side of the pop-up. 
This way, when the pieces are cut they easily fit together, creating a seamless area for the counters and oven to pop-up together. 
Once I had the areas traced out, I carefully cut them with a pair of scissors. I discarded the remaining pop-up mechanism, because I didn't need the middle area. 


Once I had all the pop-up mechanism pieces ready, I began gluing them into my card. I started with the middle piece, folding and gluing as per the packaging instructions.  
For the two smaller pieces, I just followed the same directions, butting them up next to the middle pop-up area, as shown below. 


As you can see, they make one larger area for more counter space! This is great given all the fantastic extras in the Oven extras die set. 

Once I had all the pop-up mechanisms in place, I added my oven. I used Simon Says Stamps Lipstick Red cardstock for the oven. I also added a grey and black area on the inside of the oven, so when you open the door the back of the oven door is grey and the inside is black. 

I also added a sparkly red front to the oven door. A good tip for the oven pop-up is to make sure that whatever cardstock you use, be sure that you can glue on top of the surface. I had originally used the red shiny cardstock for the entire oven, but it wouldn't stay glued to the counter top. 

Once I had my oven in place, I added the four cupboard pieces. To make these, I die cut four cupboard pieces, adding drawers to two and doors to the other two. I then cut two additional door pieces that come with the Oven Extras and glued them to the underside of both cupboards, leaving enough space on one side to attach to the oven. 

I also found, when making my first card, that the extra cupboard needed some extra support, so I die cut some of the little additional pop-up pieces and added one each side of the extra cupboards, as shown to the left and below. 

I then glued each cupboard piece to the pop-up mechanism in the card, using my Lineco Neutral pH glue. Once the glue set, I closed my card to make sure everything worked correctly. 


I added some Copic markers to the fronts of my cupboards and drawers to add some dimension to the fronts of them. 

I die cut black circles and added them as drawer and cupboard door handles. 

I die cut the extra pieces to go on the oven, like the knobs and elements. I also die cut the pieces for the inside of the oven. I wanted my oven to have two racks on the inside, so I die cut one rack for the bottom of the oven area. Then I die cut some more of the little pop-up extra pieces and created two black pop-up mechanisms, placing them on top of the bottom rack. These hold up the second rack. Once I had the second rack glued in place, I could add my cookie sheet with the little gingerbread cookies on it. 

I also die cut a second cookie sheet to go on top of the oven. For this one, I added the hearts and stars die cuts. I added gold Liquid Pearls on top of the stars and red glitter Stickles to the tops of the hearts. 

I added the oven handle to the front of the oven door using a shiny metallic cardstock. I would advice you use something heavy for this piece because it's what you use to open the oven door. Next time, I will double up mine so the handle is more durable. 

I then die cut the pieces for the upper cabinets, including the vent for the oven. I did the same thing for the upper cabinets that I did for the bottom cabinets, adding Copic marker details to give them dimension. 

I wanted to have a Christmas theme to it, so I once I had all my cabinets in place, I got out the Fireplace Extras 1 and added the green trim to the top of the cupboards. I also added a red bow from the same die set and then using the glitter red Stickles, added holly berries to it as well. I also die cut four wreaths from the Gingerbread Tiny House Add-Ons and added bows to them as well. I glued them onto the cupboard fronts. 

I then die cut all the Oven Pop-Up and Oven Extra elements, such as the stand mixer, loaf of bread, turkey and pot. 

With some of these, I used the little pop-up piece, but with others such as the loaf of bread, I used foam squares. These still work well with closing the card. 

Once I had all my elements added, I stamped three little mice from Lawn Fawn's A Creature Was Stirring stamp set. I colored them using Copic markers and die cut them using the coordinating dies. Then I added them to my card. I had to use foam squares for them so they would stay on the card. I then die cut two ovals using Ovals - Crosshatch and added them like a rug to the floor. I die cut the "Merry Christmas" sentiment using the new Small Script - Christmas die set and added it to the "rug". 

For the front of my card, I used the same patterned cardstock as the inside. I added some bright green to give it a splash of color. Then using the Baking Charms, I die cut several items from heavy weight smooth white cardstock and silver cardstock. I colored some using Copic markers. Then for the hearts, I added some red glitter Stickles gel. 

I die cut the word "Whisk" from the Mini Alphabet and Numbers die set. I stamped the "We" and "You A" from MFT - Bitty Holiday Wishes. 

Thank you so much for stopping by today! Don't forget to leave your name and email address when leaving a comment so you can be entered to win a $25.00 gift card at Karen Burniston's online store!! Be sure to visit all our Design Team to give you more chances to win! To visit the next team member, click the name below. Again, thank you so much for stopping by and Happy Crafting!

Jennifer Webster - you are here!

Friday, September 15, 2023

Karen Burniston New Release - Sneak Peek Week Day 5: Witch Pop-Up

 Hello Crafty Friends and Welcome to our last day of Sneak Peek Week. I hope you have enjoyed seeing all the Design Teams fantastic creations using the 9 new dies in this release. Be sure to come back on Monday, September 18th for Blog Hop Day!!


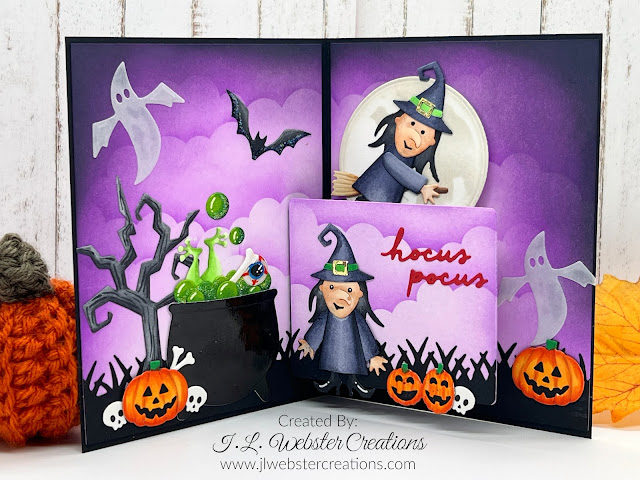
My card today uses the new Witch and Cauldron die along with the Pop and Swap to create this amazing card! 


For this card, I started with an A2 sized card base using smooth black 110lb cardstock. I cut two rectangles from 110lb smooth white cardstock and created spooky backgrounds using Simon Says Stamps Pawsitively Saturated ink in Lilac, Orchid and Amethyst. I added some Distress Oxide ink in Black Soot. I used my MFT - Mini Clouds stencil as well to create a cloud background. 

I die cut the rectangle panel from the Pop and Swap and placed it where I wanted it. Then I did the same background on it. 

I die cut the grass using Nature Edges and black cardstock. I die cut my pop-up mechanism from black cardstock, turned it backwards so it pops up instead of down. To see how to do this check out Karen Burniston's video here

I die cut the Witch twice from smooth white cardstock and colored them both in using Copic markers. I also did the same for the Halloween borders and the tree from Halloween Scene. I die cut the cauldron from shiny black cardstock. 

I then die cut the ghosts, bats and other pumpkins from other Karen Burniston Halloween dies. I added everything together and glued it all down using Lineco Neutral pH glue. I then added Glossy Accents and Glitter Gel to bubbling brew in the cauldron and the bat in the sky. 

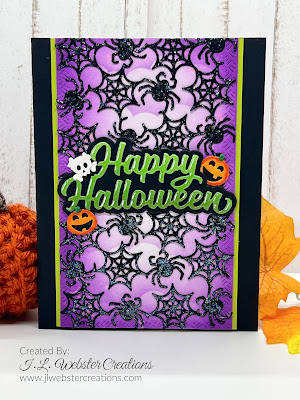
For the front of the card, I created the same type of background, this time using the Short Rectangles - Crosshatch die in the largest size to create a panel. Then I die cut the Spiders Slim Pattern Plate from black cardstock and glued it to my background panel. I added Glitter Gel to the entire pattern plate die cut. 

Once that dried, I die cut the sentiment from the Happy Halloween die. I added some green ink in various shades to create my sentiment. I added it to a black background. Then I added Glossy Accents to the letters and set it aside to dry. 

I cut a bright green piece of cardstock to fit just slightly larger than the purple background. Once everything was dry, I glued it all together and then added a couple of left over Halloween Border pieces. 


As you can see in the above video, when you open the card, the witch and the moon rise up! I just love how this card turned out. It's one of my most favorite. Thank you so much for stopping by today, be sure to come back on Monday for Blog Hop Day and also check out the other Design Team members cards from this week. Happy Crafting!!

Thursday, September 14, 2023

Karen Burniston New Release - Sneak Peek Week Day 4: Choo Choo Christmas Train

 Hello Crafty Friends and Welcome! It's day four of Sneak Peek Week for the September 2023 Karen Burniston release. I hope you have been inspired by all the Design Teams amazing cards! There are 9 new dies in the release, including two new pop-up dies!! 


For my card today, I created this super cute Christmas train card using the Train Pivot Panels along with the new Christmas Borders 1 and 2. 


For this card, I started with an A2 side fold card base using Neenah Classic Crest 110lb smooth white cardstock. I then cut rectangles using a snowflake patterned paper I had on hand. I also added some of the snowflake background to my pop-up mechanism. 

I die cut the pop-up mechanism from 80lb smooth white cardstock. I also cut two snow hills out using the same cardstock and the hill die in Nature Edges. 

I die cut the train and all the accessories from heavy weight smooth white cardstock. I cut the train wheels and front scoop from a shiny black cardstock. I colored all my train pieces using Copic markers and then glued all the pieces together. 

I die cut the Christmas Borders and colored them using Copic markers. I trimmed the pieces I wanted to add to the card. 

I die cut the train track using the same shiny black cardstock as the train wheels. I figured out where I wanted the track on the card and glued it down using Lineco Neutral pH glue. 

I then stamped and colored my little images from Mama Elephant - Little Elf Agenda and Little Agenda Trains. 

Once I had everything cut and colored, I began to add all the pieces to the card. I added Glossy Accents to the Christmas ornaments and Glitter Gel to the train and candy canes. I also die cut the Merry Christmas sentiment from Word Set 3 - Holiday. 

For the front of my card, I kept it simple. I used the same patterned paper as the inside. I die cut two ovals using Ovals Crosshatch, one from red cardstock and one from white cardstock. Then I die cut two candy Christmas Borders and colored them and added them to the front. I had to carefully bend them around my oval. I added glitter gel to the candy wrapper ends and gold Liquid Pearls to the circle spaces between the candies. Lastly, I added the "Holiday Greetings" sentiment. 

I love how the Christmas borders can be used as a great border die or can be trimmed and used individually in cards. Thank you so much for stopping by today. Be sure to visit our other Design Team members to check out their fantastic cards. Happy Crafting!

Wednesday, September 13, 2023

Karen Burniston New Release: Sneak Peek Week Day 3 - Santa Rooftop Card

 Hello Crafty Friends and Welcome to Day 3 of Sneak Peek Week for the new Karen Burniston September 2023 release. This new release has 9 new dies including two new Pop-Up dies!!! 


My card today features the new Stocking Pop-Up die set. I also used the new Small Script - Christmas dies and the Gnome and Santa dies. 


I'm going to be honest....the card in the picture was my second attempt at this. This one gave me a hard time, but the end result was totally worth it!!

I started by making an A2 sized card base using Neenah Classic Crest 110lb smooth white cardstock. My first attempt with this card, I used patterned paper as the background, but it just didn't look right. So for my second card, I created the background using Distress Oxide Ink in Tumbled Glass, Salty Ocean and Faded Jeans. I added some black soot around the edges. I also used a moon stencil I had from Tim Holtz to create the big moon in the sky. Once I had my background inked, I added stars using Copic Opaque white paint (is it paint?? I have no idea but it works amazing!). 

I set the background aside to dry and started on making my roof top. This I created by hand. I started by measuring the width of the center pop-up panel. I figured that I would need to cut the roof top down the middle so the card folded closed properly, so I measured accordingly. I then figured out how high the roof peak would have to be without hiding the pop-up Santa. Once I had everything measured, I cut everything out to create the roof top. I used a brick stencil I had to create a brick wall for the house. Then I used a Lawn Fawn die set I had that had a window big enough for my house. I created the trim and roof pieces and glued everything together. 

I added the Christmas lights to the roof from the new Christmas Borders 1, cutting them from smooth white cardstock and coloring them in with Copic markers. I added Glossy Accents to the lights and I also added some white gel to create snow on the roof. I set this aside to dry. 

I cut out my Santa from the Gnome and Santa die set, again using smooth white cardstock and coloring each piece with Copic markers. I didn't put a lot of details on my Santa as only half of him would be showing. 

I glued my roof top down to the center piece of the pop-up mechanism. I closed the card to make sure it was placed correctly. Then I added my Santa to the pop-up mechanism. I had to make sure that he would pop-up correctly, so it took a couple of tried to get him just right. 

Once I had everything in place, I used the new Small Script - Christmas die set to create some sentiments for the inside of the card. 

For the front of this card, I used the stocking that comes with the Stocking Pop-Up along with all the pieces to make gifts and a candy cane. I added this to the front, as a simple card front. 

As you can see, the Stocking Pop-Up is a very versatile die set. Be sure to check out the other fantastic card designs by our very talented Design Team. Thank you so so much for stopping by and Happy Crafting!!

Tuesday, September 12, 2023

Karen Burniston New Release: Sneak Peek Week Day 2 - Spooky Cupcakes!

 Hello Crafty Friends and Welcome to Day 2 of our Sneak Peek Week for the new Karen Burniston September 2023 New Release. The new release features 9 new fabulous dies, two of which are new Pop-Up dies!! 

My card today features the new Halloween Borders die set. This amazing borders set comes with everything you need to create spooky pumpkin, spider, bat, bones or skull borders.  I also used the Cupcake Add-On for the Landscape Rectangle Accordion die.


 I started by cutting three panels using a heavy weight dark purple cardstock. I then cut frames for my Landscape Rectangle Accordion using a fun spider web patterned paper. 

I die cut two cupcake back pieces from heavy weight black cardstock and from the same spider web patterned paper (which I added to the backs of my cupcake pieces). I trimmed two panels to fit the cupcake add-ons, leaving the middle panel as is. 


I then die cut all my pieces from smooth heavy weight Neenah Classic Crest 110lb white cardstock. I colored all my pieces using Copic markers. For the slime on the cupcakes, I used my pencil to create an area of slime, then colored it with Copic markers. I then added Glossy Accents to create a shiny slime. 


I die cut the pieces from the new Halloween Borders and trimmed them to use as cupcake toppers! So not only are they great borders but you can also use them on their own as individual pieces. 

I die cut the sentiment using the Mini Alphabet and Numbers die and black glitter cardstock. I used Distress Oxide Ink in Mowed Lawn, Rustic Wilderness and Black Soot to create a background for the center piece. I used my spray bottle with water to give it some dimension. Once dry, I added my "bugs and hisses" sentiment. I added some more border pieces to the middle panel for a little extra detail. 

I was never into making Halloween cards, but this year I have discovered just how much fun making Halloween cards can be!! Be sure to check out the fantastic cards from our very talented Design Team for more inspiration! Thank you so much for stopping by and Happy Crafting!!


Monday, September 11, 2023

Karen Burniston New Release: Sneak Peek Week Day 1 - Snowman Pop-Up!

 Hello Crafty Friends and Welcome to the first day of Karen Burniston's Sneak Peek week for the new September 2023 release. There are 9 new dies in the new release, with two of those being new pop-ups!!! 


For my first card this week, I used the new Stocking Pop-Up along with the Snowman die set to create this cute card. 


For this card, I started with an A2 sized card base using Neenah Classic Crest smooth white 110lb cardstock. I had this beautiful wood grain paper with snowflakes on it and wanted to use it with this card. Using the Rectangles - Crosshatch dies in the largest size I die cut two rectangles from the patterned paper. 

I then die cut all my mechanism pieces from Neenah Classic Crest smooth white 80lb cardstock. I went with a lighter cardstock so that the card would close better. I added some more patterned paper to the front mechanism panel. 

I then die cut some snowflakes using the Holiday Charms and Winter Charms die sets. I cut a small piece of acetate and figured out where I wanted my snowflakes to sit on the acetate so that they would pop up with the mechanism. Once I had that figured out, I glued the acetate to the pop-up mechanism. 

I then cut two snowmen out from the Snowman die set. I added one to the pop-up piece and one to the side of the card. I love these little snowmen! 

I also die cut the mitten border from the new Christmas Borders 2 die set and added the little hearts and snowflakes to them. I cut these from a white glitter and black cardstock and glued them together to add some dimension to the mittens. 

Lastly, I used Word Set 13 - Snow to add some sentiments to my card. I used a glitter blue cardstock to tie everything together. 

The new Stocking Pop-Up is a great die set that can be used for so many different card ideas! Check out the new release by clicking here. Also be sure to check out the fabulous card ideas by our amazing Design Team!! Thank you so much for stopping by and Happy Crafting!

Tuesday, September 5, 2023

Karen Burniston Design Team Challenge - Holiday House

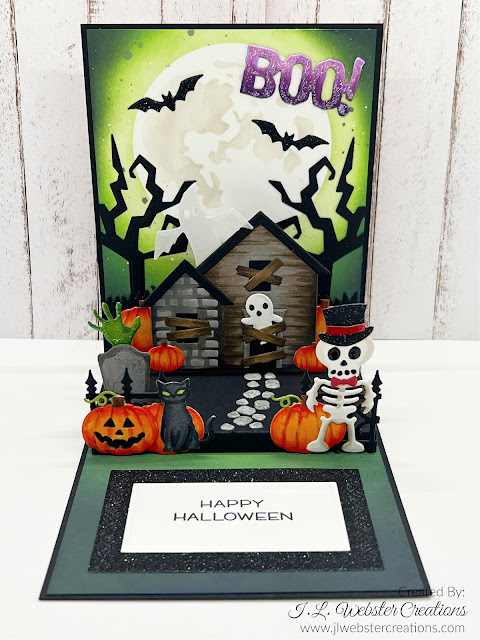
 Hello Crafty Friends and welcome to another Designer Challenge! I just love Designer Challenge each month and this month was extra exciting because we were challenged to create a holiday house. I had a bit of a hard time deciding which holiday I wanted to use, I really love Christmas, I love Thanksgiving (but that was a hard one to create a house for) and I love Easter. But I love Halloween and all the spooky fun to be had, so I chose to create a Halloween House!

Let me first say, creating this was SO MUCH FUN!!! All the die cuts, all the coloring, all the ideas that kept coming...I was exhausted by the time I was done but the end result was worth it!

For this card, I started with an A2 sized card base using smooth heavy weight black cardstock. I cut two rectangles to fit slightly smaller inside the card, the got out my Distress Oxide inks to create the ground piece and background piece. I used a moon stencil I got once which is a Tim Holtz stencil. I used Mowed Lawn, Rustic Wilderness and Black Soot to create my ground and backgrounds. For the moon I used Pumice Stone to create the areas on the moon. 

Then I started die cutting. For this card, I used the following die sets from Karen Burniston:

1. House and Fence Pop-Up

2. Halloween Scene

3. Halloween Elements

4. Haunted Tiny House Add-Ons

5. Skeleton and Bat

I die cut everything from smooth white cardstock and colored it with Copic markers. I know that seems like so much work (and it really is) but the final result is worth it. I figured out where I wanted everything before I started gluing. 

I added the pop-up base to the house and then began gluing my pieces down. I added an area to sign the card and stamped a sentiment using Lawn Fawn's Costume Party stamp set. 

For the front of my card, I kept with the same theme, including how I created the background. 

I did add costumes to my skeletons using Tiny Accessories 1 to create a pirate and a fancy gentleman. 

I stamped the "Trick or Treat" sentiment on the front using VersaMark ink and white embossing powder. Then I glued down all my images where I wanted them. 

I love love love how this card turned out. This is one of my favorites and I am actually going to send this to one of my best friends because Halloween is her favorite holiday!! 

Thank you so much for stopping by for Designer Challenge! Happy Crafting!


Monday, September 4, 2023

Craft Roulette Episode 179 - Having Fall Fun!

 Hello Crafty Friends and Welcome! It's Monday and that means it's Craft Roulette card day. Episode 179 had the following parameters: 

1. Tri-Panel Card

2. Farm House Colors

3. Under the Leaf

4. Belt(s)

For my card, I used three different stamp sets from Hello Bluebird. They are Bee Happy, Field Mice and Oh Nuts!. 


For this card, I started with a 5x7 card base using Ground Coffee cardstock from Lawn Fawn. I cut each panel from smooth white cardstock (2.25x4.785).

I figured out where I wanted my images on each panel, stamping then using masking paper to cover each image as I went. 

Once I had all my images stamped (using Lawn Fawn Jet Black ink), I started on the background. I created the clouds using MFT - Mini Clouds stencil and Distress Ink in Peacock Feathers. I created the grass using MFT - Grassy Hills stencil and Distress Oxide Ink in Mowed Lawn. 

Then I colored the images in with various Copic markers and added details using a white Gelly Pen, Glossy Accents and Glitter Gel. 

I stamped grass areas using a grassy stamp from one of the Hello Bluebird stamp sets I used and a dark green ink. 

Lastly, I stamped the sentiment onto black cardstock using VersaMark ink and white embossing powder. 

Even though it is a lot of extra, fiddly work, I really enjoy stamping and masking. Thank you so much for stopping by and Happy Crafting!

Friday, September 1, 2023

Purple Pansy Card with Honey Bee Stamps

 Hello Crafty Friends and Welcome! Today's card features Honey Bee Stamps Lovely Layers: Pansies. 


For this card, I started with an A2 sized card base using smooth heavy weight black cardstock. I die cut a rectangle from smooth white cardstock using MFT - Stitched A2 Rectangle STAX in the largest size. 

I used my Glimmer Hot Foil machine to create a pretty holographic border around the rectangle. I used Spellbinders - Essential Duo Lines Glimmer Rectangles plates. 

I die cut the pansies from Honey Bee Stamps using smooth white heavy weight cardstock (Neenah Classic Crest 110lb) and colored them using Simon Says Stamps Pawsitively Saturated Ink in Lilac, Orchid, Lemonade, Sprout and Fairway. I did my Copic markers to add some additional details to the flowers and leaves. 

I added Glitter gel to the flowers to give them some extra detail. I glued them down to the card background using Lineco Neutral pH glue. 

I added the sentiment using Honey Bee Stamps - Bitty Buzzwords: Bloom. 

I really enjoy making flower cards, because they just have such a wow factor! I've used Altenew flower dies (flower of the month club) and I've tried Honey Bee Stamps Lovely Layers. Between the two, my favorite is Honey Bee Stamps. Their dies are easy to use and always come out looking lovely. Some of the flowers that I have from Altenew end up looking a little bit jumbled. 

Thank you so much for stopping by and Happy Crafting!

Sending Sunshine Birthday Card

Hello Crafty Friends and welcome!! My card for you today was created using Karen Burniston's Spinner Square Pop-Up. I made this card for...