Thursday, August 31, 2023

Panda Birthday Wishes using Karen Burniston's Little Twist Panel Pop-Up

 Hello Crafty Friends and Welcome! I have been trying to use some pop-up dies I haven't used recently. So I went through my collection and realized I have only used the Little Twist Panel once. I decided to create a birthday card using that pop-up along with the cupcakes from Cupcake Add-Ons that recently came out. 


For this card, I started with an A2 sized card base using smooth white cardstock. I found this great birthday paper and decided since there were pandas on the patterned paper, I would go with a panda theme. 

I die cut the pop-up mechanism from a light blue cardstock, then I marked on my patterned paper where the pop up comes out and made two slits so I could just slide my paper over the mechanism, hiding the panel underneath. I will try to make a short video on how to do this at some point. I find it easier to do it that way then trying to add paper on top and have it match to the paper underneath. 

I then die cut three cupcakes (two for the inside and one for the outside of the card) from the Cupcake Add-Ons die set. I cut them from smooth white cardstock, then used my Simon Says Stamps Pawsitively Saturated inks to add color to the cupcake wrappers. I used Copic markers to added detail to the icing. I die cut cherries to go on top of each cupcake. I colored these in with Copic markers as well and then added Glossy Accents to each cherry. I also added glitter gel to the cupcakes and set them aside to dry. 

I die cut two border pieces using Karen Burniston's Border Blends - Trims and put them together to add some detail to my card. I placed them to break up the patterned paper and the piece to sign the card. 

I die cut the word Sweet using Karen Burniston's You're Sweet die set. I cut the word from light blue cardstock and black cardstock, trimmed the "you're" from the die cut, then glued the pieces together. I added glitter gel to the word to add some dimension. I then stamped the sentiment "birthday wishes" on to a piece of black cardstock using VersaMark ink and white embossing powder. 

I added the cupcakes to the pop-up mechanism and then added some confetti and hearts to the center to add some extra detail. 

For the front of the card, I created a panda bear using Studio Light Bear Ted Friendz die set. Then I added the third cupcake in front of the panda bear. 

I stamped the sentiment on the front using MFT - Sugar-Coated Sentiments. 

I die cut several rectangles to create dimension on the front of the card. The white rectangle the bear sits on, I added some yellow ink behind him and then added different colors of ink by flicking it on with a paint brush. 

Thank you so much for stopping by today, I hope you find some crafty inspiration today. Happy Crafting!

Wednesday, August 30, 2023

Sunflower Birthday Card with Honey Bee Stamps!

 Hello Crafty Friends and Welcome! Today's card features Honey Bee Stamps Lovely Layers: Sunflower. 


For this card, I went with a mini slimline card using Ground Coffee cardstock from Lawn Fawn. I cut out a rectangle using smooth white cardstock and added a dotted border using my Glimmer Hot Foil machine and Spellbinders Mini Slimline Nested Glimmer Dots plate. I used a dark copper colored foil for the border. 

I die cut my sunflowers from smooth white heavy weight cardstock (Neenah Classic Crest 110lb) and used Simon Says Stamp Pawsitively Saturated Ink in Lemonade, Sunbean, and Citrine. For the center of the flowers, I used the same ink in Cappuccino and Mocha. For the leaves, I used Fairway and Field. If you've been following me, you'll know that I normally color my die cuts with Copic markers, but I wanted to try something new, so I went with ink. 

Once dry, I added some splatters using white Copic paint and gina K Honey Mustard ink. I also added some glitter gel to the petals of the flowers. 

I die cut the "birthday" sentiment from Honey Bee Stamps - Bitty Buzzwords using black heavy weight cardstock. I cut the word three times, then glued all the pieces together to give the sentiment some dimension. I figured out where I wanted it on the front of the card and then placed my other parts of the sentiment where I wanted them and stamped them directly on to the card. 

It was really fun to try something new with die cuts and it was easier on my hands to use the ink instead of coloring everything with Copics. 

Thank you for stopping by and Happy Crafting!

Tuesday, August 29, 2023

Welcome Fall with Karen Burniston's Wide Woven Basket!

 Hello Crafty Friends and Welcome! Today's card features Karen Burniston's Wide Woven Basket along with Autumn Elements and Word Set 7 - Autumn. I also used Spellbinders Welcome Fall and Wagon Full of Fall dies. 


For this card, I used a heavy weight kraft cardstock to create the wide woven basket (for the assembly video on how to create the wide woven basket click here for Karen Burniston's video).

I added a fall themed patterned paper to the basket. Then I die cut four grass inserts and added some slight detail using a green Copic marker. 

I die cut all the pieces I needed from Karen Burniston's Autumn Elements using smooth white heavy weight cardstock (Neenah Classic Crest 110lb). Then I began coloring all the pieces with Copic markers. Once done, I added shine lines using a size 10 white Gelly Pen. I also added some sparkle to the leaves using some glitter gel. 

I die cut the wagon and basket from the two different Spellbinders sets, coloring the pieces with Copic markers and then gluing everything together. 

Once I had everything cut out and colored, I began adding everything to my basket. 

For the front of the basket, I wanted to add a simple sentiment, so I die cut two ovals using Karen Burniston's Ovals - Crosshatch and glued them together. 

I die cut the sentiment "welcome fall" from red and orange cardstock as well as from dark brown cardstock. I glued the two pieces together for each word and added them to my ovals. 

Fall is my favorite season and this basket card just checks all the fall boxes! I just love the leaves, pumpkins and little acorns. The best part about the Wide Woven Basket is that you can add so many little details to it. 

Thank you so much for stopping by and Happy Crafting!

Monday, August 28, 2023

Craft Roulette Episode 177 - Plant Card!

 Hello Crafty Friends and welcome! It's Monday and you know what that means? It's Craft Roulette card day! This week the parameters were:

1. A Lady Card

2. Candy Colors

3. Plants

4. Tie Dye

I will be the first to admit, I was a little iffy on the "tie dye" part, but I decided to get out my alcohol inks and create a tie dye background. For this card, I used MFT - Spring Garden Die-namics, MFT - Pots and Plants, Karen Burniston's Garden Charms and Lawn Fawn's Secret Garden Window. 


I started with an A2 sized card base, using smooth heavy weight black cardstock. I created my alcohol ink background using light pinks, blues and purples as well as some silver. While the background was drying, I started die cutting all my pieces. 

I started by die cutting the bench for my greenhouse. I used a light gray cardstock and added white legs to it. I also die cut a peg board to go behind the bench, using MFT - Pegboard Coverup. 

I glued the bench and pegboard to the background. Then I started adding all the plants and other items. All of the die cuts were cut from smooth white heavy weight cardstock (Neenah Classic Crest 110lb) aside from the watering can and metal parts of the gardening tools. These were cut from a mirrored silver cardstock. 

I used my Copic markers in all kinds of colors to create the plants and pots. I used bright candy colors for my pots, taking inspiration from some of my favorite candies, M&M's and Smarties. 

I die cut the gardening gloves from Karen Burniston's Garden Charms and colored them red using Copic markers. Once dry, I added red polka dots to them using a size 10 white Gelly Pen. 

Once I had everything in place, I glued it all down using Lineco Neutral pH glue. I added some foam squares to some of the plants/pots to make them stand out.

I stamped and die cut the sentiment from Honey Bee Stamps - Bitty Buzzwords: Bloom stamp set. 

This card turned out amazing, I am so proud of how great this came out. I just love it!

Thank you so much for stopping by and Happy Crafting!!

Friday, August 18, 2023

Lemon Lime Card using Lawn Fawn's Zesty Lemon

 Hello Crafty Friends and welcome! Today's card was my runner up for the Craft Roulette challenge this week. I couldn't decide which of the two cards to use, but in the end I chose the fun fruit card to send in. For this card, I used Lawn Fawn's Zesty Lemon die set. 


For this card, I started with an A2 sized card using smooth black heavy weight cardstock. I die cut a rectangle using MFT - Stitched Rectangle A2 STAX in the largest die from gold glitter cardstock. 

Then I die cut a rectangle using MFT - A2 Double Stitched Rectangle STAX from smooth white heavy weight cardstock. 

I die cut several of the lemons and lemon slice from Lawn Fawn's Zesty Lemon die set from smooth white heavy weight cardstock. I colored each one with Copic markers to either look like a lemon or a lime. I also die cut the leaves, branches and flower buds and colored them as well with Copic markers. 

I then marked out an area to create a split down the middle of the card. I placed my lemons and limes across the area and glued them down once I had them placed where I wanted them. 

I then die cut a middle border strip to go right across the fruit. I stamped a sentiment on the top using Lawn Fawn's Jet Black Ink and MFT - Anything but Basic Birthday Wishes. Then I added a yellow gingham border, creating a scalloped edge using MFT - Stitched Basic Edges 2. 

I added foam tape to the back of the middle strip and then placed it down the center of the card. Lastly, I added a couple of tiny hearts I had from Sizzix. The final touch was adding Glossy Accents to the fruit slices so they looked juicy! 

This is a clean and fresh looking card, perfect for anyone's birthday! Thank you so much for stopping by and Happy Crafting!

Thursday, August 17, 2023

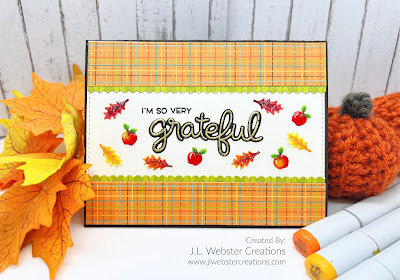
Grateful Friend Fall Card using Karen Burniston's Garden Bench Pop-Up

 Hello Crafty Friends and welcome! Today's card was inspired by my favorite season....FALL! I recently purchased the Garden Bench Pop-Up and I thought it would make the perfect pop-up for a fall card. 

For this card, I started with an A2 sized card, using a smooth brown cardstock from Lawn Fawn called Ground Coffee. I die cut two rectangles using MFT - Stitched Rectangle STAX in the largest size. I used Neenah Classic Crest Smooth white cardstock. These will become the background and ground areas. For the background, I created a sky using MFT - Mini Clouds stencil and Distress Oxide ink in Tumbled Glass and Squeezed Lemonade, adding a little bit of Carved Pumpkin near the bottom to give the background a fall day feel. 

For the ground piece, I used Distress Oxide ink in Mowed Lawn all over. Then I splattered Rustic Wilderness, Mustard Seed and Vintage Photo to create some details on the ground. 

I die cut the bench from a heavy weight kraft cardstock and added details using Copic markers. I then die cut the small pop-up pieces that hold up the pillows on the bench using the same cardstock as the bench. 

I glued the bench into the card using Lineco Neutral pH glue. I then die cut two trees using Karen Burniston's Tree Pop-Up die. I die cut the trunk from Ground Coffee cardstock and the leaves from smooth white cardstock. Then, with my Copic markers, I added details to the leaves. I then glued the trees into the card on the background.

I die cut apples from Karen Burniston's Tree Fruit die set using smooth white cardstock, then colored them with Copic markers. Once I added them to the trees, I added Glossy Accents to the apples. I set this aside to dry. 

While the apples were drying, I started on the pillows. I went through my scraps and found some nice fall patterned paper. I chose two different patterned papers and die cut the pillows out. I added some Distress Oxide Ink to the edges to add some dimension. 

Then I die cut some leaves that came with the Tree Pop-Up set. I die cut these from smooth white cardstock as well and again, used Copic markers to color them in. I glued them into the card on the ground around the bench and then added some glitter gel to them to give the card some sparkle!

I added a patterned paper piece that had a scalloped edge and then added a smooth white piece on top to give the sender a place to sign the card. I stamped a sentiment from Lawn Fawn's Scripty Autumn Sentiments. 

For the front of the card, I carried over the same patterned paper theme as the inside. 

I die cut the word "grateful" from the same Lawn Fawn stamp set and then stamped the word using VersaMark Ink and heat embossed it with gold embossing powder. Then I stamped the "I'm So Very" sentiment where I wanted it and glued down the word grateful. 

I die cut some more apples and leaves and after coloring them, I glued them to the front of my card. I added Glossy Accents and Glitter Gel again to the apples and leaves. 

This is a very simple card on the front, but it's a real surprise to open the card and see that beautiful bench. It makes me want to put a warm sweater on, grab a cup of coffee and a book and sit and enjoy the cool weather and beautiful fall colors. 

As always, thank you so much for stopping by and Happy Crafting!


Monday, August 14, 2023

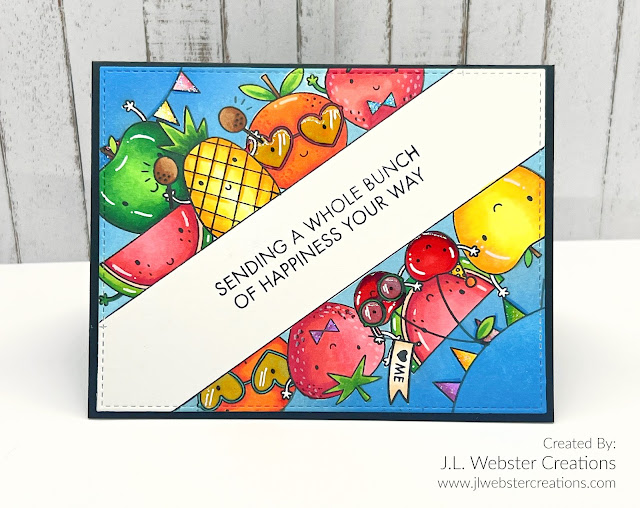
Craft Roulette Episode 176 - Fun Fruit Friends!

 Hello Crafty Friends and welcome! Looks like Mondays are my new Craft Roulette day! For Episode 176 our parameters were:

1. Split in the Middle

2. Jolly (for colors)

3. Fruit

4. Heart

So for my card, I used MFT - Bunch of Happiness to create this fun card!


For this card, I started with an A2 sized card base. Then I die cut a rectangle from smooth white cardstock for my card front. I measured one inch from each corner, then lightly drew a line to create my split down the middle. I added repositionable tape across my white space. 

I began to stamp my images and then cover them with masking paper. Once I had all the images where I wanted them and covered, I used Distress Oxide Ink in two different blue colors (tumbled glass and salty ocean) to create the background. 

Then I removed the masking paper and colored all my images using Copic markers. I tried to use bright, jolly colors. I added glossy accents and glitter gel to add some dimension to my card. 

For the heart, the little oranges are wearing heart sunglasses! 

I just love how bright and vibrant this card turned out! Thank you so much for stopping by and Happy Crafting!

Tuesday, August 8, 2023

The G.O.A.T. Card with Karen Burniston's Fancy Label Accordion

 Hello Crafty Friends! I have a very fun card for you today! For this card, I was inspired by Lawn Fawn's You Goat This stamp set. I actually used this stamp set for the sentiments. Also, lately, I've been trying to use die sets that I haven't used in a long time. So I dug out Karen Burniston's Fancy Label Accordion to create this G.O.A.T. card. 


For this card, I started by cutting out three Fancy Label Accordion pieces using Neenah Classic Crest 110lb smooth white cardstock. Then I die cut the same pieces using a patterned paper from Echo Park called Fun on the Farm. I used these to add a frame around each accordion piece. 

Then I die cut grass area from green cardstock, using Karen Burniston's Natures Edges grass die. I die cut clouds from her Outdoor Scene dies and of course my goats from Karen's Cow and Goat dies. I also die cut flowers and tin can from the Cow and Goat set as well as the Tree Pop-Up. I die cut the hay from the Barn Pop-Up. I die cut everything from the same heavy weight smooth white cardstock and colored it all with Copic markers (my favorite thing to do!). I then die cut the fence from the Farm Edges die set.

I added Distress Oxide Ink in Tumbled Glass to each accordion panel. Then I stamped the sentiments from Lawn Fawns You Goat This where I wanted them. I added the fence and grass to the first two panels. Then I added my details, like the goat and flowers. 

I die cut a smaller frame for the last accordion to add a place to sign the card. This is a pretty simple card that only took about three hours to make but it looks fancy because of the accordion! 

Thank you so much for stopping by and Happy Crafting!


Monday, August 7, 2023

Craft Roulette Episode 175 - Space Card!

 Hello Crafty Friends! I joined in for Craft Roulette again on Friday and was very excited about this weeks four parameters. 

1. 4.25 Square Card

2. Craft Roulette Colors

3. Night

4. Bottom Border

So my first idea was to create a night scene with two little critters on a hill watching the stars. I made it, but it just didn't pop for me. It was cute, but it just wasn't what I wanted. So as I was walking back to my office from making a coffee, I had a brain fart! I think it was a pretty good brain fart, lol!


I thought, why make just one 4.25 sized square, when I could make three and add them together to make a folded card. I decided to go with a space theme as well. 

One of my favorite things to do with alcohol ink is create space backgrounds!! They just come out so amazing! Add some color, add some silver, add some black, blow it around and let it dry. Then I added splatters of white using Copic Opaque white paint to create the stars in the sky. I set these aside to dry. 

Using Neenah Classic Crest Smooth White Cardstock, I stamped my images from MFT - Space Explorer with Lawn Fawn Jet Black Ink. I colored the images in with Copic markers. I tried to make sure the colors were bright like the Craft Roulette color wheel. 

I die cut the images out using the corresponding dies and then added glossy accents to the astronauts helmet covers to look shiny. I also added some to the front of the astronauts suits. Once dry, I used a size 10 white Gelly Pen to create shine lines. 

I cut a piece of light grey cardstock to 4.25. I used Karen Burniston's moon die that comes with the Rocket Pop-Up to trace the moon and craters onto the grey cardstock. I then continued the same pattern on two other pieces of grey cardstock so that when put together, they look complete. Then I added detail using Copic markers. 

I cut my alcohol ink backgrounds down to 4. 125 (4 1/8) and then glued down the moon bottom border to each panel. I glued each piece into my tri-fold card base. Then I started adding my little astronauts, planets and moon to the inside of the card. 

I repeated the same process for the inner fold of the card, only I didn't add a moon base to this panel, I wanted it to seem like the astronaut was floating in space with his balloons. 

For the front of the card, I added the moon bottom border, only this time I stamped the "mission control" sentiment on it. This came with the stamp set I used from MFT. Then I added another astronaut to the front. 

I absolutely love how this card turned out. Those backgrounds just blow me away and I made them lol! Sometimes, you think, these aren't great. Then you keep going, adding the white flecks for stars and then add the stamped images and realize it's great. I am very proud of this card for sure!

Thank you so much for stopping by and as always, Happy Crafting!


Friday, August 4, 2023

Sweet Birthday Wishes with MFT Something Sweet Card Kit

 Hello Crafty Friends! Welcome! Today's card was made using the new MFT Card Kit with all the really cute sweet treats dies. The paper pack that came with the kit was gorgeous! Those blended colors! Swoon! For this card, I used MFT - Sweet Sticks and MFT - Something Sweet sentiment stamp. 


For this card, I started with an A2 sized card using smooth black heavy weight cardstock. I added a rectangle from a bright fuchsia colored cardstock using MFT - Stitched A2 Rectangle STAX. 

I die cut a rectangle using MFT - A2 Double Stitched Rectangle STAX and smooth white cardstock. I added some color using Simon Says Stamps Pawsitively Saturated Ink in Lilac and Bubblegum. I added some splatters using Copic Opaque White paint and SSS Pawsitively Saturated Ink in Orchid. 

I set that aside to dry while I started die cutting the cake pops. I used the cardstock that came with my card kit. I die cut the icing from the white cardstock and once I glued the icing to each cake pop, I added Glossy Accents to the icing part. While it was still wet, I added plastic sprinkles to each cake pop. I set them aside to dry. 

I stamped the sentiment on the front of the card using Lawn Fawn Jet Black Ink. Then once all my cake pops were dry, I added them to the card. 

This was a great card kit and I can't wait to make more "sweet" themed cards! The card kits are no longer available, but you can still buy all the dies and stamps over at My Favorite Things! 

Thank you so much for stopping by and Happy Crafting!

Thursday, August 3, 2023

Four! A Golf Card for any Golfer!

 Hello Crafty Friends! Welcome! I dug through my stash of stamps and dies and decided to use a stamp I haven't used in years! So I got out my Art Impressions PAR-TEE stamp set. I wanted to use Karen Burniston's Paper Frames Pop-Up as well and I went through my Karen Burniston charms dies and realized that I had never used the Sports Charms. So with all those elements I created this cute golf themed card!

For this card, I started with an A2 side fold card using 110lb smooth white cardstock. I die cut two rectangles from 80lb smooth white cardstock and with the MFT - Cloud stencil and Distress Ink in Peacock Feathers I created the sky background. 

I used Karen Burniston's Nature Edges die set to create the hills using a darker green cardstock. Then I cut grass area using a die from the same set only using a lighter green cardstock. I set these aside, and started stamping my images onto 110lb smooth white cardstock. 

I do not have the coordinating dies (if there are any) for this stamp set so I had to fussy cut the images out. This is a real pain in the butt! I am not a fan of fussy cutting lol. I stamped the images using Lawn Fawn's Jet Black Ink and colored everything using Copic markers. 

I die cut the Paper Frames pop-up from a light kraft cardstock. I added the same darker green I used for the grass hills to the frames, then added white cardstock. For the assembly video by Karen Burniston's on this die, click here

I added the darker green grass to the backgrounds and then glued that into the card. I added the pop-up paper frames and glued them where I wanted them to be. Then I added the stamped golfers and finally added the lighter green grass. 

I stamped the "Let's Par-Tee" sentiment from the Art Impressions stamp set. For the other side of the pop-up, I used Karen Burniston's Sports Charms and die cut the golf tee and golf ball. I used Copic markers to add some details to the charms. 

For the front of the card, I kept the same grass/sky theme. I added more of the golf items from Karen Burniston's Sports Charms. 

I die cut the Happy Birthday from Karen Burniston's Happy Birthday die. Lastly, I stamped the "it's time to celebrate" sentiment from MFT - Bitty Birthday Sentiments. 

I love how this card turned out. It will be perfect for any golfer! Thank you so much for stopping by and Happy Crafting!


Wednesday, August 2, 2023

Fall is in the Air!

 Hello Crafty Friends and welcome! I know fall isn't in the air.....yet! But I couldn't help but make this fall themed card using Honey Bee Stamps Market Cart die set and Pumpkin Spice Market Cart Add-On. Fall is my absolute favorite season! The colors, the smell, the apple pie, the warm sweaters on cold days! So here is my ode to fall so to speak. 


For this card, I started with an A2 sized card base using Coffee Grounds cardstock from Lawn Fawn. 

I die cut a rectangle from smooth white cardstock for the background. I started with three colors of Distress Oxide Ink in Mustard Seed, Carved Pumpkin and Crackling Campfire. I used my MFT - Mini Clouds stencil and created the cloud background. 

I die cut two scraps of different colored green cardstock using the same rectangle die as the background (MFT - Stitched A2 Rectangle STAX) and then used the MFT - Slimline Grassy Hills dies to cut two different grass pieces. I added some detail to them using Distress Oxide Ink in Mowed Lawn and Rustic Wilderness. 

I stamped the sentiment "fall is the best season of all" on to the front grass piece using Lawn Fawn's Jet Black Ink. The sentiment came from Spellbinders - Fall Greetings stamp set. 

Then I die cut the market cart and all the pieces using scraps of cardstock (because I save everything just in case!) and used Copic markers to color and add detail to everything. I die cut the canopy and trim using some fall themed patterned paper I also had in my scraps, so I am sorry, I'm not sure where it came from. 

I die cut the wagon from the Honey Bee Stamps - Farmers Market Cart Add-On and I also added some additional pumpkins using Spellbinders - Welcome Fall die set. All the pumpkins I cut from smooth white cardstock and then colored them individually with Copic markers. 

I glued the background down, then added the darker green grass piece. I added the Market Cart where I wanted it, then added the front grass piece with the foam squares. I began to add the pumpkins and other pieces as I went. Once finished, I added some shine lines to the pumpkins using a white size 10 Gelly Pen. 

Cards like these are a lot of work with die cutting but sooooo worth it when the outcome is as pretty as this! Thank you so much for stopping by and Happy Crafting!

Tuesday, August 1, 2023

Karen Burniston Design Team Challenge - August 2023 - Accordions!

 Hello Crafty Friends and welcome! It is Designer Challenge time and the Karen Burniston Design Team were challenged with the theme Accordion. That means we could use any "accordion" style die. 

For my card, I chose the Landscape Rectangle Accordion die and went with a Halloween theme! I know, I know, it's still summer, but I love Halloween! 


For this card, I used a heavy weight black cardstock for the base of each rectangle accordion piece. Then I chose two different Halloween themed patterned papers and created borders for the front and back of my card. 

For my first rectangle, I die cut a center piece from smooth white cardstock and created a green background using Distress Ink in Twisted Citron, Mowed Lawn and Rustic Wilderness. Then I added water to some Distress Ink in Black Soot and with a paint brush, flicked black spots onto the background. 

Once dry, I added the cemetery background from Karen Burniston's Halloween Scene die set. I cut this twice, once from smooth black cardstock and once from a glitter black cardstock. Then I trimmed the tomb stones from the smooth black cardstock and glued it on top of the glitter paper, so I looked like the tomb stones glittered. 

I die cut two ghost from Karen Burniston's Halloween Elements, adding black to the eyes to they popped! I glued them down behind the cemetery scene and then glued down the cemetery. 

I die cut three pumpkins, two from Haunted Tiny House Add-Ons and one from the Halloween Elements die set, from smooth white cardstock and colored them using Copic markers. 

Lastly, I die cut the word "BOO!" from the Halloween Elements using purple cardstock. I die cut two pieces and glued them together because my cardstock was very thin. Then I added some glitter gel. 

For the center rectangle, I die cut a panel from smooth white cardstock and added purple ink on it. I used Simon Says Stamps Pawsitively Saturated ink in Lilac and Orchid. 

Then I mixed water with Distress Ink in Black Soot and with a paint brush, flicked black splatters all over. 

Once that dried, I used some Distress Crackle Paint over the purple to create a "cracked" look to the background. 

I die cut two bats from Karen Burniston's Haunted Tiny House Add-On using sparkly black cardstock. I also used the same cardstock to cut the background of the "Happy Halloween" sentiment. 

I blended Distress Ink in Dried Marigold, Carved Pumpkin and Crackling Campfire and once dry, die cut the Happy Halloween sentiment from it. 

For my last rectangle, I used the cauldron and cloud from Karen Burniston's Good Luck Charms to create a witches bubbling cauldron. I die cut the cauldron from a shiny smooth black cardstock. I die cut the "bubbles" from white cardstock and colored them with Copic markers to look like bubbling goo. Then I added some glitter gel to give a little extra oomph!

I added some pumpkins from the Haunted Tiny House Add-On as well as the spiders, which I cut from sparkly black cardstock. 

I added the witches hat and bird from the Halloween Elements die set. Lastly I die cut a white rectangle from the Landscape Rectangle Accordion set and glued it down. 

I love using the Landscape Rectangle Accordion. It makes such a fun card with panels large enough to make neat scenes on it. Thank you so much for stopping by and Happy Crafting!


Sending Sunshine Birthday Card

Hello Crafty Friends and welcome!! My card for you today was created using Karen Burniston's Spinner Square Pop-Up. I made this card for...