Showing posts with label Handmade Cards. Show all posts

Tuesday, August 1, 2023

Karen Burniston Design Team Challenge - August 2023 - Accordions!

 Hello Crafty Friends and welcome! It is Designer Challenge time and the Karen Burniston Design Team were challenged with the theme Accordion. That means we could use any "accordion" style die. 

For my card, I chose the Landscape Rectangle Accordion die and went with a Halloween theme! I know, I know, it's still summer, but I love Halloween! 


For this card, I used a heavy weight black cardstock for the base of each rectangle accordion piece. Then I chose two different Halloween themed patterned papers and created borders for the front and back of my card. 

For my first rectangle, I die cut a center piece from smooth white cardstock and created a green background using Distress Ink in Twisted Citron, Mowed Lawn and Rustic Wilderness. Then I added water to some Distress Ink in Black Soot and with a paint brush, flicked black spots onto the background. 

Once dry, I added the cemetery background from Karen Burniston's Halloween Scene die set. I cut this twice, once from smooth black cardstock and once from a glitter black cardstock. Then I trimmed the tomb stones from the smooth black cardstock and glued it on top of the glitter paper, so I looked like the tomb stones glittered. 

I die cut two ghost from Karen Burniston's Halloween Elements, adding black to the eyes to they popped! I glued them down behind the cemetery scene and then glued down the cemetery. 

I die cut three pumpkins, two from Haunted Tiny House Add-Ons and one from the Halloween Elements die set, from smooth white cardstock and colored them using Copic markers. 

Lastly, I die cut the word "BOO!" from the Halloween Elements using purple cardstock. I die cut two pieces and glued them together because my cardstock was very thin. Then I added some glitter gel. 

For the center rectangle, I die cut a panel from smooth white cardstock and added purple ink on it. I used Simon Says Stamps Pawsitively Saturated ink in Lilac and Orchid. 

Then I mixed water with Distress Ink in Black Soot and with a paint brush, flicked black splatters all over. 

Once that dried, I used some Distress Crackle Paint over the purple to create a "cracked" look to the background. 

I die cut two bats from Karen Burniston's Haunted Tiny House Add-On using sparkly black cardstock. I also used the same cardstock to cut the background of the "Happy Halloween" sentiment. 

I blended Distress Ink in Dried Marigold, Carved Pumpkin and Crackling Campfire and once dry, die cut the Happy Halloween sentiment from it. 

For my last rectangle, I used the cauldron and cloud from Karen Burniston's Good Luck Charms to create a witches bubbling cauldron. I die cut the cauldron from a shiny smooth black cardstock. I die cut the "bubbles" from white cardstock and colored them with Copic markers to look like bubbling goo. Then I added some glitter gel to give a little extra oomph!

I added some pumpkins from the Haunted Tiny House Add-On as well as the spiders, which I cut from sparkly black cardstock. 

I added the witches hat and bird from the Halloween Elements die set. Lastly I die cut a white rectangle from the Landscape Rectangle Accordion set and glued it down. 

I love using the Landscape Rectangle Accordion. It makes such a fun card with panels large enough to make neat scenes on it. Thank you so much for stopping by and Happy Crafting!


Wednesday, July 12, 2023

Backyard Garden Card!

 Hello my Crafty Friends and welcome! Today's card is very special because it was inspired by my best friends beautiful backyard garden. She has a very green thumb and once a week, I go visit her and we sit in my Adirondack chairs in the back and just enjoy her beautiful plants. So, I just had to make a card based on her gardens. 


This card is a larger than normal slim line. Not even sure you could still call it a slim line, but it is 10in wide by 8in folded down the middle for 4in wide sides. I wanted this to be big so I could not only fit two pop-up Adirondack chairs, but also two trees and lots of plants and gardening tools, etc. 

For this card, I used Karen Burniston's Adirondack Chair Pop-Up die. I cut the card base first, from Lawn Fawn's Mermaid cardstock. I used my score board and a bone folder to create the center fold. Then I positioned the Adirondack Chair pop-up die where I wanted the two chairs and die cut them out. From there I cut a piece of patterned paper with clouds on it for the background and added it to the back of the card. To do this, I die cut the top of the chair on to the patterned paper exactly where it was positioned on the card base, then trimmed it out of the patterned paper. This fits perfectly around the chairs. Then I added a panel to the back using the same patterned paper to hide the open space behind the chairs. I repeated the same steps for the grass area as well. 

Once I had this done, I die cut two trees using Karen Burniston's Tree Pop-Up die set. I used Lawn Fawn's Coffee Grounds cardstock for the trunk/branches and MFT Limelight cardstock for the leaves. I used my Copic markers to add details to the leaves. Then glued them to either side of the card. 

I die cut a fence using Karen Burniston's Fence Add-Ons from a light brown kraft cardstock. I used my Copic markers and added detail to the fence. From there, I added it to my card. I had to add the fence in small pieces, lining up the fence under and around the chairs, sometimes having to cut small slits in the fence so it would slide around the chair arms. 

Once I had the trees and fence done, it was time to decorate with plants, flowers and garden accessories. I used Karen Burniston's Garden Charms, Backyard Charms, Fence Add-Ons flowers and Fun Flowers. I also used the Coffee Charms to add the mug for tea!

I colored everything using Copic markers to give all my die cuts some dimension. 


One of the pots, I added a flap to the back that was part of Karen Burniston's Frame Pull Pop-Up so that the pot stuck out from the back of the card. 

I added a little mushroom to the back in between the chairs (which is hard to see in my pictures). 

I added the sentiment "from the garden" to the bottom of the card, using bright yellow cardstock. I die cut this twice, once from dark brown cardstock and once from the yellow. Then I added some glitter gel to the sentiment to give some extra pop!

I used Karen Burniston's Short Rectangles - Crosshatch die and die cut a white rectangle to use as a place to sign the card. 

For the front of this card, I kept it very simple. Adding some floral patterned paper along with some mermaid blue cardstock and then added Karen Burniston's Hello die using the same bright yellow cardstock as I did for the sentiment inside the card. I added some of the floral stickers to the front that came with this paper pack. 


My friend was so impressed with her backyard being turned into a card. She said her favorite was the gardening gloves on the chair. I love how this card turned out. Thank you so much for stopping by and Happy Crafting!


Tuesday, September 6, 2022

September 2022 Karen Burniston Designer Challenge

 Hi Everyone and welcome! Today's card is my second designer challenge card with the Karen Burniston Design Team and the theme this month is "Just". So here is just the card for any dog lover!


This card uses the new Label Charm Pop-Up die and Word Set 15 - Just Because. Both these dies are from the new September release. I also used MFT BB Lucky Dog stamps. 

For this card, I used 110lb heavy weight cardstock to make an A2 base. I used patterned cardstock from Echo Park - My Favorite Summer paper pack for the front and inside of the card. I had an old Doodlebug Designs paper pack called Dragon Tails and used the striped paper to make a border around the outside of the center mechanism. To make this, I die cut the mechanism out and with a pencil, sketched a border around the die cut, then with my scissors I cut it out. I cut two out and used the second frame for the inside of the card. 

From the same Dragon Tails paper pack, I used a stone path patterned paper for the background of the Label Charms. I die cut the word Just from the Just Because word set twice and glued them together to give the word some dimension. I stamped the "Woofing You" sentiment from the Lucky Dog stamp set.

I stamped and colored with Copic markers the different dogs and accessories for the dogs, then added them to the front and inside of the card. 


I stamped the "A Happy Birthday" sentiment on the inside, which was also from the Lucky Dog stamp set. This is a really fun die set from Karen Burniston! When you open the card, the front turns to face the inside. It's a simple yet fun way to make a card! To see how to use the Label Charm Pop-Up die, click here for Karen Burniston's how to video on YouTube. 

As always thank you so much for stopping by and Happy Crafting!


Thursday, August 18, 2022

Christmas in August with Karen Burniston's House and Fence Pop-Up.

 Hello and Welcome! Todays card features Karen Burniston's House and Fence Pop-Up. I wanted to create Santa's house up in the north pole, so I used the House and Fence Pop-Up to create this Christmas scene.


To make this card, I started with dark blue cardstock and cut to an A2 size card. I cut three rectangles using MFT A2 Stitched Rectangle STAX, in the largest size from white heavy weight cardstock. On two rectangles, I created a dark sky using Distress Oxide ink in Chipped Sapphire and Broken China and added white snow flakes using my Gelly Pen in size 10. I made a snow hill background using Karen Burniston's Nature Edges die set. 

For the front of the card, I made the sleigh using Karen Burniston's Sleigh Pop-Up.  I also used the Holiday Charms die and the Christmas Animals die set. I used my Copic markers to give the die cuts some dimension. I used a Christmas stamp from Simon Says Stamps I had and stamped and colored the North Pole sign. I didn't have a matching die so I fussy cut the sign out. 


For the inside of the card, I made the house look like a log/stone house. I die cut out the trees from the Winter Charms die set from green cardstock and added details using Copic markers and snow tips with my Gelly Pen in size 10. I created the polar bear and Santa and added them to the two tabs on the floor of the pop-up panel. I die cut the fence from red cardstock and added snow to it. If I make this pop-up again, I will double up on the cardstock for the fence, it wasn't very strong with the cardstock I used. 

For the house, I die it out from white cardstock and used Copic markers to add all the details. I used the wreaths that go on the fence to go on the windows and doors. I colored in the stone path way with Copics and added them to ground panel. The chimney is made from the door die. I cut it out from gray cardstock and the door frame from black cardstock and created the chimney. 

I die cut the candy canes and colored them with Copics as well and added them to the fence. I am so happy with how my Santa house came out. I hope you like it as much as I do! Thank you so much for stopping by and Happy Crafting!

Thursday, August 11, 2022

Happy Birthday Dad - Using Karen Burniston's Little Labels Pop-Up

 Hello and Welcome! Today's card features Karen Burniston's Little Labels Pop-Up and the Big Birthday Charms die sets. This card was made for my Dad who turned 74 yesterday, so Happy Birthday Dad!


I make this card, I started with a slimline size card (3.5 x 8) using a dark teal heavy weight cardstock. I decided on Lawn Fawn "Let it Shine" striped cardstock for the background. I used heavy weight green cardstock for the pop-up mechanism and some of the extra pieces. 

I used the Big Birthday Charms for the inside of the card, to decorate the Little Labels pop-ups and used Karen Burniston's Mini Alphabet and Numbers die to cut out the 74. This is a great set, because you get the number and a background piece for each letter and number. So you can choose to use it or not, which I love. 

I stamped the sentiment "Celebrate" and "Birthday Hugs & Kisses" from MFT Bitty Birthday Wishes


I love the bright colors in this card. I added some little confetti pieces I had in my supplies to add a little extra to the front of the card. I used Karen Burniston's Happy Birthday die and glitter cardstock to make the front sentiment. 

I would love to hear from you, so please feel free to leave me a comment or if you have a question about this card or any of the other cards on my website. Thank you for stopping by and Happy Crafting!


Thursday, July 14, 2022

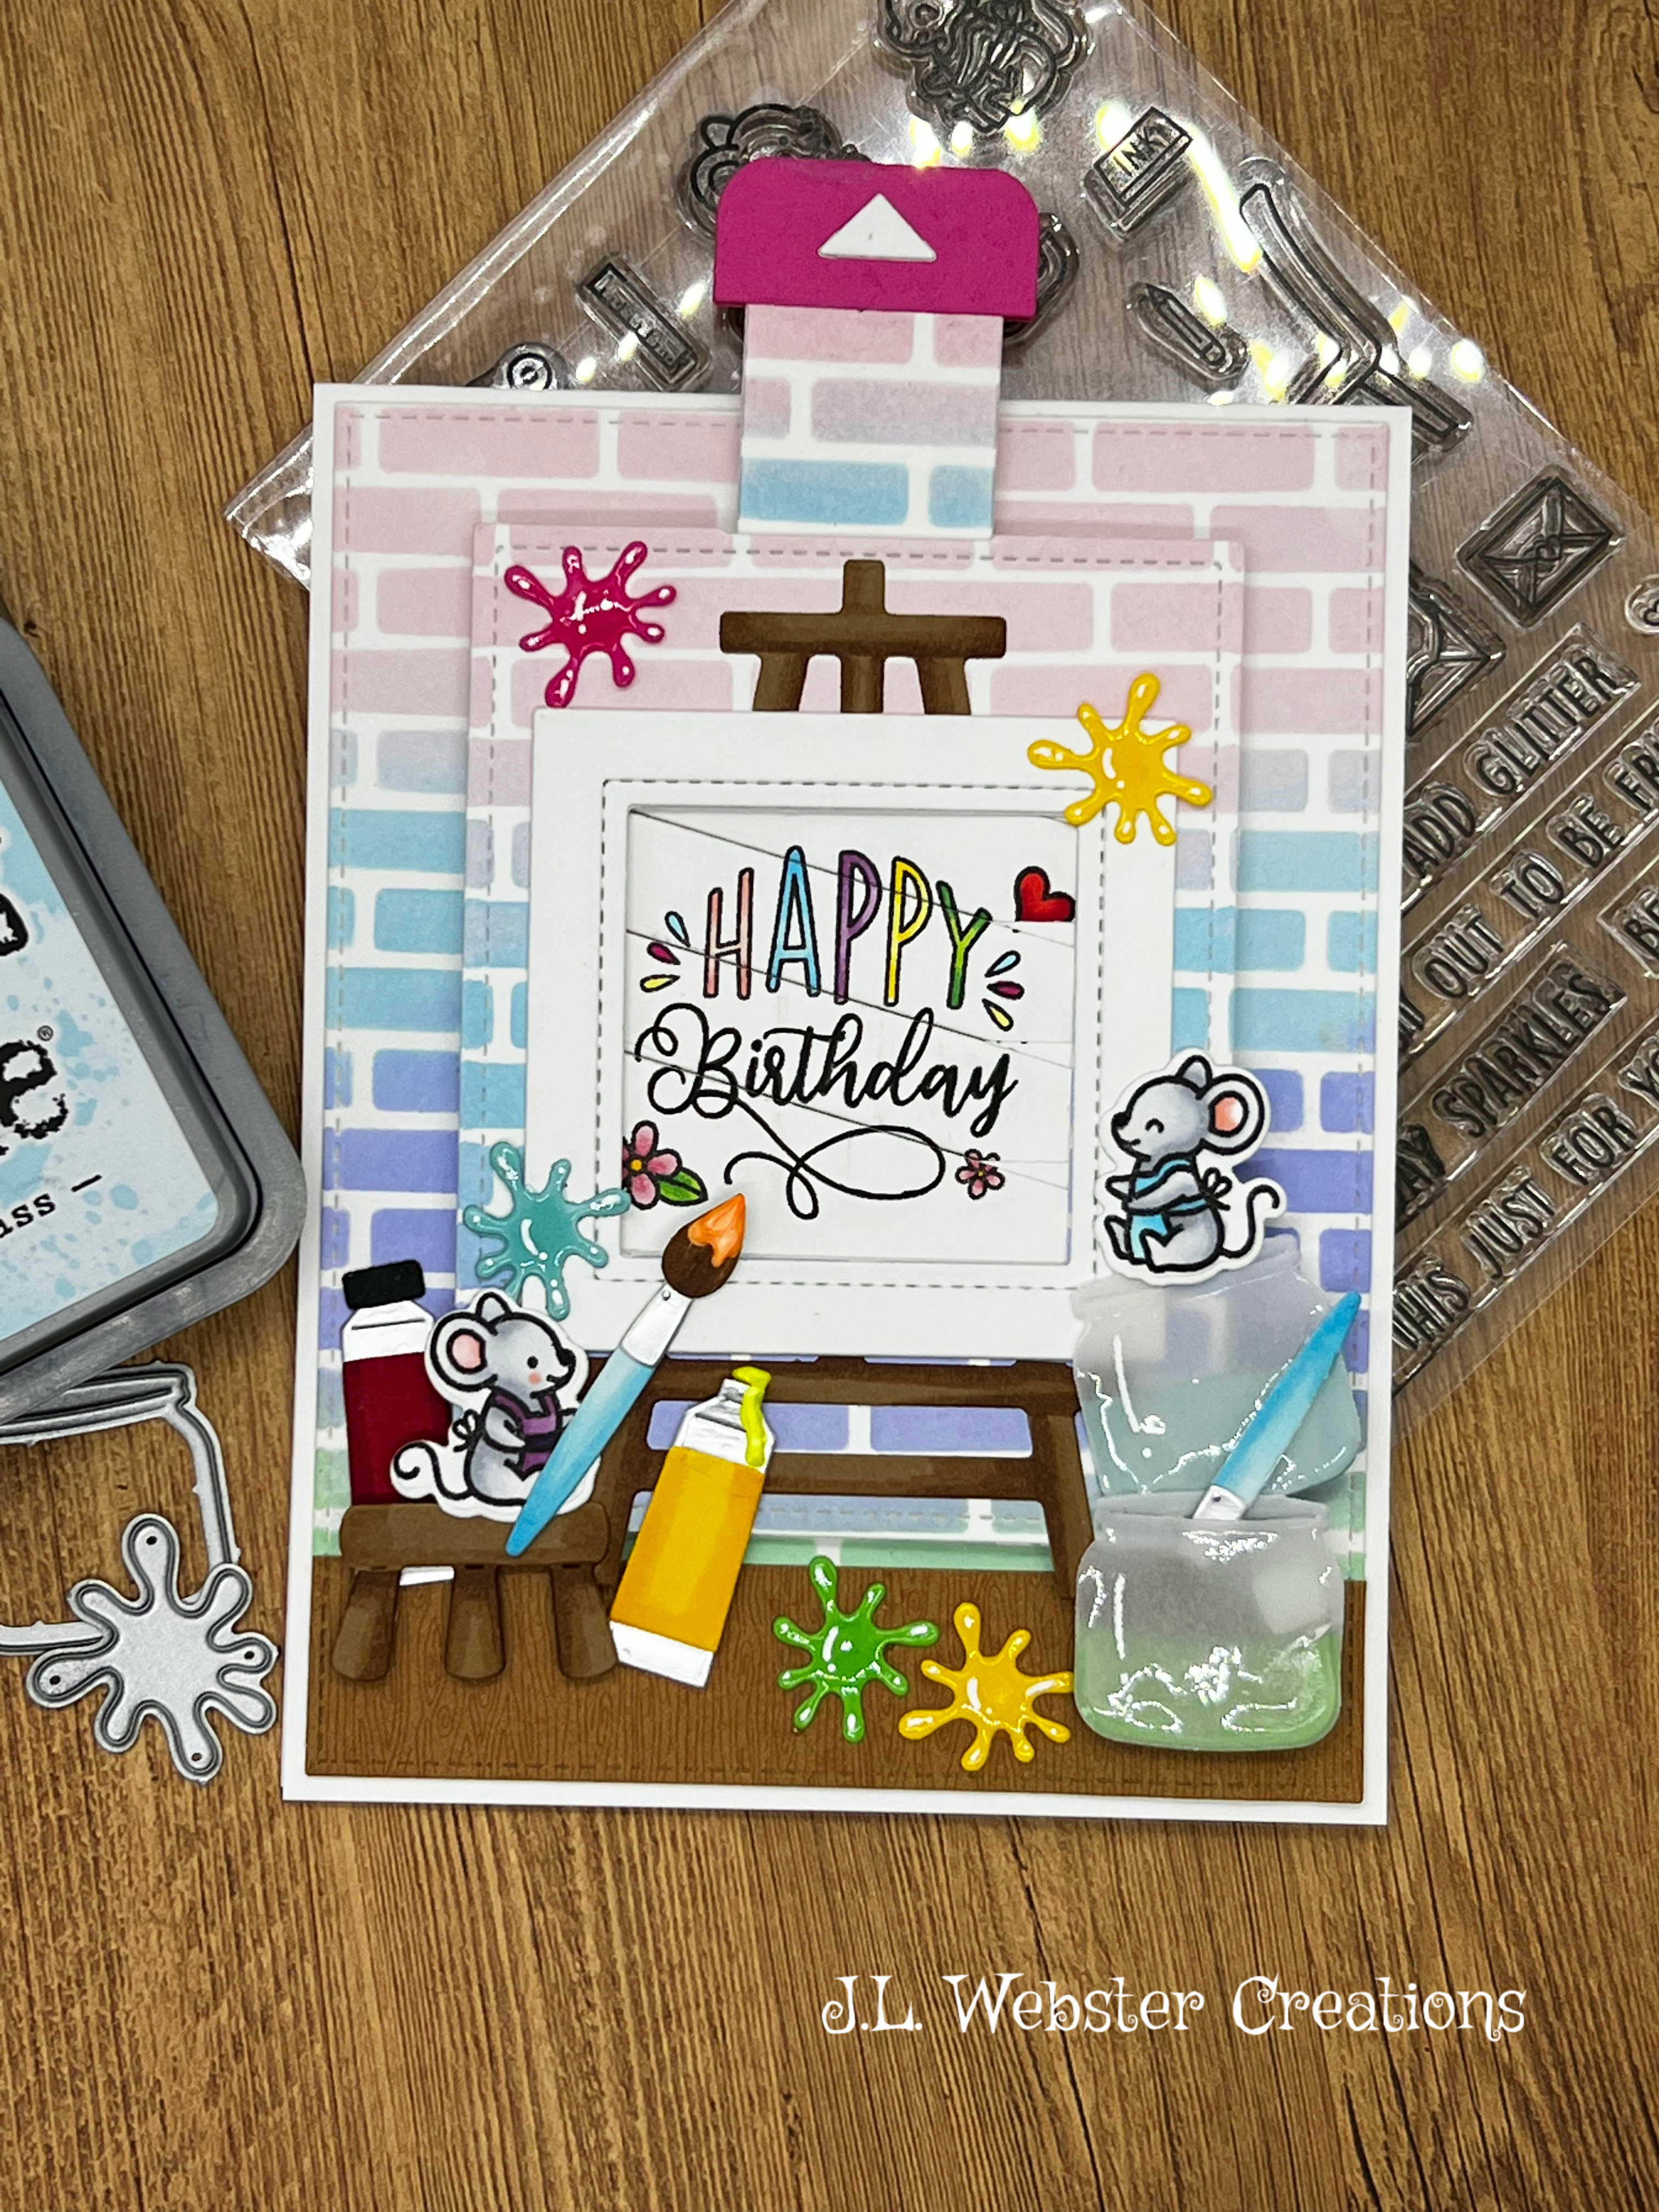
Getting Artsy Fartsy with Lawn Fawn's Summer Release!

Hello and welcome! Todays card features several products from Lawn Fawn's Summer Release! I couldn't wait to try these sets out, what crafty person wouldn't? This cards uses Lawn Fawn's Just Add Glitter stamp set, Canvas and Easel die set and the Art Supplies die set. This card also features Lawn Fawn's Magic Picture Changer die and the Magic Picture Changer Add-On. I was inspired to make this card by Kelly Marie Alvarez who created a card similar for Lawn Fawn. 

To make this card, I started with a A2 card base, using 110lb cardstock. I die cut the largest rectangle from the MFT Stitched A2 Rectangle die set from the same cardstock. I also die cut out another piece using the Magic Picture add-on die using the same white cardstock. 

Using my MFT Small Brick Wall Stencil and a blending brush, I made the multi-colored wall background. I used Distress Oxide Inks in Tumbled Glass, Spun Sugar, Shaded Lilac and Cracked Pistachio

I die cut the easel and stool from some scrap kraft cardstock and added some details using my Copic markers. I stamped the two small mice with MFT Extreme Black ink and colored them in with my Copic Markers. 

I die cut the Art Supplies from various scraps of cardstock and added details using Copic Markers and Glossy Accents. I added some paint coming out of the yellow paint tube using Liquid Pearls. 

 I die cut the glass jars of paint with Heavyweight Translucent Vellum. I then die cut the same jar out of a blue and green cardstock. I cut the colored pieces smaller and glued them on the back of the vellum to look like paint in the jars. I then added Glossy Accents to make the jars look like glass. 

I used Lawn Fawn's Magic Messages stamp to make the Magic Picture. I only colored in the second sentiment. 

I absolutely can't wait to give this card to my crafty friend for her birthday! This is such a great set if you have a crafty friend, or even just a friend that likes art! As always, thank you so much for stopping by today and Happy Crafting!


Tuesday, July 12, 2022

Flower Pot Birthday Card Surprise!

 Hello and welcome! Todays card was made for someone very special and important to me, my Mom! It is her 73rd Birthday today, so a extra special card had to be made. For this card, I used Karen Burniston's Twist Panel Pop-Up die set as well as Karen Burniston's Flowers and Bee die set and the Flower Pots from the Flower Pot Pop-Up die set.

I started with an A2 size card using Kraft Cardstock from My Favorite Things. I die cut three rectangles using MFT A2 Stitched Rectangles and Lawn Fawn Dandy Day cardstock in the light pink. 

For the front of the card, I cut out a rectangle frame using MFT Rectangle Frames and with my blending brush, Gina K Sweet Corn and Lawn Fawn No.2 Pencil inks, gave the frame some detail and color.

I left the center of the rectangle white. I die cut several flowers, leaves and bees from the Flowers and Bee die set from 110lb white cardstock. Then I hand colored the flowers with my Copic markers. I added Mini Prills in black and brown to the centers of the bigger flowers and for the small white and yellow flowers, a small dot of orange Liquid Pearls. 

Using a darker shade of pink cardstock, I die cut the Happy Birthday to You twice using Karen Burniston's Word Set 2: Birthday and glued both sentiments together to give the wording some dimension. I also added glossy accents to the words. 

For the inside of the card, I die cut the pop-up in the middle of the card using 110lb white cardstock. I added a cloud and grass background using MFT Mini Cloud Edges Stencil and Grassy Edges Stencil. I used Distress Ink in Peacock Feathers and Mowed Lawn for this piece.

I die cut the pots from scrap yellow cardstock and ran the pot bottoms through my Cricut Cuttlebug and embossed a fancy design. Then using the same ink colors as the frame on the front of the card, I added some dimension to the pots. 

I had to trim the pots down to fit the center pop-up. I glued on the flowers using Neutral PH Lineco Adhesive (honestly the best glue I've ever used!) and my Karen Burniston's fine tip bottle. I die cut the "make a wish" sentiment from the same word set birthday dies and added glitter stickles to make the sentiment pop! 

I die cut two pieces for the top and bottom of my card using 110lb white cardstock and MFT Stitched Scalloped Edges. I stamped the "You are loved" sentiment from MFT Essential Sentiments. 

This card went over very well! My Mom loves flowers and has some very beautiful gardens around their house, so this card was perfect for her! Thank you so much for stopping by and Happy Crafting!

Christmas Tree Gazebo Pop Up Card

 Hello Crafty Friends and welcome! Karen brought up to the team that a customer had asked if the Christmas Tree Pop-Up would work on the Sta...