Friday, October 28, 2022

Through the Woods Vellum Card

 Hello and welcome! Today's card was inspired by Jennifer McGuires recent YouTube video on vellum cards. For this card, I used Spellbinders Through the Woods Etched dies

I started with a heavy weight vellum from My Favorite Things and cut it to make a top fold A2 sized card. I then used an embossing folder to create the design on the front of the card. 

I die cut two white pieces using the circle die that comes with the set. One will be used for the inside of the card, and one will be used for the background of the ornament on the front of the card. 

I die cut all the pieces to make the ornament on the front using scraps of cardstock I had. A light blue cardstock for the sky, gold paper for the Merry Christmas and rim around the ornament and for the piece at the top of the ornament. I die cut the trees from white cardstock and added details with Copic markers. I die cut the truck from red cardstock and added all the details with cardstock scraps. 

I added some red and white bakers twine to the top of the ornament to make it look like it's hanging. 

Then I got out my Glimmer Hot Foil machine to create the thin band of black cardstock with the gold sentiment "and a Happy New Year" to add to the bottom of the card. I got the sentiment from Spellbinders Elegant Holiday Glimmer Sentiments

I added a sentiment on the inside of the card using black foil from the same Glimmer Hot Foil plate set that says, "from our family to yours". 

I added some shine lines to the truck using a white Gelly Pen, size 10. 

I glued the inside circle first so I could see where to line up the front ornament. Then I glued down the ornament and twine. I trimmed off the excess twine at the top. Then added the sentiment to the bottom, trimming off any extra cardstock from the sides. 

A tip when using vellum for a card. You have to be very careful what embossing folder you use. I had an issue with one card having the corner break off. I was able to glue it back on thankfully. Also, when you add the fold line in the card, don't press too hard with your bone folder. You could break the card in half. Vellum isn't like cardstock, it's not very flexible. 

Thank you once again for stopping by. Happy Crafting my friends!

Thursday, October 27, 2022

Christmas Wishes using Karen Burniston's Evergreen Pivot Panels

 Hello and welcome. I apologize for not posting anything the past few days, I have been fighting a cold and it's been kicking my butt, but I did manage to get a couple of things done. Today's card features Karen Burniston's Evergreen Pivot Panels die set. 

For this card, I made an A2 side fold card using a dark green cardstock. I die cut the pivot panel twice, once from red cardstock and once from a patterned paper from my Graphic 45 - Twas the Night Before Christmas paper pack. 

On the red cardstock pivot panel, I stamped the sentiments "We Wish You a Merry Christmas" and "'Tis the Season to be Jolly" using VersaMark Ink and embossed the sentiments with white embossing powder. 

I trimmed the top and bottom pieces from the patterned paper pivot panel (say that three times fast!) and glued it on to the red cardstock pivot panel. Once the glue dried, I made the folds for the pivot panel by folding towards me first and then back to get a good fold line. 

I die cut three pieces of patterned paper using Karen Burniston's Rectangles - Crosshatch and added Distress Ink in Antique Photo around the edges to give it an aged look. I also cut rectangles from a vertical stripped patterned paper from the same paper pack and added Distress Ink to the edges as well. 
I glued these smaller pieces to the ends of the base paper and added a thin strip of patterned paper in green to act as a border between the two pieces. 

I die cut a small rectangle piece from Karen Burniston's Rockin' Rectangle die set to give the sender a place to write a short message and added that to the right side of the card. 

I die cut the trees from three different green patterned paper and added them to the pivot panel. Once I put everything together inside the card, I added stickers that accompanied the paper pack. 

To see the video from Karen Burniston on how to put this pivot panel together click here

For the front of this card, I continued to use the same patterned paper, adding Distress Ink to the edges. 

I die cut a large oval from Karen Burniston's Ovals - Crosshatch die set using the same red cardstock as the pivot panel. I then die cut a smaller oval using an ivory cardstock and added Distress Ink to the edges. 

I die cut the word Christmas from Karen Burniston's Merry Christmas die and trimmed the word Merry from the top. I die cut this from the same green patterned paper as one of the trees in the pivot panel. I die cut the word Christmas from black cardstock twice then glued all the pieces together to give the word some dimension. 

I stamped the word "wishes" from MFT Bitty Holiday Wishes using VersaMark Ink on to black cardstock and embossed it with white embossing powder. 

I added another sticker from the paper pack and that finished the card. My favorite thing about this card is how it has a vintage look to it. Thank you so much for taking the time to stop by. I hope you have a great day and Happy Crafting!

Sunday, October 23, 2022

Coffee Friends with Karen Burniston's Coffee Cup Pop-Up

 Hello and welcome! Today's card features Karen Burniston's Coffee Cup Pop-Up and My Favorite Things BB Sweater Weather in the Woods. I bought the Coffee Cup Pop-Up a long time ago to make teacher cards and it's definitely one that gets a lot of use, especially end of school year. The stamp set from MFT is one that has been on my list for a while, and I recently purchased it along with a coffee shop card kit that I can't wait to play with. 

For this card I started with an A2 sized card using a dark brown cardstock. I die cut three green panels for the inside and front of the card. I stamped the coffee cup with the steam coming up and the coffee beans all over the green cardstock with a darker green ink. These images come with the Sweater Weather in the Woods stamp set. 

I cut a piece of dark brown card stock and a piece of light brown card stock to make an edge at the top and bottom of the card. I then added score lines to the light brown kraft cardstock to make it look like the cup sleave on the pop-up.  

I die cut a dark brown rectangle from Karen Burniston's Rectangles - Crosshatch die sets and then cut a piece from ivory cardstock to give the sender a place to sign the card. 

I stamped the images from the Sweater Weather stamp set using Pinkfresh Studios Detailed Black ink and colored them with Copic markers. 

I stamped the sentiment from the stamp set on black cardstock and embossed it with white embossing powder. 

I cut the coffee cup pop-up out of white cardstock and added some details using a Copic marker. I then cut the cup sleave from kraft cardstock and again, added details using Copic markers. 

I cut the coffee stirrer from green cardstock and added a pink background. Then I cut all the pieces to make the center piece that goes on the coffee cup. 

I added white cardstock to a sheet of double-sided adhesive and die cut the napkin out. This makes it very easy to add to the inside of the card. 

I added some of the stamped images to around the inside of the card. 

For the front of the card, I added the same details as the inside, only I added a little scene on the front. With my blending brushes and Distress Oxide Ink, I created a fall background. 

I stamped and die cut the trees from MFT Modern Trees and used Distress Oxide Ink to stamp the leaves on the trees. 

I added my stamped images and my stamped sentiment all from the BB Sweater Weather in the Woods. 

I just love how cute these little animals are. I live in Canada and these little guys make me think of my country. This will be a set that gets a lot of use. As always, thank you so much for stopping by. Happy Crafting!


Thursday, October 20, 2022

Penguin Fun with Karen Burniston's Bitty Ball Pop-Up!

 Hello and welcome! I know it's been a little while since I posted anything, unfortunately both my children haven't been well, so this past week and a bit has been busy. Today's card features Karen Burniston's Bitty Ball Pop-Up and the Animal Add-Ons 3, which gives you everything you need to make a pop-up penguin, reindeer or moose!

For this card, I started with 10 x 5 sized card using a dark green cardstock. I added a snowy background patterned paper and die cut some snow hills using Karen Burniston's Long Natures Edges

For the actual pop-up penguin, I started with black cardstock for the base of each Bitty Ball. I then die cut the trapezoid shapes from a shiny black and sparkly white cardstock. I used the shape die to make the curved sides around the face and body of penguin. I also used the second curved die to make the pointed piece on the top of the penguin's face. 

I used a glitter red cardstock to make the scarf and added that to the bottom Bitty Ball. I die cut the eyes and added Glossy Accents to each eye. Once that was dry, I added white shine marks with a size 10 white Gelly Pen. 

Karen Burniston makes putting this penguin together easy with an instructional video that you can view by clicking here

For the background on this card, I added these cute little penguins from My Favorite Things BB Holiday Penguins. I stamped these little guys using Pinkfresh Studios Hybrid Detail Black ink. Once dry, I colored them in using Copic markers. I added some glossy accents to the ornaments and some glitter gel to the bow on the gift. 

I used the sentiments with go with the Holiday Penguins and stamped them on the front and inside of the card. 

I die cut some snowflakes using a light blue cardstock and added them around the pop-up penguin. Then I stamped the "Merry Christmas" sentiment from MFT Bitty Holiday Wishes.  

I die cut the flap for the front to keep the card closed, using Karen Burniston's Flap & Closure

This is only my second time making a Bitty Ball Pop-Up and I really love how easy it is to make. If you also get Karen Burniston's Bitty Ball Double-Ups, you can cut down your die cutting time! 

There are so many neat add-ons for this die set and for the other pop-up ball sets as well. From pumpkins to Santa Claus, you can be inspired to make some of the most unique cards!

Thank you so much for stopping by today, I hope this inspires you to check out Karen Burniston's website and see all the amazing pop-ups you can create! Happy Crafting!

Tuesday, October 11, 2022

Gingerbread House Pop 'n Swap!

Hello and welcome! Today's card features Karen Burniston's Pop 'n Swap. This Christmas card also uses Karen Burniston's Gingerbread Tiny House Add-On, Winter Charms and House & Fence Pop-Up

To make this card, I started with an A2 sized card and trimmed two inches from the front panel of the card. This will allow you to see the top pop-up. For the front of this card, I used a diagonal striped Christmas patterned paper and added a white glitter trim to the top and bottom using MFT Stitched Scallop Basic Edges

I die cut Karen Burniston's "Merry Christmas" and its shadow using white cardstock and red glitter cardstock and added that to the front panel of the card. I added a small Gingerbread man and a small Christmas tree. 

I wanted to keep the front of this card simple because the inside has so many details. For the back part of this card, I added the same white glitter trim, but I added the little red and white candies to the top of the card. These came from the Gingerbread Tiny House Add-On. 

For the top part of this pop-up, I made a big Gingerbread man. I added the same glitter white to the icing on the arms and legs. I used a white Gelly Pen to the face and buttons. I added some little glitter gum drops to add some details to the background the Gingerbread man sits on. 

 For the middle panel, I added some color to the background using some Distress Ink and added the house from the House and Fence Pop-Up. I made the house look like a Gingerbread house, adding white glitter cardstock for the roof, windows and door frame. I added some details to the house using a white Gelly Pen. I added some gum drops to the bottom of the house and also added the candy canes to the door. I added some trees to the background from the Winter Charms, which I added some details using Copic markers. 

For the back of the front panel, I added the scalloped piece that comes with the Pop 'n Swap die set. I added the candies to the corners and stamped the sentiment "From Our Home to Yours" from MFT Bitty Holiday Wishes

For the bottom pop-up, I made a Gingerbread girl and added the same gum drop candies and same white glitter icing trim on the body. 

I really love how cute this card turned out. I have been wanting to make a Gingerbread house with Karen's dies for a while now and finally got the chance! As always, thank you for stopping by and Happy Crafting!


Friday, October 7, 2022

Fall Sunflower Surprise with the Magic Iris!

 Hello and welcome! Today's card features Lawn Fawn's Magic Iris Sunflower Add-On. This gorgeous add-on allows you to create a beautiful sunflower that can be used on its own or with the Magic Iris die set. 

For this card I started with an A2 sized card using Lawn Fawn's Ground Coffee cardstock. I die cut an orange background from MFT Orange Zest cardstock and the MFT A2 Stitched Rectangle STAX in the largest size. 

Then using heavy weight smooth white cardstock, I die cut the front panel with Lawn Fawn's Magic Iris Add-On dies. 

I then used the Lawn Fawn Fall Leaves Stencil and various Distress Oxide inks in fall colors and created the background that the sunflower will sit on. 

I die cut the sunflower out from yellow cardstock and with my Copic markers, added some detail to the flower. I used Lawn Fawn's Stitched Flower Frame to create the leaves around the sunflower. I die cut these from MFT Limelight cardstock and added some dimension with Copic markers. 

I die cut the word Grateful from Lawn Fawn's Scripty Autumn Sentiments twice from Ground Coffee cardstock and glued them together. Then I stamped the word Grateful with VersaMark ink and used gold embossing powder on top. 

I die cut a second sunflower using the Ground Coffee cardstock to make the center piece. I stamped the "You Make Me Smile" sentiment from Lawn Fawn's Magic Messages using VersaMark ink and embossed it with white embossing powder. 

I die cut the "sausage" pieces from the Magic Iris using the same Ground Coffee cardstock but cut the circular pieces from white cardstock. If I make this again, I will cut everything from the brown cardstock as you can see a bit of the white poking through, and I didn't like that. 

I just love how this card turned out. The Magic Iris die is one of my favorites and I have made several cards using it. It's just so fun to pull the arm down to reveal a message or image. 

Thank you so much for stopping by and Happy Crafting!

Thursday, October 6, 2022

MFT Slimline Challenge - Fall Things

 Hello and welcome! Today's card was made for the My Favorite Things Slimline Challenge. This challenge theme was Fall Things, so for this card I used BB Fall Friends stamp and die set. 


For this card, I made a slim line card with smooth black heavy weight cardstock. I cut a piece of white cardstock for the background. 

I cut a piece of MFT Limelight green cardstock and used MFT Slimline Grassy Hill dies to make the grass for the background on this card. I added some Mowed Lawn Distress Oxide ink to give the grass some depth. I used the MFT Cloud Stencil along with Distress Ink in Peacock Feathers to add the clouds to the background. 

For the trees on this card, I used MFT Modern Trees stamp set. I used Lawn Fawn Crunchy Leaf ink for the trunk and branches and various Distress Oxide inks in fall colors for the leaves on the trees. Then I die cut the trees out with the corresponding dies. 

I stamped out the images from MFT BB Fall Friends using Pink Fresh Studios Detail Black ink and colored them in with Copic markers. I added some details to the images with the Copic blending marker and a white Gelly Pen. 

I stamped the sentiment from the Fall Friends stamp set using the same black ink as I used for the stamped images. This was my first time using the MFT Modern Trees stamp set, and I was not disappointed at all! I just love the way the trees turned out. One tip I would give though would be to die cut the trees out from white cardstock first, then stamp the images on to the die cut pieces, as shown below. This way everything is straight and stamped in the correct spot. 

I used removable tape on the back of the sheet of cardstock to hold the die cut images. Then I lined up the trunk and branches stamp and stamped that with the brown ink. From there, I lined up the stamp with the leaves and then stamped that. 

This is a great technique that I learned from Jennifer McGuire on her amazing YouTube channel. It works like a charm, especially when you have flower stamps. They come out perfectly every time.

Thank you once again for stopping by and Happy Crafting!


Wednesday, October 5, 2022

Christmas Houses using Karen Burniston's House Pivot Panels

 Hello and welcome! Today's card features Karen Burniston's House Pivot Panels die. This die (like all of Karen's dies) can be used for all kinds of things, Halloween houses, Spring houses and it can also be added to the Twist Panel Pop-Up as well! 

For this card, I made an A2 side open card base with heavy weight white cardstock. I wanted this to be a simple design, because the focus should be on the houses. 

I recently picked up a few Christmas themed paper packs and I got one out for this card. This dark blue/gray cardstock comes from PhotoPlay - It's a Wonderful Christmas paper pack. This paper pack also came with a sheet of stickers, which I also used in this card. 

I die cut the background patterned paper with Karen Burniston's Rectangles - Crosshatch dies in the largest size. I cut 3 panels out, two for the inside of the card and one for the front. I then die cut, from smooth white cardstock, the snow and trees to go on the background. I used Karen Burniston's Outdoor Scene die to make this snow hill/trees background. 

I die cut the pivot panel mechanism from heavy weight smooth white cardstock as well as another pivot panel using the same patterned paper as the background. Then I carefully cut just the top part of the pivot panel out of the patterned paper and glued it using Lineco Neutral pH glue to the white pivot panel piece. I added this to the middle of the card, following Karen's instructional video on YouTube, which you can watch here

I die cut all the pieces for the houses from scrap cardstock I keep just for things like this. I went with red, green and brown houses, with black windows and shiny black doors. I used the door die to stencil on a white border around the two door panels using a white Gelly Pen. I also added snow to the bottoms of each house with a Gelly Pen. I added some of the stickers from the PhotoPlay - It's a Wonderful Christmas sticker sheet. 

For the front of the card, I continued the same pattern adding a Merry Christmas scripty sticker to the front along with the Snowman and cardinal. 

I just love how simple and clean this design is, but when you open the card, it has a surprise inside with the pop-up houses. 

Thank you once again for stopping by. I appreciate all your views and comments so much. Happy Crafting!


Tuesday, October 4, 2022

Karen Burniston October 2022 Designer Challenge!

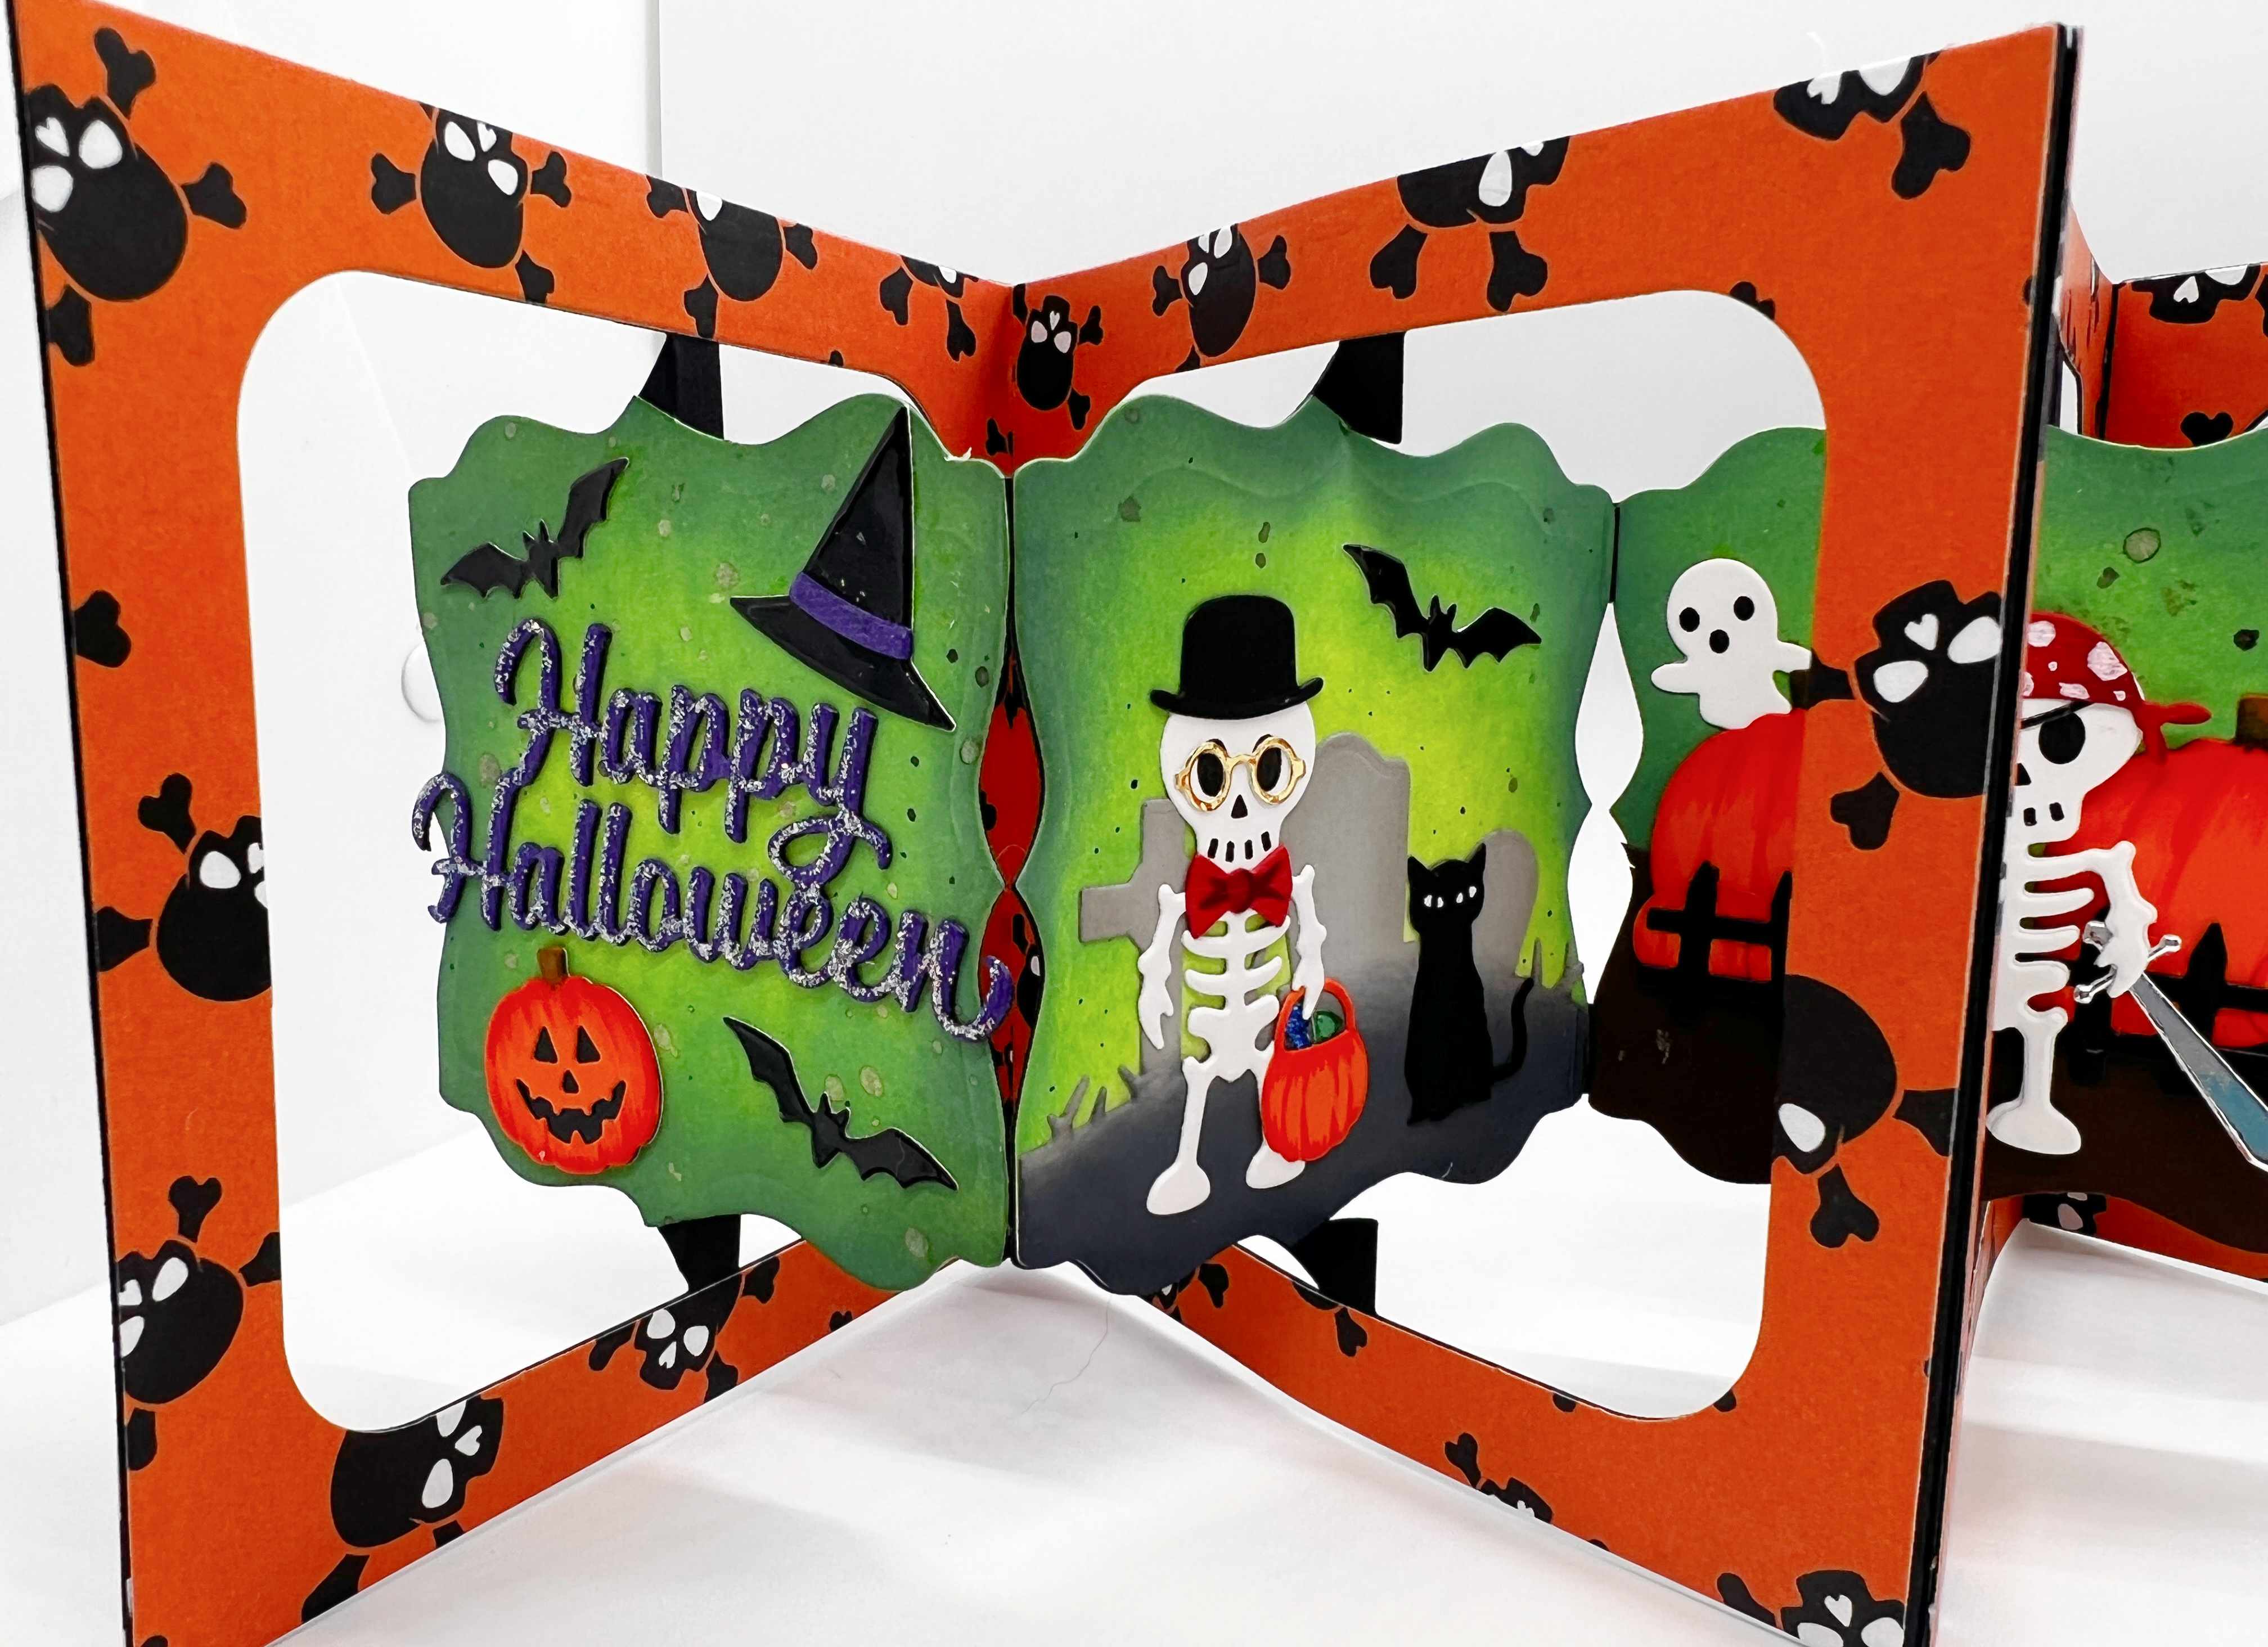
 Hello and welcome! I am excited to share with you my Karen Burniston October 2022 Designer Challenge card. Our theme this month was Halloween/Fall. 


For this card I used the following dies from Karen Burniston: Fancy Label Accordion, Holiday House, Halloween Scene, Halloween Elements, Happy Halloween, Skeleton and Bat, Tiny Accessories 1 and Haunted Tiny House Add-Ons

This was my first time using the Fancy Label Accordion die set and I really like how versatile it is! Christmas, birthday, doesn't matter because you can make a card for any occasion using this die. 

To start, I die cut all four panels from smooth black heavy weight cardstock. I then die cut five pieces using the skull and bones patterned paper. I cut what I didn't need so it left a frame for each panel. I then cut four inside pieces from smooth white heavy weight cardstock. 

For the front panel, I used Distress Oxide ink in Mowed Lawn and Rustic Wilderness to create the green background. I die cut the two bats from the Haunted Tiny House Add-Ons using a shiny black cardstock. I die cut the pumpkin from the Halloween Elements and added some detail using Copic markers. I die cut the witches hat using the same shiny black cardstock and added a purple band. I then die cut the sentiment "Happy Halloween" from black and purple cardstock, putting the purple on top and added glitter gel to add some sparkle!

For the second panel, I added the same background using Distress Oxide Ink. I die cut the skeleton from the Skeleton and Bat and added the costume using the Tiny Accessories 1. I die cut the graveyard background from Halloween Scene using gray cardstock and added some detail using a dark gray ink. I die cut the cat also from Skeleton and Bat from black cardstock and added the eyes using a white Gelly Pen. I added another bat cut from the same shiny black cardstock. I die cut the pumpkin basket for the Skeleton to carry his Halloween treats in and used the bowtie die to make candies for this trick or treater!

For the third panel, I made a pumpkin patch, using various pumpkins from different sets. I added the little ghosts from the Haunted Tiny House Add-Ons and colored the eyes and mouth in with a black pen. I added the fence and another skeleton, this time dressed at a pirate!

For the last panel, I made the house that is giving out the candy. I used the Holiday House and made it into a haunted Halloween house! I used the same green Distress Ink to make the green ooze that is coming out of the roof. I die cut a second set of roofs using black cardstock and cut what is used as snow off. Then I added it to the green roof, so it looked like green slime was coming out of the roof. I added glossy accents to the green slime to make it look really slimy! I added the Halloween lights in orange, green and purple. I made an orange wreath for the front door and added the pumpkin bucket by the door. I added the treats in different colors. 

I absolutely love how this card came out! There are so many fun elements and a great way to use all your different die sets! As always, thank you for stopping by and Happy Crafting!
 

Monday, October 3, 2022

Christmas Barn and Pop-Up Trees with Karen Burniston's Christmas Tree Pop-Up

 Hello and Welcome! Today's card features Karen Burniston's Christmas Tree Pop-Up and Barn Pop-Up. I was searching for ideas on Pinterest and came across a card that folded out with side panels attached. I thought, what a great idea! So, I made a 5x7 card, then added two panels 3.5 x 5 on each side. I wanted this card to have a vintage feel to it, so I went on a hunt for vintage looking Christmas paper. Low and behold I found the perfect paper, Graphic 45 - Twas The Night Before Christmas paper pack. 

To make this card, I started with some dark green cardstock and made a 5x7 card. I added two 3.5x5" panels to either side of the bottom part of the card. I added patterned paper to the inside of the card and the two flaps. Before I added the paper to the flaps and bottom of the card, I measured out where to put the pop-up Christmas trees and die cut the two little pieces that hold the trees to the card fold. 

I then made the barn, adding some Distress Ink in Vintage Photo and some Distress Ink in Black Soot to give the barn a worn-out vintage look. With Copic markers, I gave the white panels on the barn a worn look, then added everything to the barn. I die cut two trees from Karen Burniston's Tiny Trees Pop-Up, adding detail to them with Copic markers and gluing them into the card, beside the barn. I then added some white Nuvo Crystal drops to make snow. Unfortunately, the Nuvo drops absorbed the color from the edge of the paper and it became a brown color. So, I added white paint on top of it to get rid of the brownish color. 

I cut the trees from MFT Limelight green cardstock and added dimension using Copic markers. Again, I added Nuvo drops in white and white paint to the tips of the trees to give it a look of snow on the trees. Once dry, I added the brown cardstock bases to the card where I had cut the pieces that hold the tree to the card. I added the trees to both areas, then tested the card to make sure it folded down correctly. 

I added some strips of the patterned cardstock to the top and bottom of the card and larger pieces to the sides of the cards, cut with a scalloped edge. I used Karen Burniston's Ovals - Crosshatch dies to create a piece that you can use to sign your card. 

I also added some of the same patterned paper to the back of the two flaps so you can see it as you're opening the card. I kept the front simple, with a Merry Christmas in an Oval shape and continued the same patterned paper. 

I love the vintage look this card has. It's simple yet elegant. As always, thank you so much for stopping by and Happy Crafting!

Easter Scene using Karen Burniston's Landscape Rectangle Accordion!

 Hello Crafty Friends and welcome! My card for you today uses Karen Burniston's Landscape Rectangle Accordion, along with the Fence Add-...