Friday, June 30, 2023

Karen Burniston's New Twist Flower Pop-Up!

 Hello Crafty Friends and Welcome! Today's card features Karen Burniston's new Twist Flower Pop-Up accompanied by Hello Bluebird Bee Happy stamp set. 

For this card, I made a slimline sized card using a light green cardstock. I then cut a panel from a patterned floral paper for my background. 

For the inside of the card, I added a bright yellow panel to both sides. 

I added my pop-up mechanisms, cut from the same yellow cardstock as the card panels. 

I die cut three flowers from pink cardstock and added some dimension to them using Copic markers. I die cut the flower centers from a dark brown and lighter brown cardstock. 

I die cut the leaves from the same green cardstock as my card base, added some shading around the edges using Distress Oxide ink in Mowed Lawn. 

I die cut the daisy chain border in a sparkly white cardstock and added yellow centers to each daisy. Then I added them to the top and bottom of the card. 

I stamped the bee images from Hello Bluebird using Lawn Fawns Jet Black ink and colored them in using Copic markers. Then I die cut them using the coordinating dies and added the little bees to the flowers and to the right side of the card. 

I had to do some "word stitching" to create the Happy Bee-Day sentiment from some Karen Burniston Word Set words. I added a white rectangle so the sender can sign their name. 

For the front of the card, I used the same color scheme, including the daisy chain. 

I added the "Just Saying" sentiment from Karen Burniston's Word Set 15 - Just Because. 

I think the best part about this new die set from Karen Burniston is that you can use as many flowers as you want and they fit into a slimline card. 

I really enjoy making slimline cards and now I can also turn them into really neat pop-up cards! 

Thank you so much for stopping by and Happy Crafting! There is also still time to leave a comment on my Blog Hop post for a chance to win $25 in store credit at Karen Burniston.com! So be sure to post your comment, leave your name and email address for your chance to win!


Thursday, June 29, 2023

Flower and Bees Cards with Hero Arts!

 Hello and Welcome! Today's cards feature Hero Arts Honey Pot and Bees and Flowers die sets. I made four different cards using these die sets.

For my first card, I started with an A2 sized card base using smooth black heavy weight cardstock. 

I created two backgrounds using Hero Arts Bees and Flowers Bold Prints background stamp and Simon Says Stamps Pawsitively Saturated Ink in Seafoam and Surf. I started by inking the entire background with the Seafoam Ink, then I inked the edges with Surf to create a darker area around the background. I then stamped the background stamp using the Surf ink. 

I die cut the honey pot from Lawn Fawn's NO.2 Pencil Cardstock and added detail to the pot using various Copic markers. 

I die cut the flowers and bees from smooth white cardstock and then colored them in with Copic markers. 

I stamped the "have a Bee-youtiful Day" sentiment from Gina K Designs Beautiful Bees stamp set using VersaMark Ink and white embossing powder. 

I added some yellow and white bakers twine to the honey pot. I also added some foam dots to the back of the bees to make them stand out more. 

For my next card, I started with an A2 sized card base using smooth black heavy weight cardstock. 

I created the same background as the previous card, but this time I used Simon Says Stamps Pawsitively Saturated Ink in Bubblegum and Sweets. 

For this card, I added the die cut piece for the top of the honey pot that looks like a piece of cloth. I colored everything with Copic markers. I cut and colored the pot and flowers the same as the previous card. I added some glossy accents to the honey pot and honey dipper to make it look like honey was dripping off them. 

Lastly, I stamped the sentiment "Hello There" from MFT More Essential Sentiments using VersaMark Ink and white embossing powder. 

My next card is another A2 sized card from smooth black heavy weight cardstock. 

This time for the background, I used Simon Says Stamps Pawsitively Saturated Ink in Lemonade and Sunbeam. Then I stamped the background with Hero Arts Abstract Honeycomb Bold Prints and Lawn Fawn NO.2 Pencil ink. 

I die cut the honey pot and dipper from Lawn Fawn's NO.2 Pencil cardstock and added details to it using Copic markers. 

I die cut the fabric topper and bees from smooth white cardstock and colored them in with Copic markers. 

I die cut the word "honey" from Hero Arts Honey Pot die set, three times, twice from smooth black cardstock and once from a smooth shiny black cardstock. 

I stamped the sentiment "You Are the Sweetest" from MFT More Essential Sentiments using Lawn Fawn Jet Black ink. 

I added some glossy accents to the pot and dipper to make it look like dripping honey again, but this time I colored in the glossy area under the dipper to look more like honey. 

My last card, is a slimline card using smooth black heavy weight cardstock. For my background on this card, I used Simon Says Stamps Pawsitively Saturated ink in Lemonade and Sunbeam. Then I splattered black ink, NO.2 Pencil ink and a darker yellow ink. I also splattered some Copic white paint. 

Once the background dried, I added the sentiment "sending you" and the die cut piece "hugs" from Honey Bee Stamps Bitty Buzzwords. 

Then I added my flowers and honey pot. I colored everything as I did in the previous cards, only this time, I colored the flowers using various colors of pink. 

I added some twine around the honey pot and then glued everything down to the card. I added foam dots to the back of the bees to give them some dimension. 

I absolutely love how these cards came out. If you don't already own Hero Arts Honey Pot and Flowers and Bees, you need to add it to your craft stash! Thank you so much for stopping by and Happy Crafting!


Wednesday, June 28, 2023

Tag Book Pop-Up with Karen Burniston's New Fun Flowers!

 Hello and Welcome! Today's card features Karen Burniston's Tag Book Pop-Up along with the brand new die set from the June 2023 release called Fun Flowers!


For this card, I used a light yellow cardstock for the tag book. Then I added a light olive green cardstock as a complimentary color. I also added a pretty patterned paper as well. 

I die cut all the flowers from the Fun Flowers die set from heavy weight smooth white cardstock, then colored them all in using my Copic markers.

I die cut the butterflies that also come from the Fun Flowers set and colored them the same way. 


I die cut the sentiment "Hugs" from Word Set 14 - Hugs using a gold glitter cardstock. 

I added a couple of hearts, covering them with Glossy Accents to give them some dimension. 

For the front of my Tag Book, I added some more flowers and hearts. 

Then I die cut the "sending a smile" sentiment from the same word set and added it to the front of my Tag Book. This is a very simple card, but those new flowers just give this that little bit something extra! As always, thank you for stopping by and Happy Crafting. 

Tuesday, June 27, 2023

Pretty Kitty Birthday Card with Doodlebug Designs

 Hello and Welcome! Today's card features Doodlebug Designs Pretty Kitty stamp set. This adorable little kitty stamp set has several different stamps that would be great to make several different cards. 


For this card, I started with a A2 sized card base from Mermaid cardstock from Lawn Fawn. Then I die cut a rectangle using MFT A2 Stitched Rectangle STAX in the largest size and smooth white 110lb cardstock. 

With removeable tape, I created a base line. Then I stamped my images where I wanted them using the tape line as my floor line. I used Them O Web Gina K Designs Masking Paper to create my stamped picture. 

Once I had everything stamped and covered with the masking paper, I inked the background using Simon Says Stamps Pawsitively Saturated Ink in Lemonade. Then I stamped the paw background using an old MFT paw print background stamp and SSS Pawsitively Saturated Ink in Citrine. 

I removed the masking paper and colored all my images in using various Copic markers. Then added some extra detail with a white Jelly pen. 

I die cut a fancy border to go across the floor line. Then I stamped the "you're the cat's meow!" sentiment on the bottom. 

This stamp set it so adorable! I couldn't wait to make something with it. Thank you so much for stopping by and Happy Crafting!

Monday, June 26, 2023

Cupcake Accordion Card Using Karen Burniston's New Cupcake Add-Ons!

 Hello and Welcome! Today's card features the new Cupcake Add-Ons die set that is part of Karen Burniston's June 2023 new release. This add-on die set is for the Landscape Rectangle Accordion die set. 


This amazing die set comes with everything you need to make three cupcakes per panel, as well as the icing, cupcake wrapper and different toppings. Also included with this add-on is the dies to make the streamers!

For my card, I started by cutting out three Landscape Rectangle Accordion panels using 110lb heavy weight smooth white cardstock. From there I die cut trim to go around the panels using a birthday themed patterned paper I had in my stash. 

I die cut all the cupcake mechanisms in heavy weight black cardstock. I used black to make my cupcakes pop! I cut the wrappers in rainbow colors and cut the "icing" using a cream colored cardstock. 

With a blending brush and various colors of Simon Says Stamp Pawsitively Saturated inks that correspond with my wrappers, I added some dimension to them. Then I added a shine line with a white Gelly Pen. 

Then with my Copic markers, I added some shadowing to my icing. From there I added the cupcake decorations, some had sprinkles, some cherries and the ones with no extra decorations, I added some glitter gel to them. 

I set them aside to dry. Meanwhile, I cut out a small rectangle to add to the end panel for a place to sign the card. I used one of the rectangle pieces from the Tag Book Pop-Up, adding a pink border that matches the pink cupcake!
Once my cupcakes were dry, I glued them down to the black background pieces. Then I added my stamped sentiment, from MFT Sugar Coated Sentiments to the front panel of the card. 

I added green cardstock to the center panels on the first and last rectangles on this card. I also die cut several streamers in the same rainbow colors and added them to my card, added glitter gel to them as well. I had to trim the first and last panels to add the cupcakes to them and I tried to trim along the edge of the cupcakes so it looked better. 
I just love how this card turned out. It's such a neat surprise for the recipient. Thank you so much for stopping by and as always Happy Crafting! Be sure to check out the entire new release at www.karenburniston.com


Friday, June 23, 2023

Karen Burniston - KB Riley LLC June 2023 New Release Blog Hop!

 Hi Crafty Friends,

Welcome to our Karen Burniston Products - KB Riley LLC June Release Blog Hop. The Design Team have come together with Karen today for a fun blog hop to celebrate the release of 9 new dies. Sneak peeks of the new release started earlier in the week, and the dies are available to order NOW!


This release includes:
  • 2 new Charm Sets
  • 1 new Word Set
  • 2 new Add-on Sets
  • 3 new Pop-up Die Sets
  • 1 stand alone Die Set
Dies are available to order now on the website.
GIVEAWAY:
To celebrate the release Karen Burniston and each of the Karen Burniston - KB Riley LLC Design Team members will be giving away a $25 Gift Certificate to some lucky person who comments on our blog posts, so make sure you join the hop and comment on everyone's blog post. Winners will be randomly chosen from ALL of the blog hop comments received on our blog posts by Friday,30th June 2023. Lots of chances to win some goodies, so just leave a comment on this post or any other blog hop posts to enter! Don't forget to leave some way for us to contact you, in case you are a lucky winner!
My card for this Blog Hop uses the brand new Fence Add-Ons! 

For this card, I started by die cutting three Landscape Rectangle Accordion panels from 110lb smooth white cardstock. I used a pretty blue patterned paper and created a border to go along each panel. 

I then die cut the fence panel twice from the same heavy weight smooth white cardstock. I added some detail shadow to the fence with a Copic marker. I also die cut a scalloped panel from the Short Rectangles - Crosshatch die set from patterned paper and then a smaller rectangle from the same set in white cardstock. 

I glued the Landscape Rectangle Accordion panels together. Once they were in place, I added the blue patterned paper borders to each side. Then I started to die cut all my little pieces that I wanted to add on to my card. 
I started with two trees from the Tiny Trees Pop-Up die set. I used Ground Coffee cardstock from Lawn Fawn for the tree and Limelight cardstock from MFT for the leaves. Then I used Mowed Lawn Distress Oxide Ink and a blending brush to add some dimension to the leaves on the tree. 
Then I die cut the dog house using the Tiny House Pop-Up and the Doghouse Tiny House Add-On. I had to trim some of the dog house down and add a roof. Then I used a white Gelly Pen to create the lines on the dog house. I die cut the bone out and added the name to the bone before gluing it on the dog house. I also die cut the bowl and bone as well as the dog from the Doghouse Tiny House Add-On. 
I die cut the second dog from the Cat and Dog die set. I used a cream cardstock for this dog and with my Copic markers, added patches and details to this dog, like I did with the first dog. I added  his little bandana and with a white Gelly pen added some polka dots to it. 

Then I die cut out the grass from the Natures Edges die set and with two different colors of green ink, I added some dimension to the grass. 

From there I started cutting out the flowers and plants. I used the flowers from the Tiny Tree Pop-Up and from the new Fun Flowers Die set as well as the flowers that come with the Fence Add-On die set. For those ones, I turned them into bushes instead of the tall pretty flowers that they can be made into. 

Once I had all my pieces cut and colored using Copic markers, I began to place them where I wanted them before I glued anything down. 

Once I had them where I wanted them, I glued them down using Lineco Neutral PH glue. 

I die cut the "Just Sitting Here" and "Thinking of You" sentiments from Word Set 10 - Thinking of You. I added them to the card and then I glued the inner panels together to create the accordion. 

Thank you so much for joining the Karen Burniston June 2023 New Release Blog Hop! To head to our next amazing designer, click the link below. You will find a list of our Design Team members and links to their blogs. Also please be sure to leave your name and email address so we can contact you if you are the lucky winner of the $25.00 gift certificate!!

Jennifer Webster - You are here

Thursday, June 22, 2023

Karen Burniston Sneak Peek Week Day 4 - Game Charms

 Hello and Welcome! Today's card features the new Game Charms die set. This awesome set comes with dies to create chess pieces, dice, small playing cards, poker chips and a pool cue and 8 ball! For my card today, I create a pool table card. 

For this card, I started with a 5x7 card base using a heavy weight black cardstock. 

I used the Rectangles and Labels - Crosshatch die set to create the edge around the pool table. 

I glued down a piece of green felt first. Then I added foam tape to the back of the pool table edge I created. I punched out black circles and cut them to create the pockets on the table. 

I didn't just want one pool ball, so I dug out my Mini Alphabet and Numbers die set to create different pool balls, including solids and stripes. I looked up the correct numbers and colors so it was accurate. I added some gloss lines on the balls using a size 10 white Gelly Pen. 

I die cut the pool cues, adding details with Copic markers. Then I die cut the "Happy Father's Day" sentiment from the Happy Fathers Day die using holographic cardstock.

For the inside of the card, I used the Little Labels Pop-Up die set. I added some green paper to continue with the pool table theme and added different pool balls again to each little label. 

I die cut the word "Dad" using the Alphabet die set and the same holographic paper. I stamped and die cut the sentiment "you're the best" using VersaMark Ink and white embossing powder on smooth black cardstock. 

I added a few more little stamped details and an area to sign the card. 

I can't wait to create another card using the Game Charms dies. My parents both play cards at our local Legion, so I think I playing card card is in order! 

Thank you so much for stopping by for my last Sneak Peek day. Tomorrow is our Blog Hop so be sure to stop by and leave a comment so you can be entered to win a $25.00 gift card for Karen Burniston.com!! Happy Crafting!

Wednesday, June 21, 2023

Karen Burniston Sneak Peek Week Day 3 - Small Scenes Bam Box Pop-Up

 Hello and Welcome! Today's card features the new Small Scenes Bam Box Pop-Up. This new set comes with four small little scenes for any theme, such as snow, grass, water or just a small hill! This also includes a smaller bam box pop-up, which is perfect for those smaller details you want to pop-up. 

For my card, I wanted to create a picnic surrounded by fruit trees! It was the perfect excuse to finally use the Tree Fruit dies. 

I started with a A2 sized card using smooth white heavy weight cardstock for the base. I then created a cloud background for the sky and used the Natures Edges die to create a grass hill in the background. 

Then I die cut four trees using the Tiny Trees Pop-Up. I added some texture to the trees using Distress Oxide ink in Mowed Lawn. 

I then die cut several apples and peaches, adding details to each fruit with my Copic markers. I added two trees to the background of the card and added the fruit. 

Then I die cut two small Bam Boxes from the new Small Scenes Bam Box die set using the same green cardstock as the background. 


I added the two other trees to the front of each bam box and then placed a grassy "scene" over the base of the tree. 

I added the fruit and the tire swing to the trees. Then I die cut some little flowers from the Tiny Trees die set. I added some detail to them using Copic markers and then glued a couple on to the small grassy mound. 

I figured out where I wanted to place the bam boxes and then glued them down to the base of my card. 

For the base of my card, I used the same green cardstock, adding dimension to it with Distress Oxide ink in Mowed Lawn. 

I created the picnic scene using the Picnic Elements die set (another one I've never used before) and added some extra fruit I had die cut so it looked like whomever is having the picnic just picked the fruit fresh from the trees. I added a couple of ants, because what kind of picnic would it be without a few ants? 

I added details to all my die cuts using my Copic markers. I added some more little flowers to the base of the card. Then once I had everything in place, I used some glitter gel on the peaches and some glossy accents on the apples to create some dimension. While that dried, I created the front to my card. 


For the front of my card, I found some pretty floral patterned paper and added that for the background. 

I die cut two ovals using the Ovals - Crosshatch dies to create a frame for the center of the card. 

I added another tree to continue my theme and added the "Hello" from the Hello die. To create the backdrop for the Hello sentiment, I added yellow and pink Distress Oxide ink (Squeezed Lemonade and Worn Lipstick) to a piece of scrap white cardstock, then die cut the background out. 

I added the other sentiments from different word sets, adding heavy weight black cardstock behind the sentiments to not only add dimension but to make the words a little firmer. I just love how this card turned out, from the fruit on the trees, to the surprise you get when those Bam Boxes pop up, to the little picnic happening on the grass. 

Thank you so much for stopping by for Day 3 of Sneak Peek week. Be sure to return tomorrow for another sneak peek card. Don't forget to join us on Friday for Blog Hop Day! You could win a $25.00 gift certificate to spend at Karen Burniston.com! Happy Crafting. 


Tuesday, June 20, 2023

Karen Burniston Sneak Peek Week Day 2 - House of Cards Pop-Up

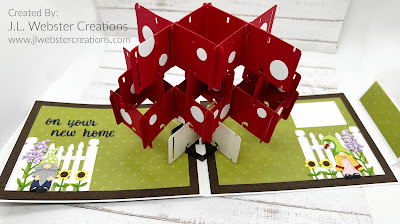
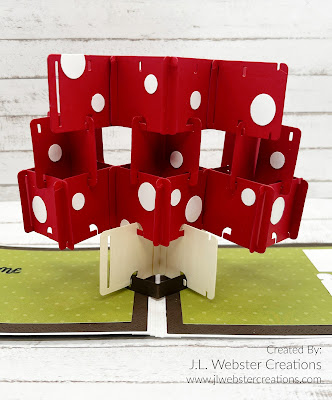
 Hello and Welcome! Today's Sneak Peek made me gasp when I first seen it. This incredible die set will create a house of cards or in my case, it made me think of a mushroom house for a little gnome family! 


For this card, I started with two 5 x 7 panels of smooth white heavy weight cardstock. I added a piece to create a spin and then created a small flap adding magnets to create the closure for this pop-up card. 

From there, I added some dark brown cardstock to the inside and the front of the card. I found some pretty green patterned paper and used that for the inside and front as well. 

I added two small fence pieces from the new Fence Landscape Accordion Add-On and also some of the flowers from that new set. Then I added my little gnomes. 

I had to stitch some words together to create my sentiment for the inside of this card. But once I had everything in place, I started building my mushroom house!

I had to die cut everything twice because my paper was very thin. Once I had all the pieces glued together, I started building. It was relatively easy to build and if you make a mistake, it's easy to take apart and correct, then put back together. Once I had my house all together, I added white dots in three different sizes to the red mushroom top. I used three different circle punches to create this. 

Once I had everything done on the inside, it was time to work on the front of my card. 

I added some more gnomes and more flowers using the new Fun Flowers die set. 

I also added the Congratulations sentiment from the new Word Set 17 - Congratulations. 

I can't wait to see what you come up with for the new House of Cards die set. Be sure to come back tomorrow for my next sneak peek card featuring another amazing new set from the Karen Burniston June 2023 New Release. 

Happy Crafting!


Monday, June 19, 2023

Karen Burniston Sneak Peek Week Day 1 - Baking Charms!

 Hello and Welcome! Are you as excited as I am for the new Karen Burniston June 2023 release? Well I know I am and I am also super excited to start my Sneak Peek week with this card using the new Baking Charms. 


For my card, I wanted to create a kitchen themed pop-up to use with the new Baking Charms die set. So I created a pop-up gnome using the Bitty Ball Pop-Up along with the Mini Ball Add-On 1 - Gnomes to create my little pop-up baker!

I added the oven mitts (which is from the new Baking Charms) to her little hands and then die cut a spatula from the new die set to add to her hand. 

I created a card base that is 5 x 5 with a 1/4 in center spine. I added a flap using the Flap and Closure die set. For the inside of the card, I used some patterned paper I had on hand to create the wood looking floor and the walls. 

From there I created a round floor mat to go under my Gnome baker using the Circles - Crosshatch die set. 


To create the kitchen cabinets, I used the Squares - Crosshatch dies to create the door on the cabinets. Then I cut a thin piece of gray cardstock to create a counter top. 

I die cut the bowl, spoon, rolling pin and whisk from the new Baking Charms and added detail to them using my Copic makers. 

I then glued them down on the counter top using my Lineco Neutral PH glue. 

Before I added my little Gnome baker, I wanted to create the front of the card. I added some small magnets to the flap and to the front of the card and glued them down. Then I covered the front with a baking themed patterned paper. I added some additional squares of paper and added the word "Sweet" using the You're Sweet die set, only cutting off the You're part. 


I stamped the sentiments "Have a" and "Birthday" using VersaMark ink and white embossing powder to black cardstock and added it to the front of the card to create the sentiment. 

Once I had everything ready, I glued down my baker Gnome and my card was finished! I was super excited about the baking charms, because in my free time I love to bake. These will be great for Christmas themed cards! 

Thank you so much for stopping by on Day 1 of Sneak Peek week. Be sure to stop by tomorrow for another peek into the Karen Burniston June 2023 New Release! 

Happy Crafting!


Thursday, June 8, 2023

Friendship Card with Lawn Fawn's Garden Before 'n Afters

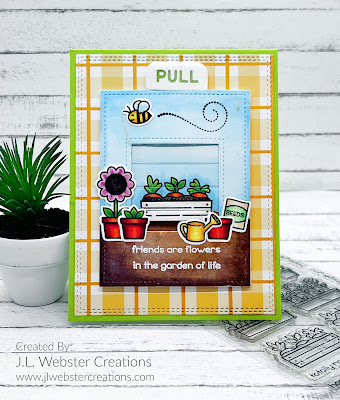
 Hello and Welcome! Today's card is a cute interactive card using Lawn Fawn's Magic Picture Changer along with their Garden Before 'n Afters stamp set. 

For this card, I started with a A2 top fold card using MFT's Cardstock in Limelight

I used a pretty yellow patterned paper for the background from a paper pack I purchased recently called Fun on the Farm by Echo Park. I thought this splash of yellow would go well with the green cardstock. 

With a pencil, I drew the area with the picture changer so I knew where to stamp my before and after images. I tried to make sure both images were in the same position so when you pull the tab they look the same. 

Once I had my images stamped, I colored everything in with my Copic markers. 

I then die cut the frame around the picture changer using Lawn Fawn's Magic Picture Changer Add-On and following the images I stamped on the picture changing insert, I created the sky and ground to match what I had made in the picture changer. I colored this in with Copic markers as well. 

I stamped a few images from the Garden Before 'n Afters stamp set as well as the little bee from Lawn Fawn's Berry Special stamp set. I colored these in with Copic markers and die cut them out using the coordinating dies. 

Before I added the extra images, I stamped the sentiment on the front using VersaMark Ink and white embossing powder. 

Then I added the images I stamped and die cut to the front, being careful not to get glue on the picture changer mechanism. 

I did a test pull to make sure everything worked well and it did! Lastly I added a bit of scrap green cardstock to the pull arm and added the "pull" tab on the end. 

I just love how great these cards turn out, how simple they are to make and just how much fun it is to pull the tab and watch the picture change! 

Thank you so much for stopping by today and Happy Crafting!


Tuesday, June 6, 2023

Karen Burniston Designer Challenge - June 2023 - Wedding or Baby!

Hello and Welcome! It's Designer Challenge time once again and this months theme is Wedding or Baby! For my card, I used the Surprise Cube Pop-Up to create baby blocks.  

For this card, I started with a card base of 5 x 10 3/4. I created a 1/4 in folding point in the center to make room for the blocks. 

I added the flap using the Flap & Closure die set and made the "buttons" on the flap and front along with bakers twine to create a closure for the card. 

I added patterned paper I had from a baby themed patterned paper pack. 

For the blocks, I used 80lb smooth white cardstock and added blue and white to each block. I used the Alphabet dies to cut out the word baby in a sparkly blue cardstock.

I also added some baby themed die cuts to the other sides of the blocks using the Baby Charms die set.  

I had a star shaped die set and cut several different sizes of stars out in different colors of blue cardstock that I had in my scraps. 

I die cut one big star and used Honey Bee Stamps Inside: Welcome Baby Sentiments to create the sentiment on the large star. Then I used Distress Ink in Peacock Blue to add some color to the edges of the star. 

I tried to keep the background and the front of the card simple, because the pop-up blocks are really the center focal point in this card. 

I double checked twice the positioning of the blocks before gluing them into the card base, ensuring that they would fit perfectly. 

For the front of the card, I kept it simple, using the Rectangles - Crosshatch to created squares and Lawn Fawn's Little Bundle stamp set to create the baby images and sentiment. 

Thank you so much for stopping by and Happy Crafting


Monday, June 5, 2023

Baby Bear Pop-Up

 Hello and Welcome! My card today uses Karen Burniston's Katherine Label Pop-Up along with these adorable baby bear dies from Studio Light - Bear Friendz


For this card, I started by making a card base using 80lb smooth white cardstock. Then I dug out an old baby themed patterned paper pack and found this perfect cloud paper. I used Karen Burniston's Rectangles - Crosshatch to die cut out three rectangle panels. 

For the inside of the card, I die cut the pop-up mechanism from a scrap of blue cardstock I had on hand and glued it inside of the card. Then I die cut the label from the same patterned cardstock as the inside of the card. 

I assembled the little bear in the blanket using scraps of cardstock and added some details with my Copic markers. I checked the placement before gluing the bear down and once I had him placed where I wanted him, I glued him to the pop-up mechanism. 

I used Karen Burniston's Welcome die and Mini Alphabet dies to create the Welcome Baby sentiment. Then I added a place to sign the card using Karen Burniston's Hexagons - Crosshatch dies and some smooth white cardstock. 

I used Honey Bee Stamps Inside: Welcome Baby Sentiments to stamp and cut the little sentiment under the bear. 


For the front of the card, I used the same patterned paper. I added a little bear only holding a blanket and with a pacifier in his mouth. As I did with the bear on the inside, I added some details to the bear with Copic markers. 

I stamped another sentiment from Honey Bee Stamps and used the coordinating dies to cut it out, then placed it under the bear. 

How adorable are those little bears!! Thank you so much for stopping by and Happy Crafting!

Sending Sunshine Birthday Card

Hello Crafty Friends and welcome!! My card for you today was created using Karen Burniston's Spinner Square Pop-Up. I made this card for...