Wednesday, December 21, 2022

Gingerbread Pop-Up Gift Card Box

 Hello and welcome! Today's card features Karen Burniston's Bitty Ball Pop-Up and Pretty Springy Ball Box template. I have been very busy trying to make these gift card boxes with fun pop-ups and when I found a Gingerbread patterned paper, I had to make a Gingerbread pop-up!

I started with the Pretty Springy Ball Box template for the 4.5 x 4.5 box. I used a heavy weight 110lb kraft cardstock and Gingerbread patterned paper. 

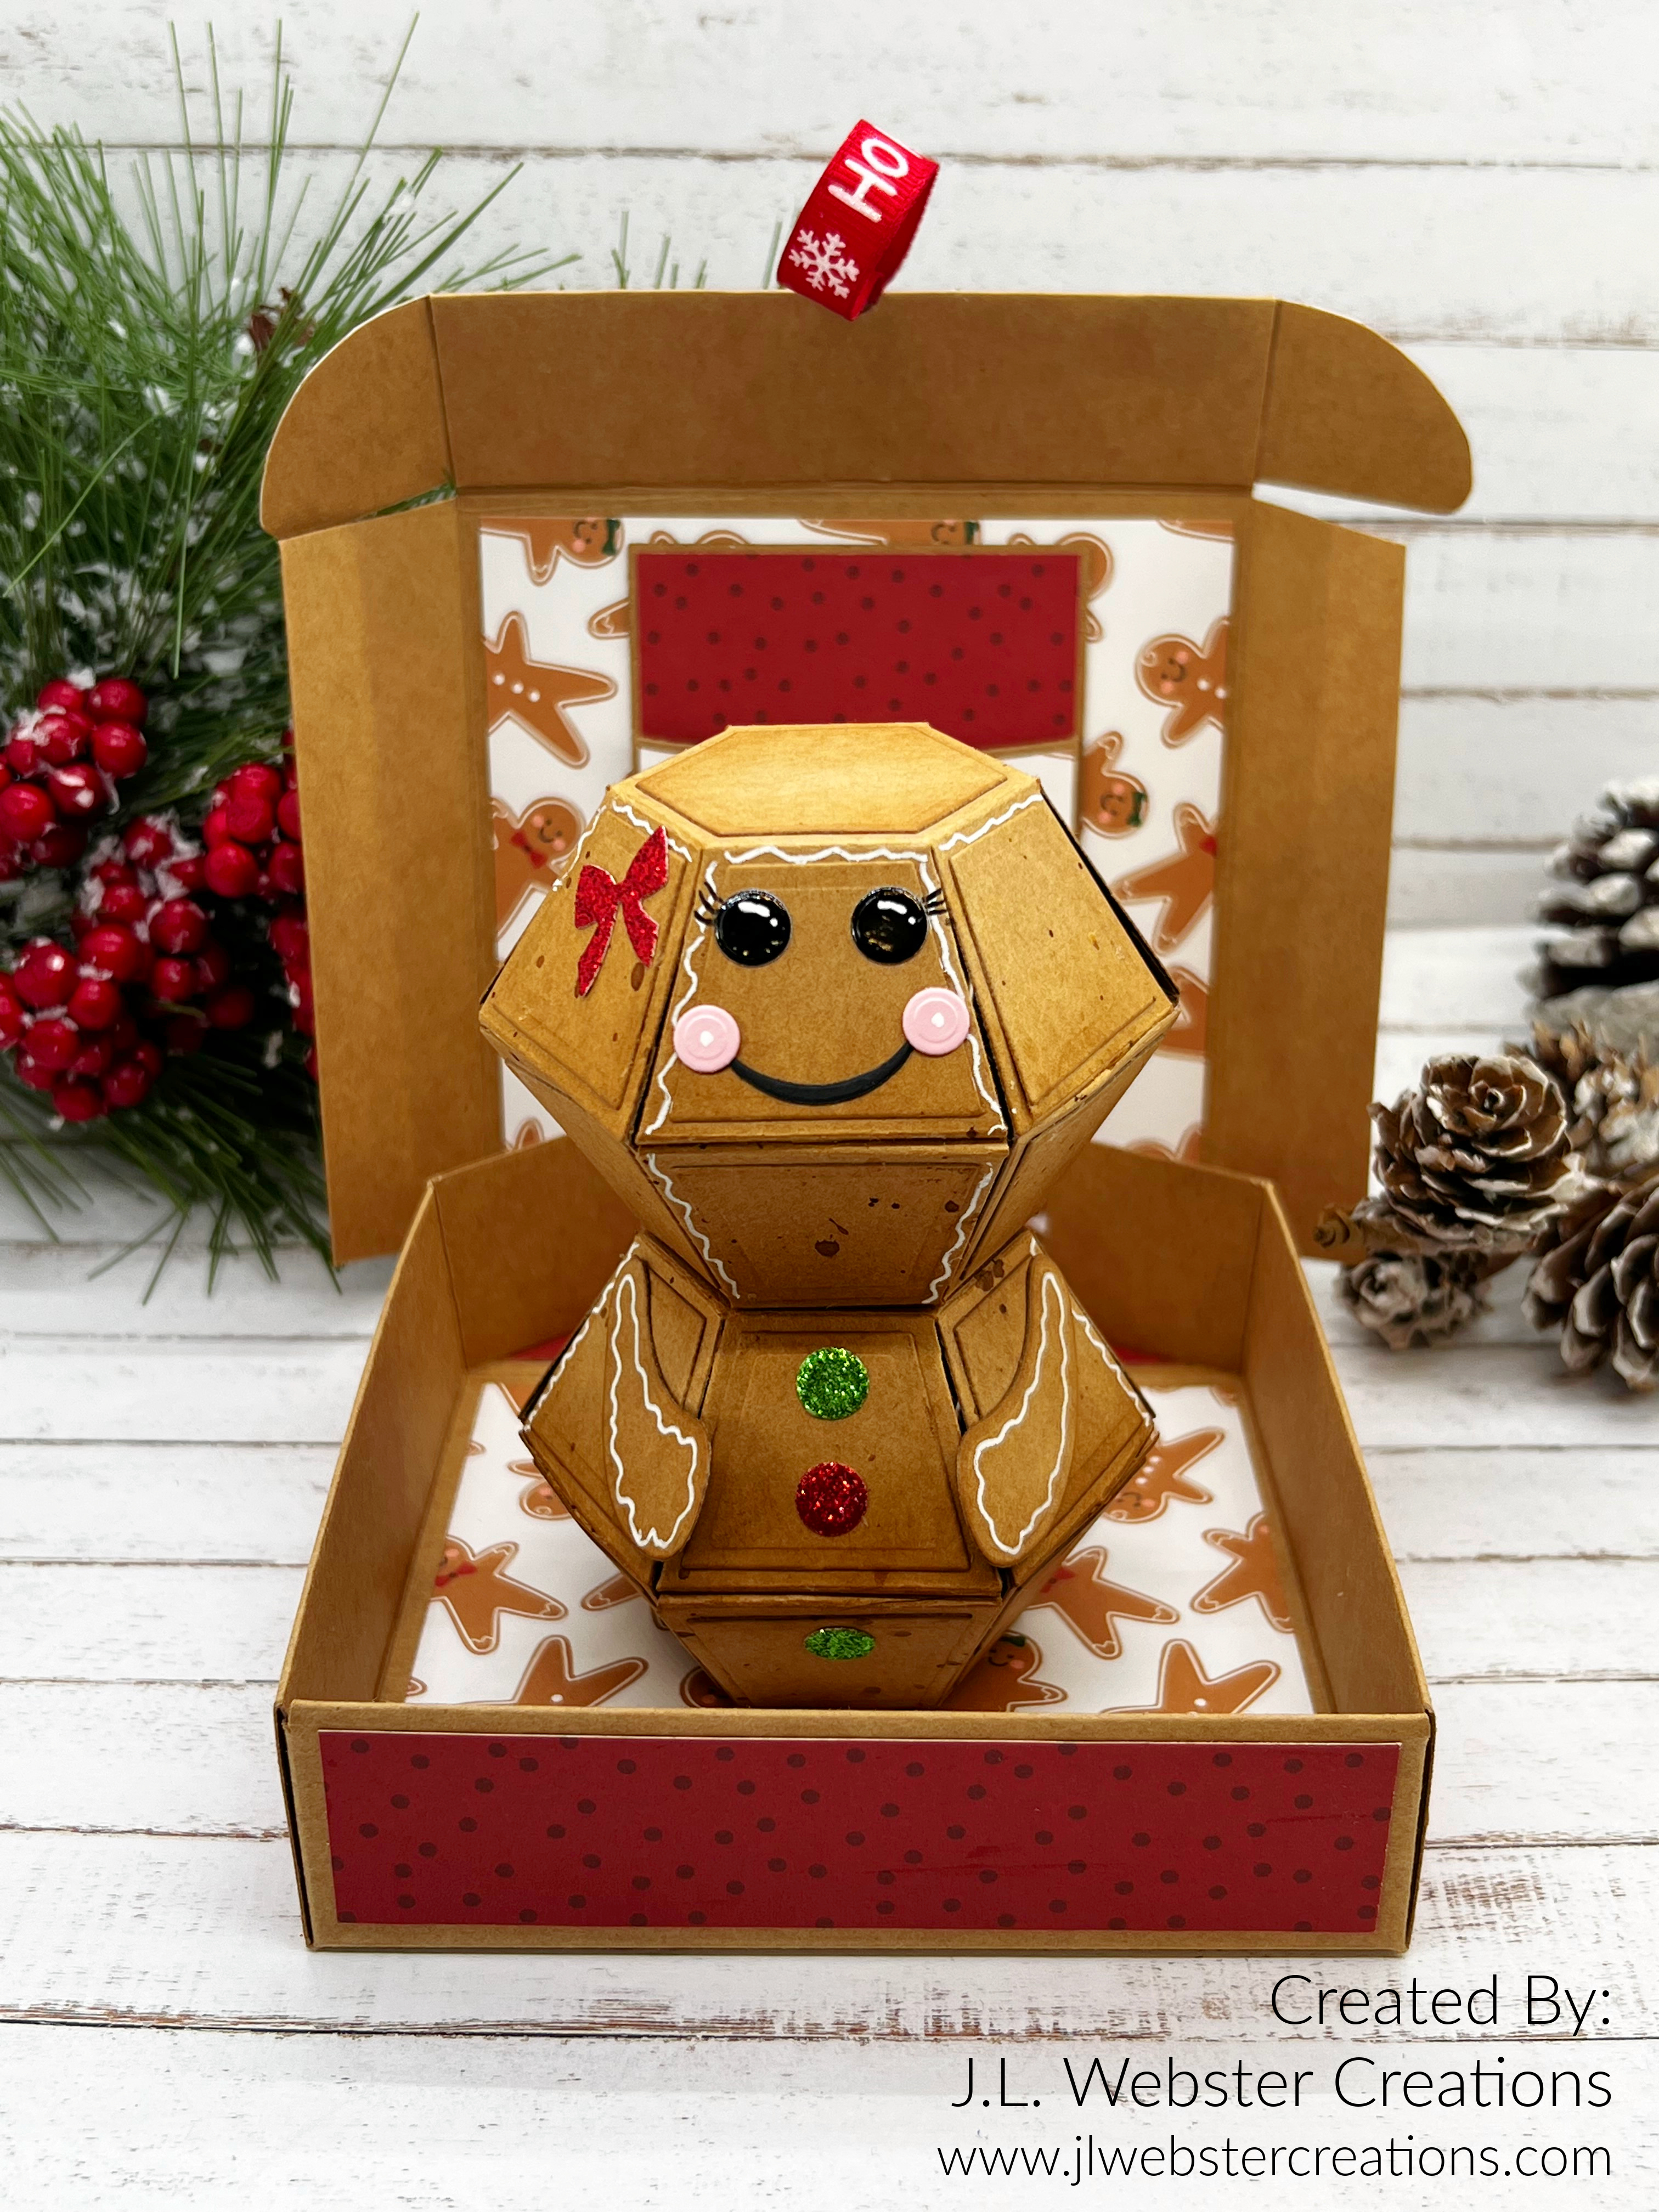
Once the box was created and ready to go, I started on the pop-up Gingerbread girl. I used the Bitty Ball die set and the same heavy weight kraft paper to create the two bitty balls. 

Before I put the balls together, I laid them flat and flicked different colors of Distress Ink to create a baked cookie look. Then, with a blending brush, I added Distress Ink in Vintage Photo along the edges. 

Once I glued the two balls together, I used the die from the Snowman Add-On's, that creates the buttons for the snowman to create the eyes and candy buttons for the Gingerbread girl. I used the smile from the Bitty Ball die set and the eyes die to create the blush on her cheeks. 

I also used the arm pieces that come with the Bitty Ball and die cut them from Kraft cardstock. I added Distress Ink in Vintage Photo around the edges and used my Gelly Pen to create an icing trim around the arms. I also added an icing trim around the Gingerbread body. I die cut a glittery bow and added it to her head. Then I glued her into the box using Lineco Neutral pH glue

I die cut a gift card holder using My Favorite Things Gift Card Pocket and the same kraft cardstock and patterned paper. 

I created a to and from piece to add to the front of the gift card pocket using a program called Adobe Illustrator on my computer. I printed it on heavy weight smooth white cardstock and die cut it out using a small rectangle die from one of Karen Burniston's other sets. 

I love how this cute little Gingerbread Girl turned out. I really hope the recipient of this card likes it as much as I do! 

As always, thank you so much for stopping by and Happy Crafting!


Monday, December 19, 2022

Fireplace Pop-Up and Holiday House Card

 Hello and welcome! Today's card features Karen Burniston's Fireplace Pop-Up and Holiday House die sets. Since the Fireplace Pop-Up came out, I've only used it once to make my "Haunted Mansion" Fireplace Pop-Up card. Now with Christmas just around the corner, I am making cards for family and decided to make a Christmas card using the Fireplace Pop-Up. 

For this card, I started with an A2 sized card using a smooth red cardstock. One thing I love about using Karen's dies is I can usually go through my scrap cardstock to die cut the small pieces. Well this time I was able to use scraps for the wallpaper background and floor. I cut a piece for the wall trim using a dark brown cardstock. 

For the fireplace, I used a light gray cardstock and added some dimension using Distress Oxide ink in Black Soot around the edges of the fireplace. I was going to make the Santa boots come out of the fireplace, but I really wanted to add a fire and no one wants to set Santa on fire (lol) so I decided to scrap the Santa boots and went with a fire. I die cut it out of white cardstock and colored it with Copic markers. I used Karen Burniston's Fireplace Extras 1 and Fireplace Extras 2 to create all the added elements, such as the garland on the mantel, the wreath and the candles. I used scrap cardstock for all the small pieces. 

I used a piece of cardstock with little pictures of Santa and Frosty to create the photos on the wall of this room. For the "rug" I used Karen Burniston's Oval - Crosshatch dies. 

For the front of this card, I used Lawn Fawns Stitched Ripple Backdrop die and a light blue cardstock. Then I used scrap pieces of cardstock to make the holiday house. I also used Karen Burniston's Outdoor Scene die to make the tree/snow background. I used my Copic markers to color the trees in the background. 

I used My Favorite Things Bitty Holiday Wishes to stamp the sentiment on the front of the card. 

I just love how the fireplace came out. I find it easy to put together and with all the little extras, you can make your fireplace pop-up just POP! 

If I don't post anything later this week, I want to take this time to wish each and everyone of you a wonderful holiday season, Merry Christmas and all the best for 2023. Thank you so much for visiting my blog and as always Happy Crafting!


Tuesday, December 13, 2022

Christmas Gift Card Pop-Up!

 Hello and welcome! Today's card features Karen Burniston's Parcel Pop-Up die set. I have only just purchased this set and once it came I knew I had to make a gift card pop-up card. With Christmas coming, both my kids have asked for gift cards, so I made this for my daughter.

As this was my first time using this die set, I did what I always do and looked up the assembly video from Karen Burniston, which you can view by clicking here. Karen's assembly videos are full of great tips when it comes to putting her pop-up dies together. Also, at the end she usually showcases different cards made by herself and the Design Team. 

So I got the idea for this style of card based on her video. This is a 5x5 card, cut from a light blue heavy weight cardstock. I made the front panel of this card clear so you could see inside it. 

To make the flaps that hold the card closed, I used Karen Burniston's Flap & Closure. I added a white glitter washer for a festive look to the closure and used a light blue and white twine. 

I used patterned paper from this super cute paper pack that I have used a lot this year. It's from Doodlebug Designs and it's called Winter Wonderland


For the Pop-Up gift box, I added some polka dot paper from the same pack and added a bow and ribbon using metallic blue cardstock. 

For the Polar Bears, I used BB Polar Bear Pals from My Favorite Things. I stamped the images using Pinkfresh Studios Detail Black ink on Neenah Classic Crest 110lb smooth white cardstock. I colored the Polar Bears using Copic markers and made the scarves keep in the same color theme as the gift box. 

I die cut the smallest rectangle from Karen Burniston's Rectangle - Crosshatch die set and stamped the "I Come Bearing Gift" sentiment from the Polar Bear Pals stamp set. 

I added the two Polar Bears to the front of the parcel using Lineco Neutral pH adhesive. I was going to add more Polar Bears to the clear front of the card, but they would have blocked the inner bears. 

For the clear front of this card, I used a Merry Christmas sentiment from Lawn Fawn and a banner die from Lawn Fawn as well to create the scripty sentiment. 

The end result is a super cute pop-up gift card holder that I think my daughter will just love, probably more what gift card she's going to get, but still. 

This was my first time using this type of closure and at first I thought it would be complicated, but it was really simple and makes a great closure. 

Thank you so much for stopping by to visit my blog today. I hope you find some crafty inspiration! Happy Crafting!

Monday, December 12, 2022

Karen Burniston - KB Riley LLC December 2022 New Release Blog Hop


Hello Crafty Friends!
Welcome to our Karen Burniston Products - KB Riley LLC December Release Blog Hop. The Design Team have come together with Karen today for a fun blog hop to celebrate the release of 11 new dies. Sneak peeks of the new release started last week, and the dies are available to order NOW!


This release includes:
  • 2 new charm die sets
  • 1 new stand-alone die set
  • 2 new Tiny House Add-Ons sets
  • 2 new Pop-up die sets
  • 1 new Woven Box Basket die set
  • 2 new Crosshatch die sets
  • 1 new Box die set
Dies are available to order now on the website.
GIVEAWAY:
To celebrate the release Karen Burniston and each of the Karen Burniston - KB Riley LLC Design Team members will be giving away a $25 Gift Certificate to some lucky person who comments on our blog posts, so make sure you join the hop and comment on everyone's blog post. Winners will be randomly chosen from ALL of the blog hop comments received on our blog posts by Monday, 19th December 2022. Lots of chances to win some goodies, so just leave a comment on this post or any other blog hop posts to enter! Don't forget to leave some way for us to contact you, in case you are a lucky winner!

For my card I used the new Church and School Tiny House Add-On to create this super cute School house card. 

I used a combination of new windows and windows from the Tiny House Pop-Up to create my School House. 

I wanted my school to have some super cute students, so I dug out as many animal dies that I had and created a dog, lion, giraffe and fox using the following die sets:
Of course, the students need a teacher and whoooo better than Mr. Owl! I created this owl using the Feathered Animals die set. I used some of the Tiny Accessories to add glasses, hats and bow ties to my animals. 


To make the students pop-up when you open the card, I used the new Bam Box Pop-Up dies to create two Bam Boxes and glued my students to them. I also used the new Banners - Crosshatch dies to create a place to add a signature or note to the recipient. 

I added some books and apples from the new Bookworm die set and glued them to the students and around the inside of the card. 


For the front of the card, I wanted to keep it simple and continue the school theme. I had a school themed paper pack and used that to create the card front. 

I die cut the Bookworm from the new set, adding a book to for him to read. I also added a stack of books and an apple to the right side. 

I added details to the book worm using Copic markers and added the ABC on to the front of the book. 

Thank you so much for stopping by for our Blog Hop Day celebrating the new December 2022 release. To check out the next Design Team member, click the link below. Be sure to leave a comment with your name for your chance to win some great prizes!!

Happy Blog Hop Day and Happy Crafting!


Jennifer Webster <<< you are here

Friday, December 9, 2022

Karen Burniston Sneak Peek Week - Dog House Tiny House Add-Ons

 Hello and welcome to the last day of Sneak Peek Week! I am so excited to share this card with you that features the new Dog House Tiny House Add-On! 

This was actually one of the first cards I made with this new die set. This is a 5x7 sized card. 

I wanted to give my dog a yard to be in, so I added some apple trees from the Tiny Trees Pop-Up die set. 

Then I wanted to create a pond for my little dog, so I cut out a piece of blue cardstock and used the MFT Perfect Pool Water stencil to create the look of water in the pond. I die cut some stones from Karen Burniston's Tent Pop-Up and added some detail to them using Copic markers. 

From there I created a red dog house with a gray roof, which I sponged a darker gray ink on to using the die as a stencil. 

I made the dog a Dalmation named Fido. I added dimension to the dog bowl using Copic markers. 

I then die cut a place to write the sentiment to the recipient using the new Banners - Crosshatch dies. 
Then I added the "make a wish" and "celebrate" sentiments from Word Set 2 - Birthday. 

As if the Tiny House Add-Ons couldn't get much better, we get a dog house add-on that just takes the cake! I can't wait to see all the amazing creations from the Pop-Up Peeps! 

Don't forget to stop by on December 12th for New Release and Blog Hop Day! We will be giving away great prizes and hopefully inspiring you with the amazing cards from our Design Team! Thank you so much for stopping by and Happy Crafting!


Thursday, December 8, 2022

Karen Burniston Sneak Peek Week - Surprise Cube Pop-Up

 Hello and welcome to day 4 of Sneak Peek Week for Karen Burniston's December 2022 Release. Today's card features the new Surprise Cube Pop-Up! This die set has everything you need to create fun pop-up cubes that can be used for any occasion!

For my card, I needed a card base that would be able to hold the boxes down, so I followed the instructions on the video Karen Burniston made for Removable Characters (click here to see that video). 

I used a heavy weight light purple cardstock to match with the theme of my patterned paper. The patterned paper I chose is from a paper pack I got that has got a lot of use this year! I've used the Doodlebug Designs "Winter Wonderland" patterned paper for several cards. For this card, I used the yeti paper. 

To make the Surprise Cubes, I die cut three different patterned cubes. I added a white background then die cut little pictures of the Yetis. I built all the boxes first and set them aside. 

I created the card base, adding coordinating patterned paper here and there. I added a place to sign the card on the flap enclosure and stamped the Merry Christmas sentiment using MFT Bitty Holiday Wishes and Pinkfresh Studios black detail ink. 

For the front I die cut the letters to make the word "Yeti" using Karen Burniston's Alphabet die set. 
I printed out the "Are You" and "For Christmas". 

How fun is this card with those Suprise cubes? These could be used for any kind of card and there are so many fun charms dies that you could use on the front of these cubes. 

Thank you so much for stopping by and Happy Crafting!


Wednesday, December 7, 2022

Karen Burniston Sneak Peek Week - Wedding Charms!

 Hello and welcome to Day 3 of Sneak Peek Week for the new Karen Burniston December 2022 New Release! I am so excited to show you another great card, this time using the brand-new Wedding Charms dies. For this card, I used Karen Burniston's Label Charm Pop-Up die set along with the new Wedding Charms. 

This new set comes with a bride and groom, a pair of champaign glasses, a set of wedding rings and the "Best Wishes" sentiment. 

For this card I started with an A2 side fold card using an off-white smooth heavy weight cardstock. Using Karen Burniston's Rectangle - Crosshatch dies in the largest size, I cut three panels using this beautiful wedding paper from Echo Park - "Just Married". 

I die cut the front panel die from the Label Charm Pop-Up (which is the one that turns when you open the card), but first I measured the center point so that I positioned the die exactly in the middle. I then measured the center point for two of the patterned paper panels so that when I die cut the patterned paper it would fit perfectly on the front and inside panel of the card. 

Once I added all the pieces of patterned paper, I then created an outer edge to go around the cut out on the front and inside panel of the card. I used a pink cardstock that was similar to the pink of the patterned paper. I had to do this by hand because there isn't a die in the Label Charm set that allows you to do with the larger die cut. You can with the smaller die cuts, but not the largest. 

I then die cut the inside pieces that attach to the front label. I used the back side of the patterned paper I used for the background of the card. I glued these into the card with Lineco Neutral pH glue which you can get through Karen Burniston's online store. 

I then die cut some center pieces, one for the middle "label charm" and one for the mounted label charm. These pieces have a really nice, pierced look around the edges which I really like! Just gives them a little extra decoration. 

I then die cut out all my Wedding Charms. For the bride and groom, I die cut the brides dress from white cardstock and glitter cardstock. For the groom's tux, I die cut the tux in black and red and then the small piece for the shirt in white cardstock. I trimmed the bow tie from the red cardstock piece and added it to the black tux. 

I die cut the Champaigne glasses from heavy weight vellum and added glitter gold for the liquid part. 

On the front of the card, I added the wedding rings, which I die cut from gold cardstock and white glitter cardstock for the diamond. 

I die cut the "Best Wishes" sentiment from white glitter cardstock and black cardstock and glued them together to make the sentiment pop out and add some dimension. 

I die cut some hearts that come with the Label Charms Pop-Up set and added them around the card. 

This is a simple yet elegant card that will be perfect to give the special couple on their big day! These Wedding Charms can be used on any pop-up card or even for an engagement or anniversary card! Thank you so much for stopping by and Happy Crafting!! 


Tuesday, December 6, 2022

Karen Burniston December Designer Challenge - Fireplace Die Through the Year

 Hello and welcome once again to the Karen Burniston Designer Challenge. For December we were each asked to pick a theme and use the Fireplace Pop-Up Die. I chose Beach/Summer for my theme and came up with a tiki beach hut using the Fireplace Pop-Up Die as well as several other fantastic dies from Karen Burniston. 

For this card, I started with an A2 size card base made from smooth white cardstock. Then using the Rectangles - Crosshatch dies in the largest size, cut 3 pieces from 110lb smooth white cardstock. Two of these pieces were used to create the beach theme on the inside and one was for the front. 

For the inside of the card, I created a beach and sky using various Distress Oxide inks. I added flecks of browns using Distress ink spray. 

I die cut the main "fireplace" front and with a blending brush added some detail to it. Then I die cut three pieces using the mantel die. I cut one side of the mantel pieces to create the thatched roof of the tiki hut. I then added details with Copic markers. 

I die cut the flip flops from the Beach Charms set and added the seashells on the beach from the Tropical Scene die set. I created a turtle and crab using the Sea Animals die set. 

I used the vine from the Monkey and Lion die set and added little flowers to it using the flower die from the Tiny Trees Pop-Up. For the background, I made the sun from the Tropical Scene set and the two palm trees came from the Palm Tree Pop-Up. I added details to everything using my Copic markers. I die cut the word "enjoy" from Word Set 6 - Summer, twice using yellow cardstock and black heavy weight cardstock. I glued them together to give the word some dimension and to bulk up the cardstock as it was very thin. 

For the front of the card, I wanted to keep it simple, but still carry on the same theme. I die cut the waves and small beach hill with the palm trees on it from the Tropical Scene set and added the shark from the Sea Animals set. Then I die cut the words Hello and Sunshine from Word Set 6 - Summer. I cut the words three times each, once using colored cardstock and twice from black. This really makes the words pop out. I didn't put a lot of detail on the front because the inside of the card is the real surprise!

There are so many unique ways to use the Fireplace Pop-Up die and this is just one of many! I look forward to seeing all your creations on the Pop-Up Peeps Facebook page. Thank you for stopping by and Happy Crafting!

Monday, December 5, 2022

Karen Burniston Sneak Peek Week - Wide Woven Basket Box Card

 Hello and welcome to day 1 of Sneak Peek Week for the new Karen Burniston December 2022 release. I am starting this week with this box card using the new Wide Woven Basket Box Card die set. 


For this box card, I made an Easter themed card. To make a rectangle shaped box card you will need Karen Burniston's Woven Basket Box Card die set which you can purchase from her online store. If you just want to make a square shaped wide woven box card, then you only need the new die set. 

For this card I made a rectangular shaped box. I used a light blue gingham patterned paper to look like fabric woven through the basket. 

I die cut two trees from the Tiny Trees Pop-Up and added flower blossoms on the trees to give them a spring look. 


I used the Spring Animals die set to create the bunnies and chicks. I added some Easter eggs from the Easter Charms die set. I also used the "Happy Easter" sentiment on the front of the basket from the Easter Charms die set as well. I added details to the die cuts using Copic markers and Distress Oxide inks. 

At first, the woven box looks intimidating, but it's a very simple die set to use. I can't wait to give this box card to someone special next Easter! Get ready for our Blog Hop on December 12th to celebrate the new release! You could win a prize and see some wonderful card ideas from our awesome Design Team! I look forward to sharing more cards this week for Sneak Peek week! Thank you for stopping by and Happy Crafting!

Easter Scene using Karen Burniston's Landscape Rectangle Accordion!

 Hello Crafty Friends and welcome! My card for you today uses Karen Burniston's Landscape Rectangle Accordion, along with the Fence Add-...