Thursday, February 16, 2023

Karen Burniston Sneak Peek Week Day 4: Eggstra Amazing Easter Card!

 Hello and welcome to Day 4 of Sneak Peek Week! Today's card features the new Little Twist Panel Pop-Up die along with the Spring Animals and Alphabet dies. 


For this card, I started with a slimline card (8.5x3.5) using a light purple 100lb cardstock. I dug through my patterned paper and found this pretty spring/Easter patterned paper, which I used for this card. 

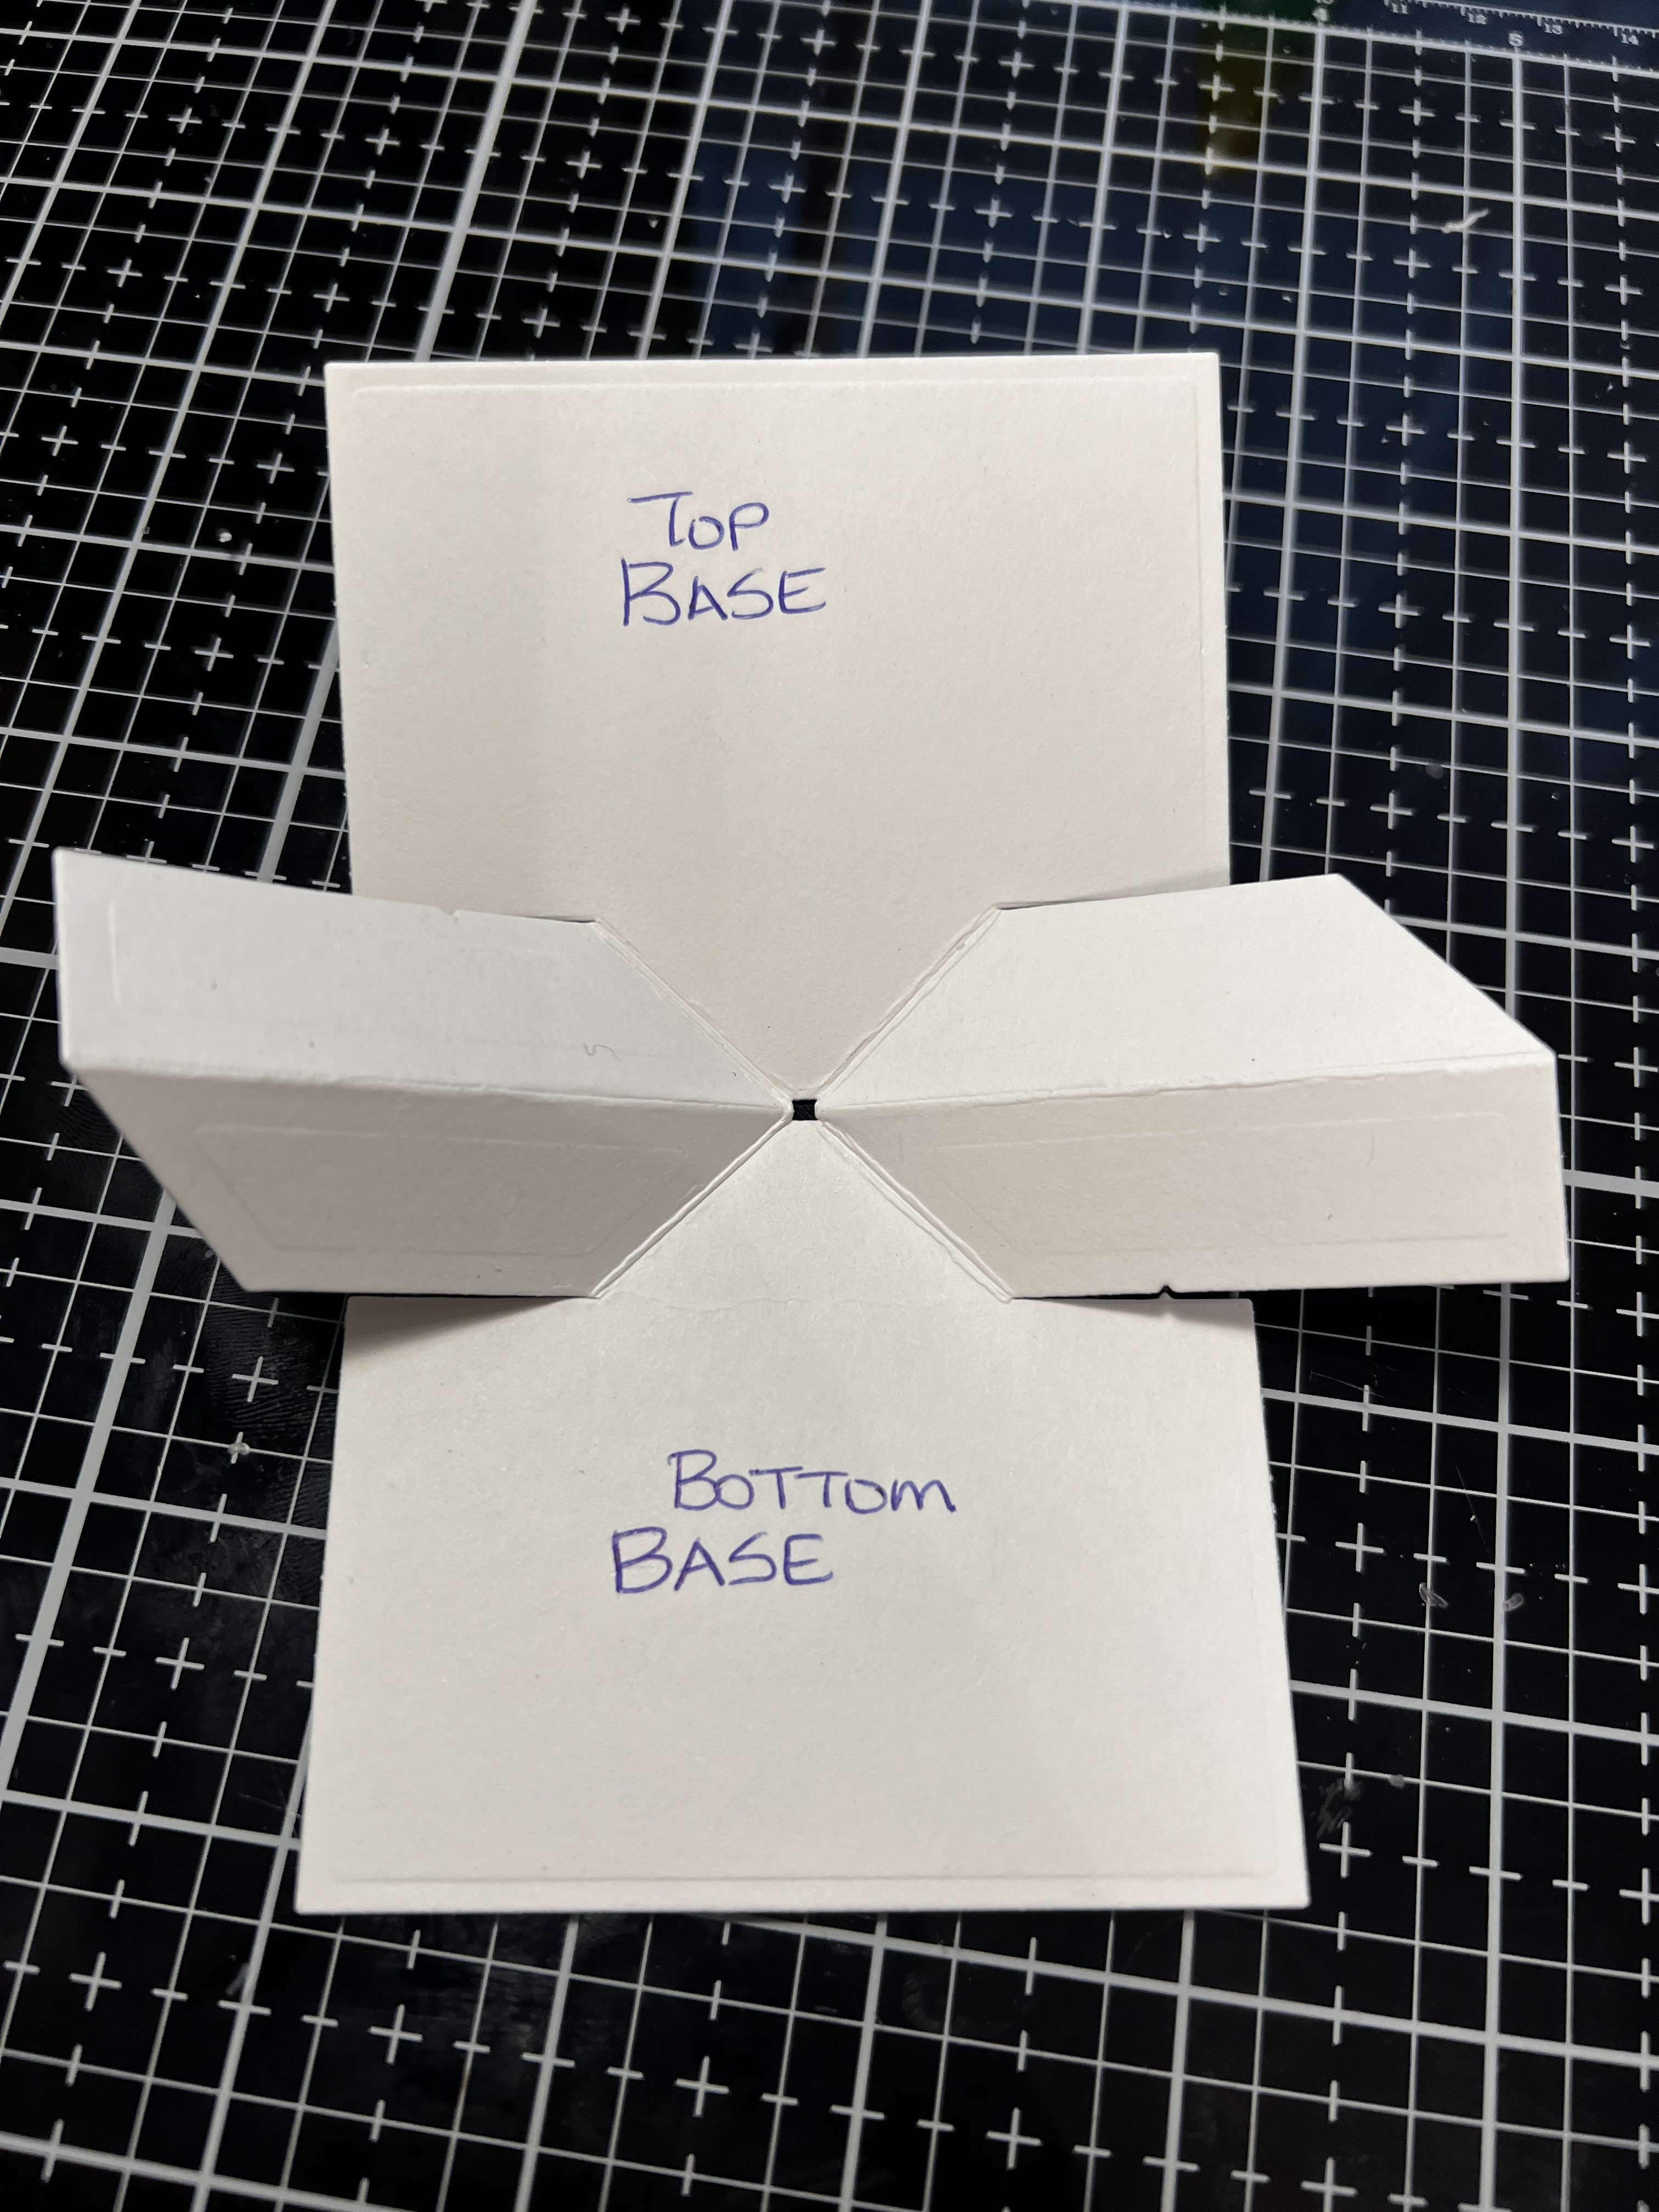
When you make a card with the Little Twist Panel Pop-up, you may want to cover the "base plate" on the mechanism (as shown below). 

So what I did in my card (thank you to my fellow Design Team member Nicky for the advice!) was put down the patterned paper I wanted to use on to the card base. Then I glued the mechanism inside the card, which I cut out from the same purple cardstock as the card base. To do this you will need to fold the mechanism down and butt the pointed edge up to the fold in the card. Then glue down one side and then the other. Once the mechanism is glued into the card, cut a strip of paper from the same pattern paper you used as the background and glue it down over the mechanism. This will leave an edge, which is easily hidden with a border. In my card, I used the flower border from the Long Natures Edges 2 die set. 

Once you have the everything in place, then you can start adding the middle piece, which goes between the two rectangles that hold the bunnies and the chicks. This is a long rectangle shaped die with two slits in it that make the cut outs needed to add the little banners. Or you could leave it without the banners and add more decorative paper. The die set comes with the exact sized dies to do this. I chose to use the banners for my card. You will need to add the banner to the die cut before you glue it into your card. Once you have it ready to go, add double sided adhesive to the arms of the mechanism (just like you do when you make the Twist Panel Pop-Up). There are notches in the arms to show you how far along the arm the tape goes. Add the middle panel to the arms. Then I added the panels with the bunnies and chicks. 

I die cut the bunnies and chicks and added some detail to them using Copic markers. I also die cut out some eggs and added them to the bottom of the card and smaller eggs to the banner in the card. 

I die cut the word "Eggstra" from the Alphabet die set, using a light blue cardstock and black cardstock. I glued them together to give the word some depth. Then I stamped the sentiment "Hope It's" and "Amazing" from Lawn Fawn's Eggstra Amazing Easter stamp set. 

I'm sorry if my instructions aren't very helpful. I am hoping to soon be making videos on how I make my cards soon. I am very happy with the end result of this Easter card. It's bright and vibrant. I just love the little critters. Thank you so much for stopping by and Happy Crafting!

Wednesday, February 15, 2023

Karen Burniston Sneak Peek Week Day 3: Stitch Bitty Ball Pop-Up!

 Hello and Welcome! Todays card was made for a very special kid. My best friends Daughter who just recently turned 11. She loves Lilo and Stitch and so when my bestie asked for a card to give her daughter, the first thing I thought of was a pop-up Stitch! 

I started with the Bitty Ball Pop-Up. I had some scrap cardstock that looked close to the color of Stitch. I luckily had just enough to make him. 

I cut out the belly pieces with a lighter cardstock and added a bit of "fur" the edges of his belly. 

I created the ears by hand, adding a small tab at the base so I could fasten them to the head. I also created the nose and colored in the black nostrils using a Copic marker. 

I cut two pieces and drew out the eye shape and cut them out with my scissors. Then I cut out two black circles to create the pupils. 

I used the die that comes with the Bitty Ball to create the arms. I used the small flower die that comes with the Label Charms Pop-Up and with a dark blue cardstock cut out the petals. I turned them around and used them to create the little nails on Stitches hands. 

I created his little feet and used foam squares to hold them to his body. I tried having them stick out but it didn't look right. 

I added his little tuft of hair on top, adding a fold line so it would flatten along with the pop-up. 

For the card base, I made a 5x5 sized card using heavy weight white cardstock. I added a sky background with ocean waves from Karen Burniston's Tropical Scene and the Palm Trees from the new release coming out February 20th!

I die cut the "Make a Wish" sentiment from Word Set 2 - Birthday Die Set from red cardstock and added it to the base of the card. 

How stinking adorable is Stitch! I can't wait to see how the birthday girl likes her card! Thank you so much for stopping by and Happy Crafting!


Tuesday, February 14, 2023

Karen Burniston Sneak Peek Week Day 2 - 5x7 Rectangles - Crosshatch

 Hello and welcome to the start of our Sneak Peek Week for the new Karen Burniston February 2023 release! I am so excited to share with you this Valentines Day card, featuring the new 5x7 Rectangles - Crosshatch. 

To create this card, I used the smallest circle die in the Circle - Crosshatch die set to create the cookies. I used heavy weight Kraft cardstock. 

For the cookies with the heart center, I used one of the heart dies in the Heart Pivot Panels to die cut the heart out of one Kraft cardstock circle. Then I glued the top piece to another circle and filled the heart in with Glossy Accents. I added a fine red glitter to the heart and let it dry. Once dry, I dusted of the remaining glitter. Then I used Distress Ink in Vintage Photo to create some dimension around the edges of the cookie.

For the cookie that is chocolate dipped, I cut out a dark brown circle and drew a wonky shape around to look like icing. Then I added Distress Ink around the edges of the cookie and glued the "chocolate" icing to the top. I added Glossy Accents to the chocolate. I die cut out the banner from the Big Birthday Charms using red glitter cardstock and while the Glossy Accents was still wet, added the banner to look like icing.

To make the vanilla iced cookie, I repeated the same steps as the chocolate dipped, only I used a cream colored cardstock and added some detail using Copic markers. Then I added some tiny red hearts, like sprinkles. 

I used My Favorite Things Essential Sentiments to stamp the sentiment on the front of the cookie box. I used VersaMark ink and white embossing powder. Then I die cut the xoxo from Karen Burnistons Word Set 9 - Love using a white glitter cardstock and glued it just beneath the sentiment. 

For the box itself, I die cut the first three 5x7 dies in red, brown and white glitter cardstock. Then using the fourth die, I cut out the center piece. Using double sided tape, I added a piece of heavy weight acetate to create the open part of the cookie box. I die cut a brown piece using the second 5x7 die and added that to the bottom of the cookie box. I added foam tape to the top of the cookie box to give it some dimension and so it wasn't resting on top of the actual cookies. 

For the inside of the card, I kept it simple and used the Katherine Label die to create a pop up that says "love you". I added the two small kraft cardstock hearts that came out of the cookies and die cut the love you in the same brown cardstock. 

I added a simple oval shaped area to sign your name or leave a little love note to the recipient using the Oval - Crosshatch dies. 

I just love how this card turned out!!! Those cookies came out amazing! Thank you so much for stopping by and Happy Crafting!


Monday, February 13, 2023

Karen Burniston Sneak Peek Week Day 1!! - Rectangles and Labels Crosshatch

 Hello and Welcome to Day 1 of Sneak Peek Week for Karen Burniston's February 2023 New Release! I hope you're as excited as I am! Today's card features the new Rectangles and Labels - Crosshatch die set. So this amazing die set gives you Rectangles that will fit a 5x7 card and Label dies so you can add a frame around the Label Charm Pop-Up!! I am so excited about this one because before I was hand drawing it and fussy cutting it out and I don't know about you, but I don't like fussy cutting at all! Lol. 


For this card, I used a A2 side fold base and I used the Label Charm Pop-Up along with the new Labels Crosshatch die set (to be released on February 20th!!). I also used the Wine Charms to create this fun Wine themed Birthday card. 

For the base, I used kraft cardstock. Then using the Rectangle - Crosshatch die in the largest size, I die cut three cream cardstock backgrounds. For the front of the card, I used Distress Paste and my MFT Small Brick Wall stencil to create a realistic brick wall background. 

I used the same stencil and made a similar background inside the card, only this time I used Distress Ink in Vintage Photo. 


I cut out the frames from the new Labels - Crosshatch set using the same kraft cardstock and added them to the card. I die cut the Wine Charms using Neenah Classic Crest Smooth White cardstock and using Copic markers and Prisma Color Pencil Crayons, created the wine bottles and wine glasses as well as the grapes to add to the card. 

I used the MFT Good Time to Wine stamp set to add the sentiments to my card, which worked perfectly with the Wine Charms! 

This card is simple but elegant and would be perfect for anyone who likes wine! Thank you so much for stopping by on Day 1 of Sneak Peek week. Come by tomorrow for a new card using dies from the new February 2023 Release. Thank you for stopping by and Happy Crafting!


Friday, February 10, 2023

Let's Curl Up with My Favorite Things!

 Hello and Welcome! Today's card features My Favorite Things stamp set, Let's Curl Up. This adorable set of foxes, sentiments and foliage could be used for any type of card. Today's card is a birthday card as I am trying very hard to build up my supply!

For this card, I started with an A2 sized card base using a smooth white heavy weight cardstock. I took the same card stock and die cut a smaller panel using MFT A2 Stitched Rectangle STAX in the largest sized die. Then using MFT Stitched Mini Scallop Circle STAX, I die cut a scalloped circle from the panel. 

I die cut two trees from the MFT Birch Trees die set, and added them to the background piece of the card. Before adding them, I used Distress Oxide Ink in three colors of blue to create a sky background. 

I added stars to the background to make it look like  a night sky. I die cut some leaves from the Birch Tree set and added some detail to them with my Copic markers. Then I added them to the birch trees. 

I used foam tape on the back of the front panel so that the circle opening had some dimension to it. Then I added the foxes and foliage that I stamped and colored with Copic markers. I used the corresponding dies to cut them out. I stamped the sentiment from the "Let's Curl Up" stamp set using Lawn Fawn Black ink on the front. Those foxes are just too cute and I love how the background turned out. It's nice when you have a picture in your head of how you want a card to turn out and it does! Thank you so much for stopping by today and Happy Crafting!

Thursday, February 9, 2023

Heart Shaker Birthday Card using Karen Burniston's Spinner Square!

 Hello and Welcome! Today's card features Karen Burniston's Spinner Square Pop-Up along with her Hearts - Crosshatch dies. This was a special request card for a birthday that is also on Valentines Day. I didn't want to make it too much like a Valentine, so I went with a blue theme. 

For this card, I started with an A2 side fold card. I used a smooth white heavy weight cardstock for the card base. I used a pretty flowered patterned paper for the card background. 

I die cut several hearts using the Hearts - Crosshatch dies to add to the card. I die cut a white heart to use as a place to sign the card. 

I used MFT - Anything-but-Basic Birthday Wishes for the sentiments on both the inside and outside of the card. 


For the front of the card, I made two shaker hearts and added a light purple and light blue confetti for the inside of the shaker card. 

I used white embossing powder with the sentiment on the front of the card. I added a few red hearts to still add that Valentine feel. 

This is a simple yet stunning card. It's been a while since I made a shaker card and it was fun to make a shaker card again. 

Thank you so much for stopping by and Happy Crafting!


Wednesday, February 8, 2023

Two Birthday Cards using Pink Fresh Studios Floral Stencil

 Hello and Welcome! Today I have two cards for you, both using Pink Fresh Studios Blushing Floral Stencil and Distress Oxide Inks. 

This first card is an A2 size card, using a light purple heavy weight cardstock. I used Neenah Classic Crest Smooth White 110lb cardstock and die cut the background with MFT A2 Stitched Rectangle STAX dies in the largest size. 

I used my Waffle Flower Stencil Mat to hold my background piece in place. Then I used the Pink Fresh Studios Blushing Floral Stencil to create the flowered background. 

I used Distress Oxide Ink in the following colors: Shaded Lilac, Seedless Preserves, Worn Lipstick, Candied Apple, Mowed Lawn and Rustic Wilderness. 

I stamped the sentiment using Honey Bee Stamps Bitty Buzzwords and used white embossing powder for the "to my best" sentiment and stamped black ink on white cardstock and die cut out the word "friend". 


For my second card, I used a heavy weight pink cardstock for my A2 sized card base. Then I die cut a similar background piece using the same Neenah Classic Crest smooth white cardstock. 

For this card, I used Distress Oxide Ink in Spun Sugar, Picked Raspberry, Squeezed Lemonade, Mustard Seed, Mowed Lawn and Rustic Wilderness. 

I also used the same stamp set from Honey Bee Stamps to create the "birthday greetings" sentiment on the front. 

I propped both the word "Birthday" and "Friend" with small foam squares to give it some dimension. 

Then on both cards, I added some gems and Pop dots as well as gold Liquid Pearls. 

Thank you so much for stopping by and Happy Crafting!


Tuesday, February 7, 2023

Karen Burniston February 2023 Designer Challenge - Love is in the Card!

 Hello and Welcome! It's Designer Challenge time once again and our theme this month is Love is in the Card! Not just Valentines Day love but love of any occasion, wedding, anniversary, etc. For my card, I chose Valentines Day and made this card using the Mailbox Pop-Up

For this card, I went with a mini slimline card base (3.5 x 6). I cut the background from smooth white cardstock and used Distress Oxide Ink in Spun Sugar and Worn Lipstick, along with a heart stencil from Simon Says Stamp to create the hearts background. 

I die cut the "Love You" and "xoxo" from Word Set 9 - Love, using heavy weight black cardstock and glitter red cardstock. Then I glued the two pieces together to make the sentiments pop. 

I used the Hearts - Crosshatch dies to create an area for the sender to write a note to the recipient. 

I used the Safari Animals Hippo and Elephant to create cute little critters. I made a envelope for the elephant to hold and added little hearts to it. I also die cut a heart for the Hippo to hold. 

I added white glitter hearts to the mailbox flag. I die cut the grass using the Nature Edges die set. 
For the front of the card, I used the same background. I added the "Happy Valentines Day" sentiment from Happy Valentines Day die and die cut it like I did the inside sentiments. 

I added some elements from the Love Charms, trimming the hole from the top to make them just decorations instead of charms. 

I added some little hearts from the Mailbox Pop-Up set all over the front. 

I'm not usually a big fan of Valentines Day, but I really love how this card turned out. I think my kids will give this card to their Grandparents for Valentines Day this year. Their Grandparents will love it! 

Thank you so much for stopping by and Happy Crafting!!


Monday, February 6, 2023

Rock-a-Bye Baby Cards using Honey Bee Stamps Dies

 Hello and welcome! Todays cards feature Honey Bee Stamps Rock-a-Bye Baby die set. This adorable die set has everything you need to make a cute nursery scene. You can also pair it with the Honey Bee Welcome Baby sentiment stamp set to create super cute cards. 

I made three cards using this die set. Each start with a heavy weight cream colored cardstock for a A2 sized card base. All of them use the MFT Wonky Stitched Rectangle background. 

I used different colors of scrap cardstock and patterned paper for each of these cards. I added some details to some die cuts using Copic markers. 

I also used different sentiments from the Welcome Baby stamp set on the fronts of the cards. 

If you need to see how anything layers together, Honey Bee Stamps offers layering guides on their website for all of their dies, which comes in really handy if you have a die and you're not sure what it's for! I just love this set and it makes such beautiful cards. 

Thank you for stopping by and Happy Crafting!


Friday, February 3, 2023

Honey Bee Stamps Market Cart - Four Different Ways.

 Hello and welcome! Todays cards feature Honey Bee Stamps Market Cart Builder and some add-ons. I have had this die set for a while now and I never get tired of making these beautiful market carts. Then with the add-ons, such as the Farm Fresh Market Cart Add-On, you can make your cards different again! 

For all these cards, I made A2 bases. Some are side fold and some are top fold. I used smooth heavy weight cardstock for the base. 

Then I die cut out four smooth white panels using MFT A2 Stitched Rectangles in the largest size. 

I used the MFT Clouds stencil and with Distress Ink in Peacock Feathers, created clouds on the background for each card. 

I used green cardstock and die cut out the grass using Karen Burniston's Long Nature Edges. 

From there I put my market carts together. For the first card in the above picture, I used the awning from the Farm Fresh add-on. Then I added the sign from the Pumpkin Spice Market Cart Add-On. I stamped the hello sentiment from the Honey Bee Stamps My Favorite Flower stamp set. I also used the Bitty Buzzwords Bloom stamp set to create the Kind and "Thank you for being so" sentiments. 

For the second cart, I used the original awning and die cut it from white cardstock. Then with Copic markers, I colored in the awning and banner on the front of the cart. I added the sign from the Farm Fresh add-on and stamped the same "hello" sentiment on it. Then I added a sentiment from the My Favorite Flower set. 

For the next two cards, I did similar things, but added different sentiments, flowers and colors to each card. I ended up with one birthday card, two thinking of you and one thank you card. I just absolutely love this die set and the add-ons! I'm really hoping they come out with a Christmas themed add-on at some point! 

Thank you so much for stopping by and Happy Crafting!!!

Thursday, February 2, 2023

Happy Bee-Day Card using Karen Burniston Dies

 Hello and welcome! Todays card features various dies from Karen Burniston. The only thing is, it's not a pop-up! It originally was going to be a pop-up but it didn't work out the way I wanted. So, I changed my design and made a beautiful non pop-up card. That's the greatest thing about her dies. You don't always have to make a pop-up! You can make a regular card with all her products!! 

For this card, I started with a slim line sized card using a lightweight kraft cardstock. I had recently purchased a large amount of patterned paper (don't tell my hubby! Lol) and one of the paper packs had this super cute bee paper!

I used the Long Rectangles - Crosshatch dies in the largest size and cut three panels out of the bee paper. 

Once they were glued to the card, I cut out the hexagon shaped windows using the Hexagon - Crosshatch dies. Once I had the windows cut out, I made a border using the Hexagon dies and added acetate to the back of the hexagons on the front of the card. 

Then, using the Flutter Charms, I created four bees and flowers to add to the card. I also cut out the honey comb from the Flutter Charms. 

I added various colored yellow paper to add to the honey comb areas. 

For the inside of the card, I die cut hexagons using a cream colored cardstock and added a little bit of honey comb to it. 

I used Gina K Designs Beautiful Bees clear stamp set to add the "Hi Honey" "Happy Bee-Day" and "Have a Bee-youtiful Day" sentiments to the card. 

I just love how adorable those little bees are! This is a simple yet elegant card to send to someone special for their birthday!

As always, thank you so much for stopping by and Happy Crafting!

Mice Day to Celebrate Cupcake Birthday Card

 Hello Crafty Friends and welcome. I know it's been a while and I am very sorry I haven't posted in such a long time. Unfortunately,...