Thursday, April 6, 2023

Toot Toot! Here Comes the Easter Train!

 Hello and Welcome! Today's card features Karen Burniston's Train Pivot Panels along with the Train Elements. I thought, since it's Easter, why not make an Easter train! I used Lawn Fawn's Eggstra Amazing Easter stamp set to coordinate with the pop-up train. 


For this card, I started with an A2 sized card using a light blue cardstock. I added two patterned paper panels, each 4x4 from Echo Park - It's Easter Time paper pack. I then cut two smaller panels (4x1.25) from the reverse side of the patterned paper. 

I die cut the pop-up mechanism from the same light blue cardstock as the card base and glued that into the card. 

I die cut the train and the box cars from various pastel scraps of cardstock I have saved. I also die cut the tops of the train cars and the front piece of the train from a white glitter cardstock. I added a piece of double sided tape/adhesive to the cardstock and then die cut the pieces out for easier assembly. I did the same with the wheels. 

Using various colors of Distress Oxide ink and a white size 10 Gelly Pen, I added some details to the train and cars. 

I die cut the track from a light grey cardstock and added it to the pop-up. I had to trim some pieces to make it fit the way I wanted, but the great part of the track die cut is, it allows to trim and adjust and still looks great!

I stamped the images from Lawn Fawn's Eggstra Amazing Easter using Lawn Fawn's Jet Black ink and colored them in with Copic markers. Then I used the coordinating die to cut them out. I added them to my train before installing the train pieces. I ended up having to trim part of the pop-up so you could see the little chick and chocolate bunny better. 

From Karen Burniston's Easter Charms die set, I die cut the Happy Easter from pink and purple cardstock, then cut it again from black cardstock and glued them together to make the sentiment stand out better. 

For the front of this card, I tried to keep it simple. I've been trying to use the little stickers that come with the paper packs more and this time I used the ones that came with the It's Easter Time paper pack. I'll be honest, I'm not entirely happy with the front, but the inside is where all the good stuff is. 

Thank you so much for stopping by today! Leave a comment and let me know what you're thoughts are on this card. Happy Crafting!


Tuesday, April 4, 2023

Karen Burniston April 2023 Designer Challenge - Bunny!

 Hello and Welcome! It's Designer Challenge time again and our theme for April 2023 is Bunny! For my card, I used the Parcel Pop-Up along with the Spring Animals, Wide Woven Basket Card and Easter Charms. 

For this card I started with an A2 sized card using heavy weight smooth white cardstock. 

I recently purchased this beautiful patterned paper pack from Echo Park called It's Easter Time. I just loved the bunny paper with the pretty green background and used it for this card. 

I added the background pieces, then cut out the Parcel mechanism from smooth white cardstock. I also cut a mechanism piece out from the patterned paper so that the white didn't show too much behind the bunny. 

I used the Wide Woven Basket to create the front. The smaller woven basket just wasn't big enough. I trimmed the flap piece off the side of the basket. I used a piece of scrap blue gingham patterned paper to add to the basket. 

I added the bow from the Parcel Pop-Up and made the tag (also from the Parcel Pop-Up) from a cream colored cardstock. Then I stamped the "To Some Bunny Special" from Lawn Fawn's Eggstra Amazing Easter. 

I die cut two bunnies from the Spring Animals set and added whiskers and different colored ears and bellies. I also die cut some eggs and the chocolate bunny from the Easter Charms and added them to the basket. 

I die cut a rectangle from the Rectangles - Crosshatch to give the sender a place to sign. 

Lastly, I added the Happy Easter sentiment from the Easter Charms using black cardstock in the back and two different colors of cardstock on the front. 

For the front of this card, I kept it really simple. I used the largest Rectangle die and cut out a pink background. Then I used the next rectangle size down and cut a piece of patterned paper. 

I added the Hello using white and yellow cardstock with black cardstock in between the layers to give the word some dimension. 

Then with VersaMark ink and white embossing powder, I stamped the "May Your Basket Be Full of Joy" sentiment from the same Lawn Fawn Stamp set. 


I love how this card turned out. It really shows that all the dies from Karen Burniston can be used together or separate. The options are endless! Thank you so much for stopping by for Designer Challenge and Happy Crafting!


Saturday, April 1, 2023

Lawn Fawn Challenge #145 - Inspired by Book, Movie or Song

 Hello and Welcome! I have really been enjoying taking part in the Lawn Fawn Challenges lately and this one at first stumped me. I kept going through my stamps and thinking nope, nope, nope. Then it hit me! Can you take a guess what movie this card is inspired by?


I have always loved The Nightmare Before Christmas. I can still remember seeing it in the theatre when it was released and being the only one of my friends that loved it! So when I seen my Christmas stamps and the little Trick or Treaters, it was a no brainer!

For this card, I started with a regular slimline using smooth heavy weight black cardstock. Then I cut a piece of smooth white cardstock to use as my background. I only had Michaels brand heavy weight cardstock and let me just say, it's good for card bases, not so much for coloring or using masking paper. It frays and tears at the paper. Unfortunately it was all I had as I am waiting for my Simon Says Stamp order to come with my Neenah Classic Crest cardstock. 

I came up with my design and started stamping and masking everything. For my images, I used Lawn Fawn's Holiday Helpers, Costume Party and Ready, Set, Snow. Once I had stamped and masked my design, I made the background. I used Distress Oxide ink in Twisted Citron, Mowed Lawn and Black Soot. I used some black water color paint to make spots on the green. Then I used Black Soot to create the ground and added water flecks to give it some dimension. 

I removed the masking paper carefully and fixed any spots that need to be touched up with a pen. Then I colored all my images using Copic markers. Once that was done, I used a size 10 Gelly Pen to give some things some shine lines. 

I used Lawn Fawn's Oliver's Stitched ABC's and die cut the word "Scary" from black and purple cardstock, then glued the layers together. I stamped the sentiment "may your days be" from Merry Messages, using VersaMark ink and white embossing powder on black cardstock. I also stamped the sentiment "& Bright" from the same set. 

Once I had the sentiments glued down, I added some glitter gel to the word "Scary" and I added glossy accents to the snow globe to make it look like glass. 

How stinkin' adorable is this card! My sister-in-law loves Nightmare Before Christmas as well, so I will be saving this card for her for this Christmas. Thank you so much for stopping by and Happy Crafting!


Thursday, March 23, 2023

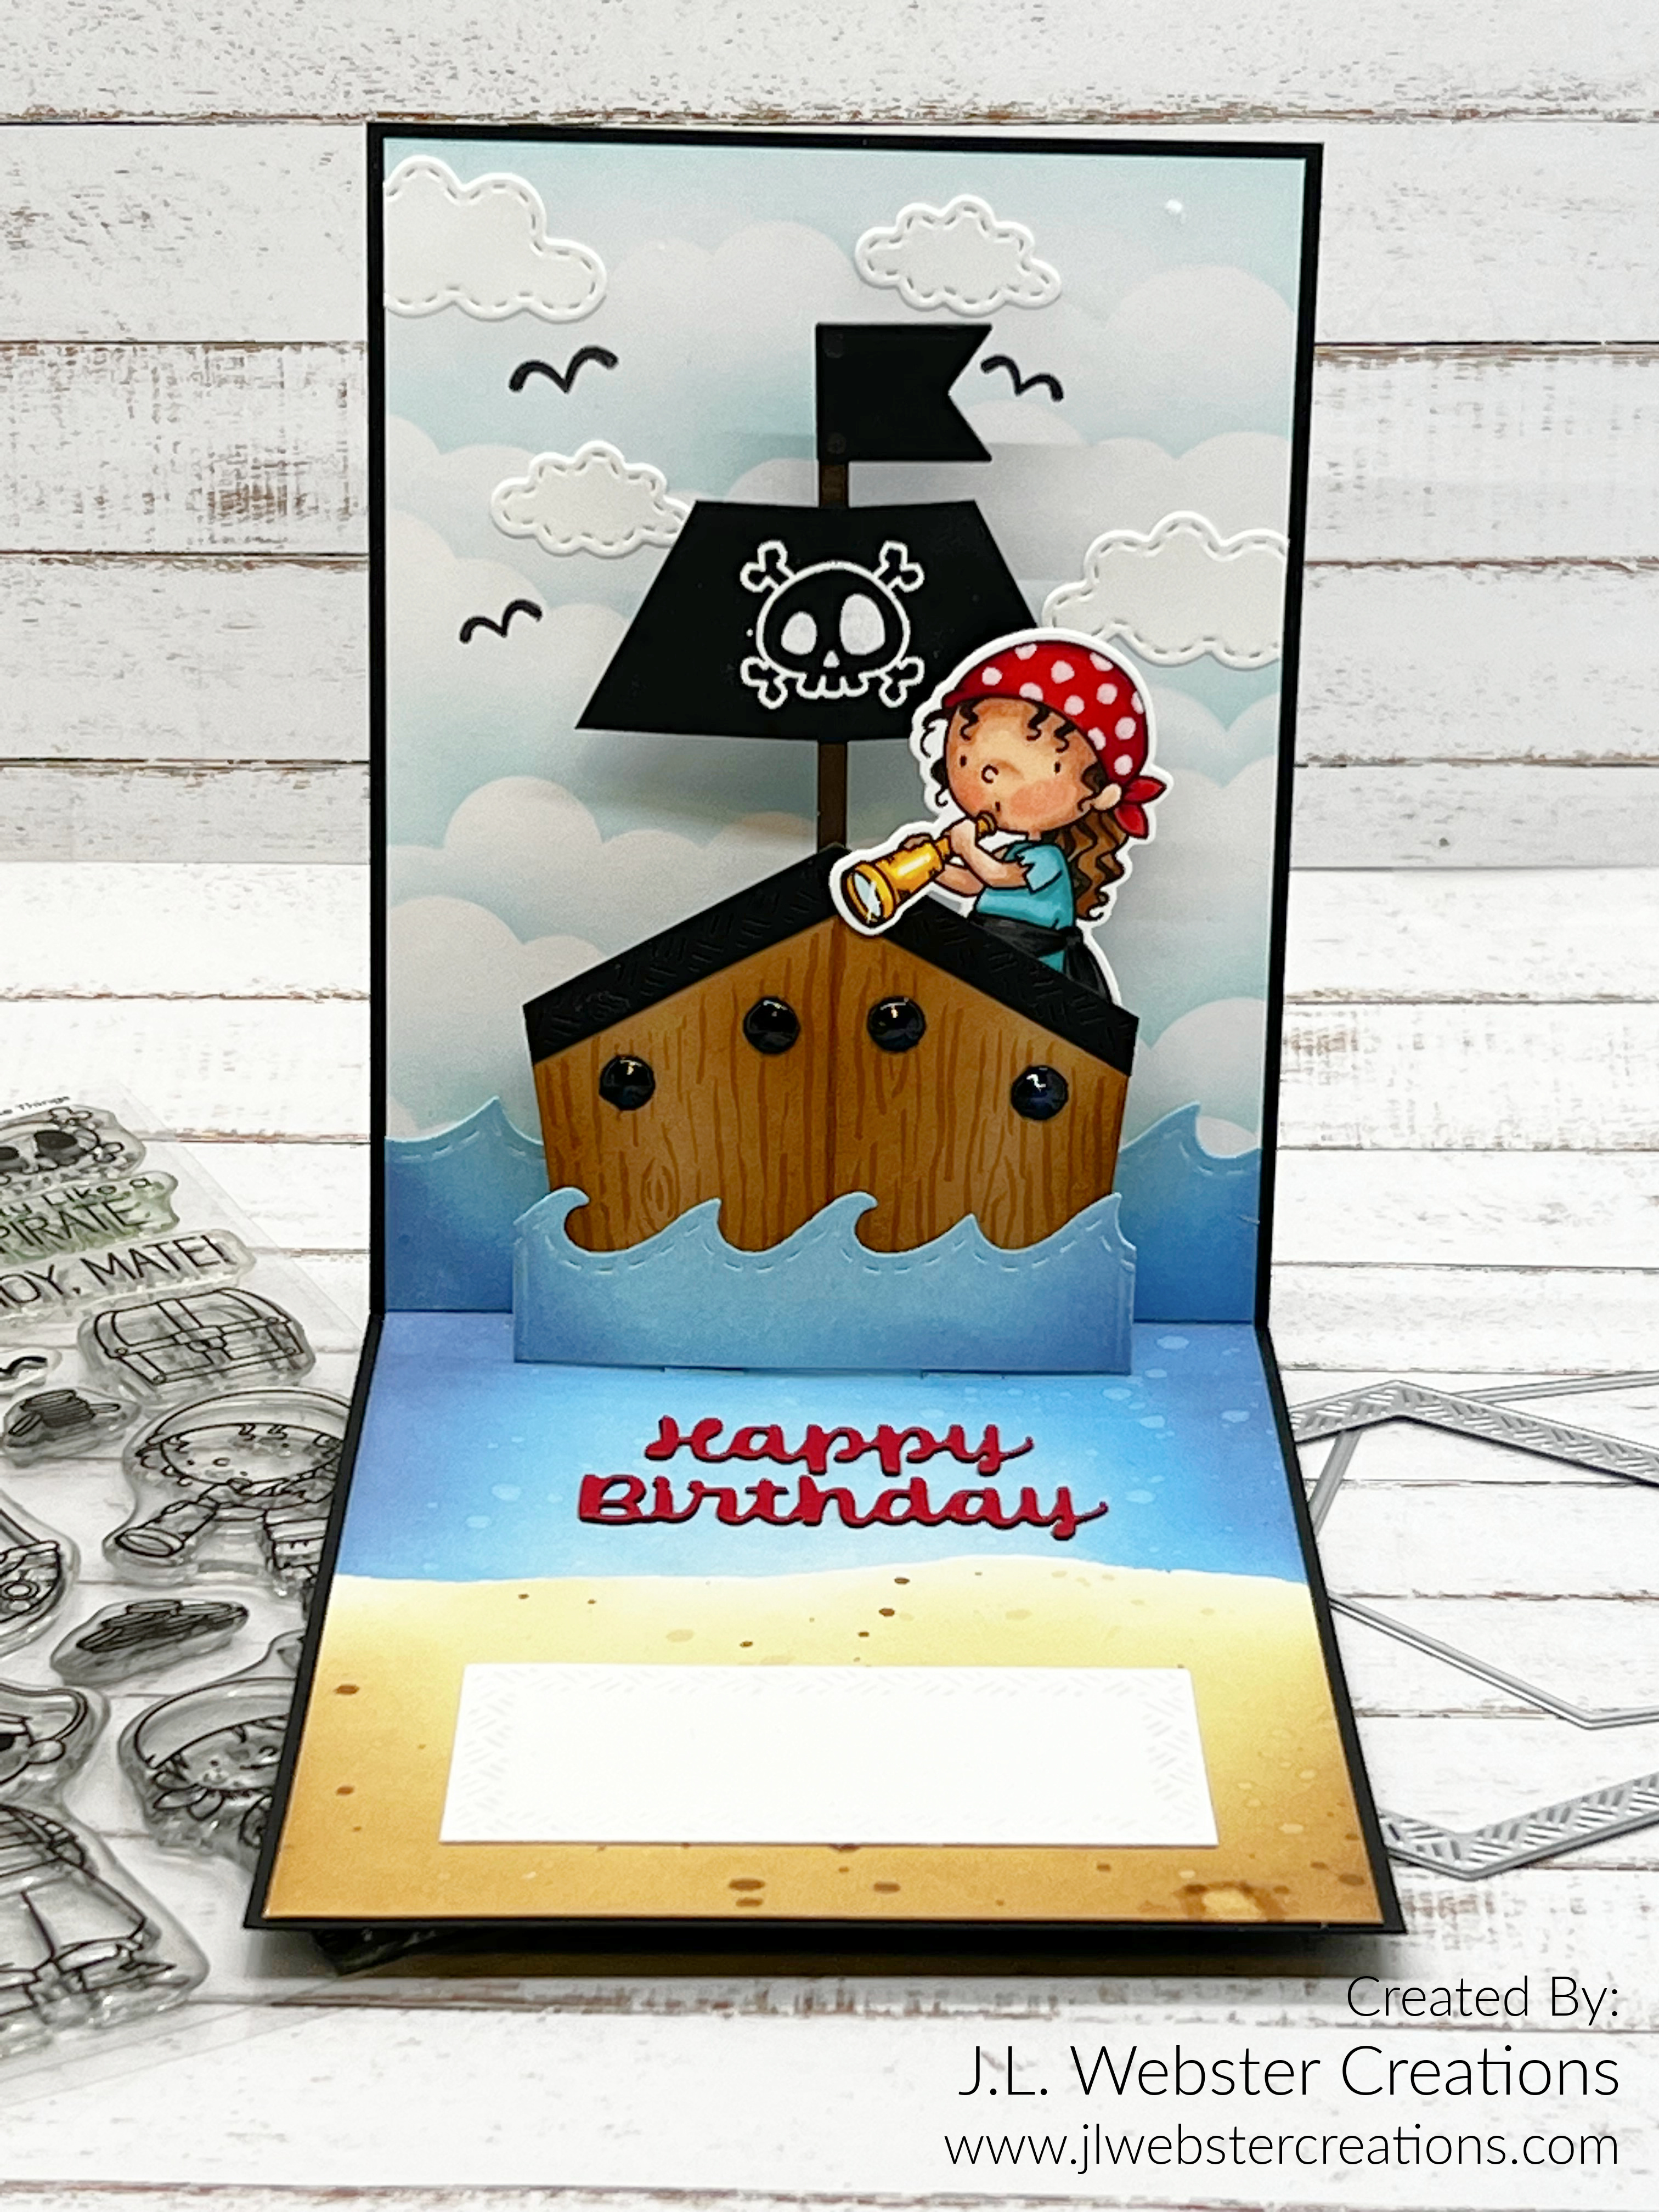
Ahoy Matey! Pirate Ship Birthday Card

 Hello and Welcome! Today's card was inspired by Karen Burniston's card in our March Designer Challenge which was Vacation themed. She made a cruise ship that popped up using her Flip Frame Pop-Up and some of her shape dies to create the cruise ship. To see her assembly video click here to view it. For my card, I wanted to make a pirate ship! I have this super cute stamp set from My Favorite Things called "Party Like a Pirate" and wanted to make a pop-up card using that stamp set to go along with it. 

For this card, I started with an A2 top fold card using a heavy weight smooth black cardstock. I used a piece of 65lb smooth white cardstock to create the inner panel and folded it in half. 

I used a removable tape to tape off the top panel to create the clouds in the sky background. I used Distress Ink in Peacock Feathers and MFT's Mini Cloud Edges Stencil to create the sky. Then I die cut clouds from Karen Burniston's Outdoor Scene and added them as well. I stamped the birds that were part of the pirates stamp set. 

Then I taped off the sky from the bottom panel and created the ocean and sand on the bottom panel, using various colors of Distress Ink and Distress Oxide ink. 

Once I finished the background, I die cut the pop-up mechanism using the pop-up die from Karen Burniston's Tree Pop-Up. I cut the mechanism twice so it fit on both sides of the ship. 

To create the pirate ship, I followed Karen's instructions on her video, only instead of creating the cruise ship top, I made the sails like a pirate ship. To make these, I used a smaller hexagon die from her Hexagons - Crosshatch die set and trimmed the bottom off. Then I bent it slightly to give it the look of a sail. I stamped the skull and crossbones using VersaMark ink and white embossing powder. I die cut the little flag from Karen Burniston's Little Twist Panel Pop-Up from black cardstock. 

Once I cut the base of the boat from a kraft cardstock, I used my E35 Chamois Copic marker to create wood texture. Then I went over it with Distress Ink in Vintage Photo. I used a circle punch and create the port holes then added glossy accents to them. 

I then cut the waves using Karen Burniston's Tropical Scene wave die and added the same colored Distress Oxide Ink. Then I glued them to the front of the ship and to the background. 

I die cut the "Happy Birthday" sentiment from Karen Burniston's Word Set 2: Birthday Die set twice, once from red cardstock and once from black and layered them together. Then I die cut a place to sign the card using Karen Burniston's Rectangles and Labels - Crosshatch and smooth white cardstock. 

For the front of the card, I die cut a rectangle panel from Neenah Class Crest Smooth white cardstock using Karen Burniston's Rectangles - Crosshatch in the largest die. 

I used masking paper along with my stamp set to create the pirate scene. Once I had all the masking paper on, I created the background scene. I did the same technique as in the inside of the card. 

Once I had the background the way I wanted it, I removed the masking paper and colored the images in using Copic markers. 

I added some shine lines using a white size 10 Gelly Pen. 

I absolutely love love love how this card turned out. Those pirates are adorable and that pirate ship came out fantastic! Thank you so so much for stopping by and Happy Crafting!


Tuesday, March 21, 2023

Birthday Bear Hugs with My Favorite Things!

 Hello and Welcome! Today's card features MFT's Beary Special Birthday stamp set and my own custom made background!


For this card, I started with an A2 sized card base from Princess Pink MFT Cardstock. I then die cut a background rectangle in black cardstock using MFT's A2 Stitched Rectangle STAX set in the largest die. Then I cut another rectangle using Neenah Classic Crest smooth white cardstock and then next size down die from the A2 Stitched Rectangles. 

On the white rectangle I started stamping the Beary Special Birthday images on to the cardstock using Lawn Fawn's Jet Black ink. I masked the images as I went using Altenew masking paper. Once I had all the images stamped and masked, I created the background. I drew out the trees and ground line. Then colored in the background using Copic markers. 

Once I was finished coloring the background, I removed the masking and colored the bears in with my Copic markers. 

I used Glossy Accents and Glitter Gel on the balloons to give them some dimension. I also added Glossy Accents to the bears noses and the frosting on the cake. 

Once dry, I added the number 1 to the glossy balloons because this card is for a first birthday. I added shine lines using a number 10 Gelly Pen in white. 

I stamped the sentiment "Sending Birthday Bear Hugs" on to black cardstock using VersaMark ink and white embossing powder, then glued my sentiment down on the front. 

I think I'll be trying to make my own backgrounds more often! I love how great using masking comes out. Although time consuming, worth it in the end. Thank you so much for stopping by and Happy Crafting!

Saturday, March 18, 2023

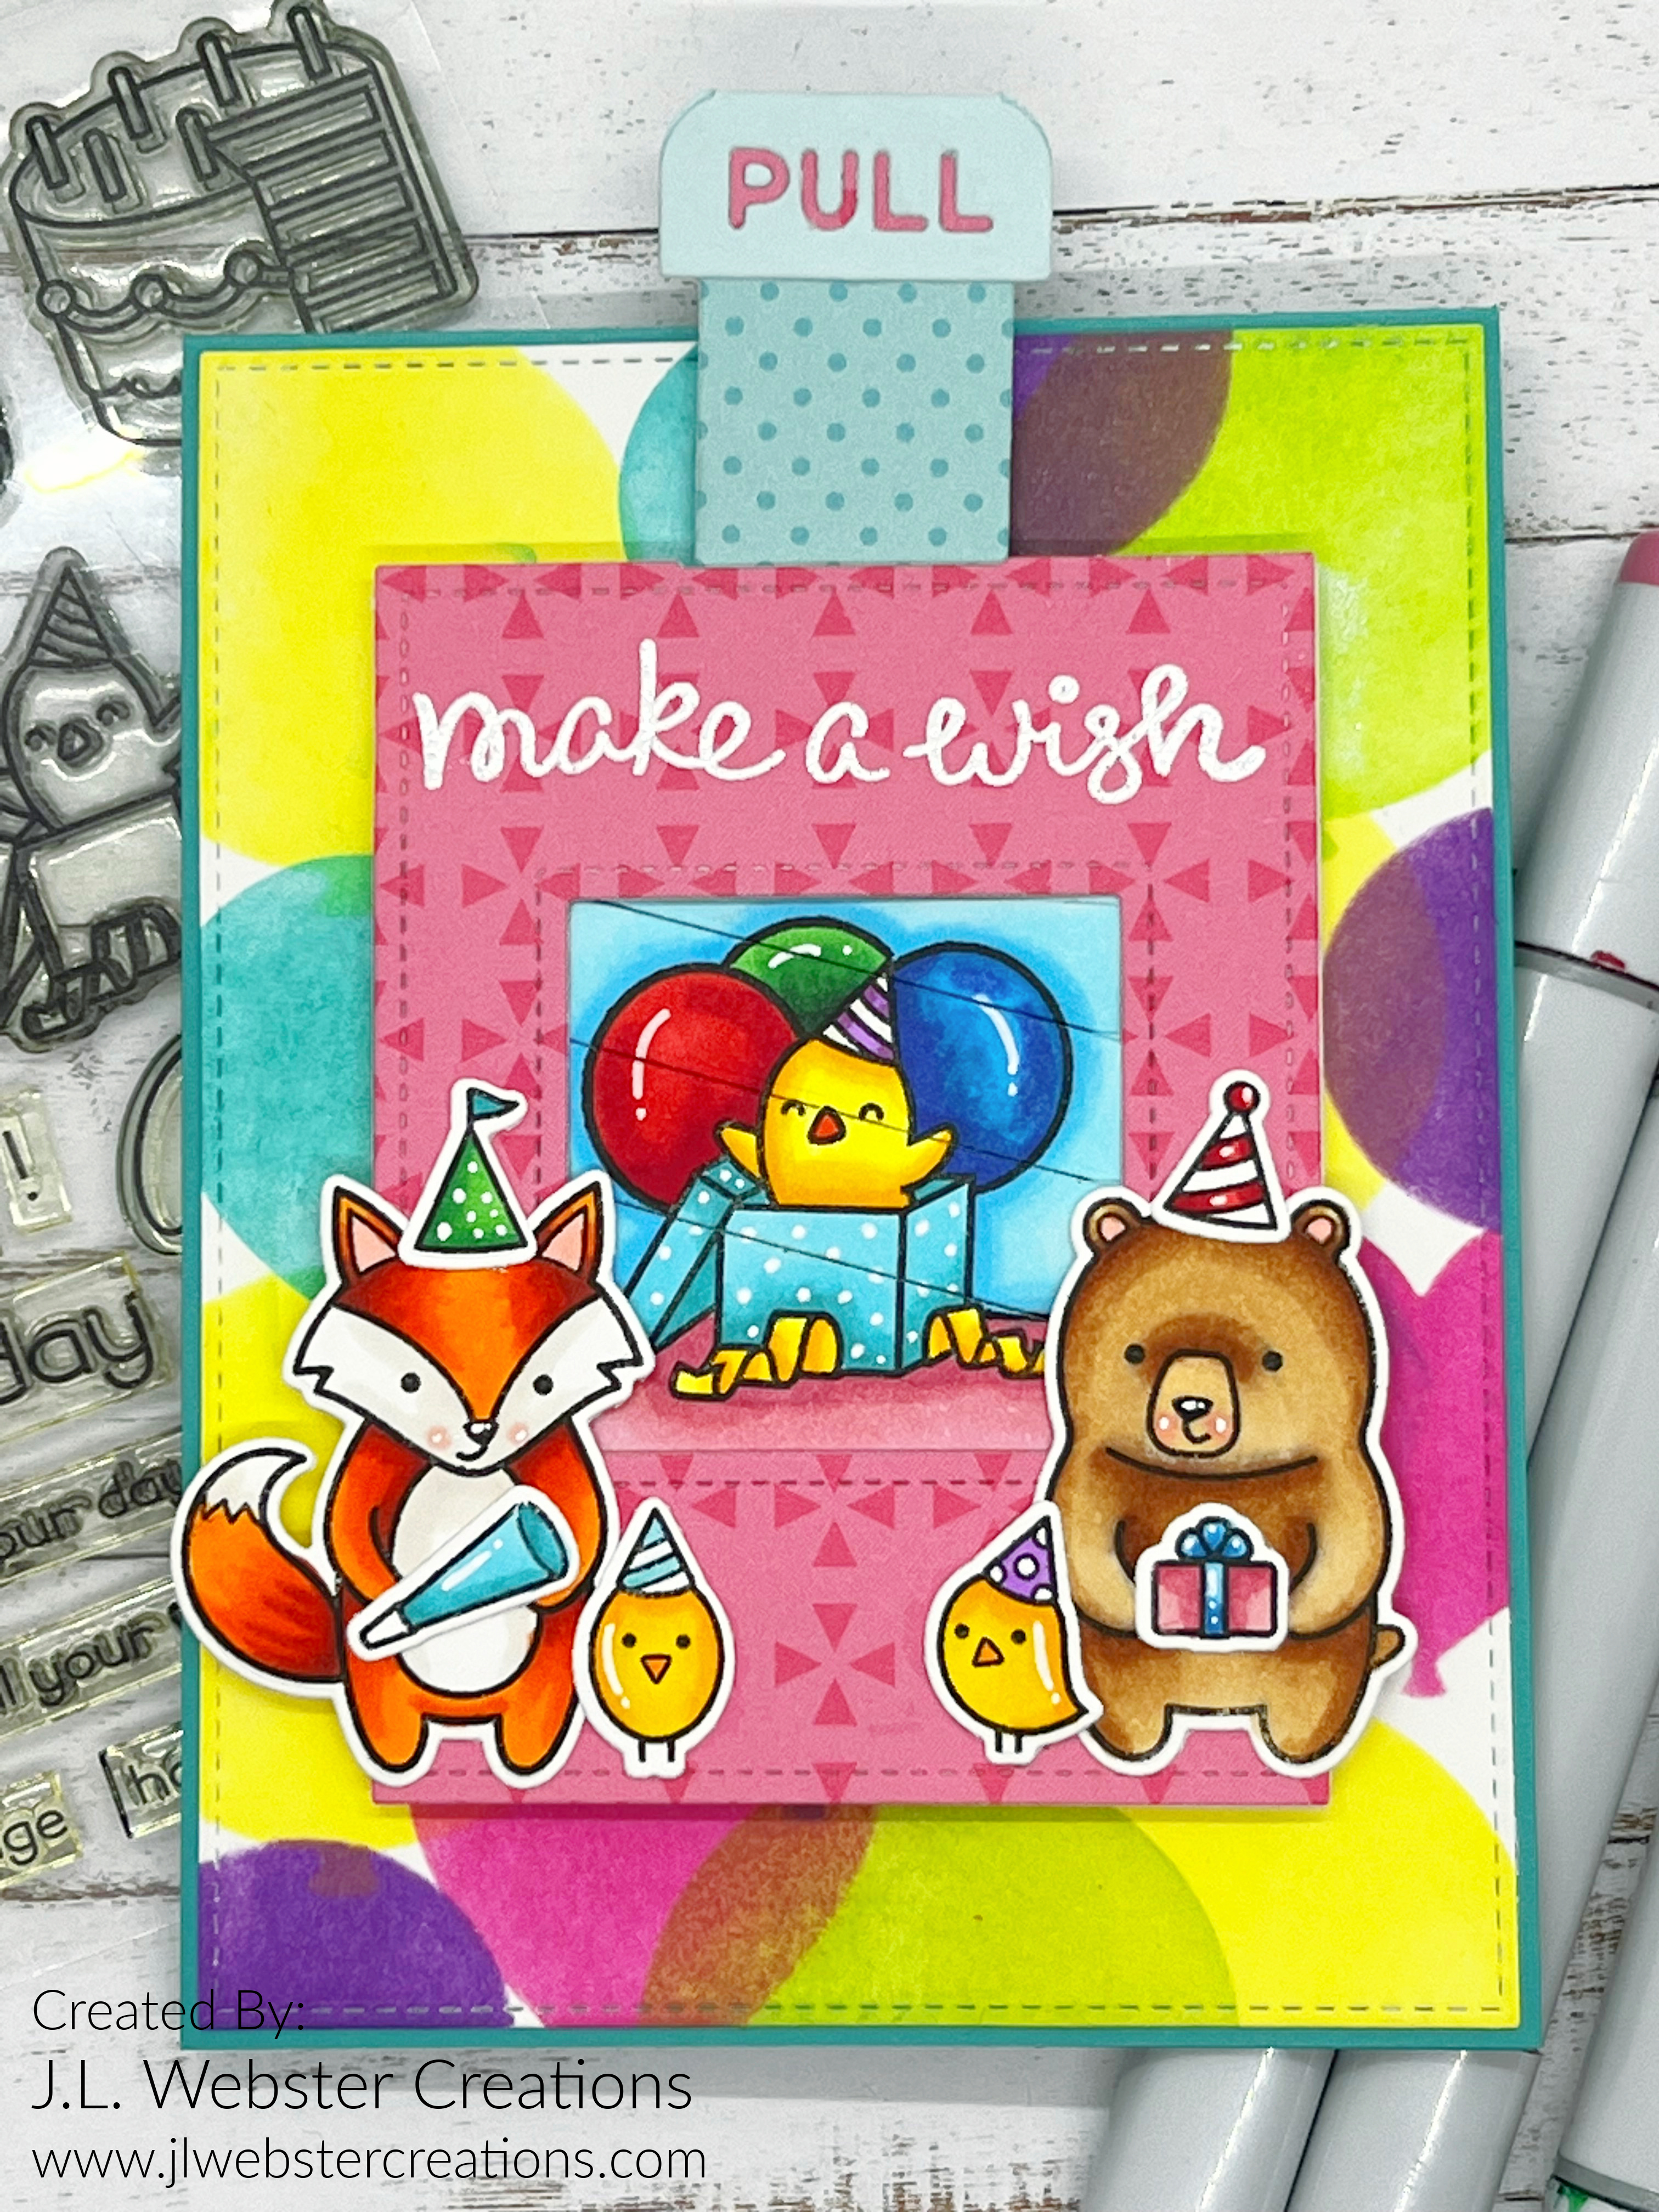
Make a Wish - Magic Picture Changer Birthday Card

 Hello and Welcome! Today's card was created for Lawn Fawn's Challenge #144 - All Things Birthday! For this card I used Lawn Fawn's Magic Picture Changer die set along with Lawn Fawn's Birthday Before 'n Afters and Party Animal stamp set. 

For this card, I started with a A2 top fold card base using a dark blue/green cardstock. I die cut two rectangles from smooth white cardstock and used Lawn Fawn's Balloons Stencil to create my background. 

I stamped out my images using Lawn Fawns Jet Black ink on to the magic picture windows. Then colored them in using my Copic markers. 

I used Lawn Fawn's Magic Picture Changer Add-On and a pink patterned paper to add on to the magic picture mechanism. I cut another piece from patterned paper to add to the pull tab. Then I added the "Pull" piece to the tab. I used the same pink patterned paper to add the word "Pull". 

Once I had everything put together, I stamped the images I wanted to use from the Party Animal stamp set using Lawn Fawn's Jet Black ink and colored them in using Copic markers. I added some shine lines using a Gelly Pen in size 10. 

I stamped the sentiment "make a wish" from the Party Animals stamp set using VersaMark ink and white embossing powder. 

This turned out to be such a bright and vibrant card and a fun birthday card to send to someone special. I really like how the balloon stencil worked out so well and how there were different balloons to choose from. 

Thank you so much for stopping by and Happy Crafting!


Friday, March 17, 2023

First Birthday Card with a Kitty Cat Pop-Up!

Hello and Welcome! Today's card was a Great Grandma special order card, created for a special little girls very first birthday! This cutie pie loves cats, so I made a pretty pink pop-up kitty. 

For this card, I started with a 5.5 wide card base. Then I followed Karen Burniston's card tutorial on making the front tuck flap card base for her pop-up gingerbread snowman. Click here to watch that video on YouTube. 

I used a light pink cardstock from MFT called Ballet Slipper for the card base and for the pop-up cat. I picked a fun kitty patterned birthday paper and added it to the inside and outside of my card base before adding the cat. 

I used Karen Burniston's Surprise Ball Pop-Up, Bitty Ball Pop-Up and Animal Add-Ons 1 to create the pop-up cat. 

I made each pop-up ball from the Ballet Slipper cardstock. Then I added a cream colored cardstock for the belly and face fur. With a pencil, I drew out fur marks and cut them with my scissors, then glued the pieces to the pop-up. 

For the collar, I used the ball die from the Surprise Ball Pop-Up and cut a piece from a teal blue cardstock. Then I trimmed off the edges I didn't need. I measured 1/4 in from the center of the ball down each flap and made marks with a pencil. I then drew a straight line across each flap and cut the part I didn't need off. Then I glued the entire piece to the top of my base pop-up ball (sorry if that doesn't make sense!). Before gluing it down though, I added my collar heart charm. 

For the cats face, I die cut the eyes out from the same cream colored cardstock and then using my Copic markers, created the cat eyes. I outlined them with a black marker and then I added Glossy Accents to the eyes. Once they were dry, I added white paint marker to add some shine spots. 

I die cut the nose from a shiny black cardstock and cut it in half to add to the face. I glued the whiskers on to the nose pieces and then added it to the cats face. 

I die cut the mouth from the same shiny black cardstock and cut that in half as well. Gluing to the face where I wanted the mouth to be. 

I die cut the ears, paws and tail out of the same cardstock as the body, adding a cream tip to the tail and cream paws to the arms. I added toe lines to the feet with a black pen. 

I die cut a circle using Karen Burniston's Circles - Crosshatch dies in the largest size from the same cardstock as the collar. 

Before I glued the pop-up cat into the card, I created the birthday greeting I wanted to put on the top part of the card. 

I die cut the word "birthday" using Lawn Fawn's Scripty Birthday die from a light blue Glitter Cardstock. I cut it twice more from black cardstock and glued all the layers together to give the word some dimension. 

I stamped the "happy" sentiment from MFT Essential Sentiments using VersaMark Ink and white embossing powder. 

I die cut the "1" from Lawn Fawn's Oliver's Stitched 123's using purple cardstock and added a couple of layers of black cardstock to that as well to give it some dimension. 

Then with a fine tip pen, I added the "st" beside the number 1. I die cut the banner using the banner dies from Karen Burniston's Twist Panel Pop-Up using different colored cardstock that I had in my stash, then added the Birthday girls name to the banner. I used a light pink and white bakers twine and glued it into the card. Once I had the wording added, I glued the cat down to the base of the card. 

For the front of the card, I used some coordinating stickers from the patterned paper I used and added them to the front. 

I also added some stickers to the inside of the card as well. 

I am absolutely thrilled with how this card turned out. I hope that the Birthday girl is as thrilled with the kitty card as I am. 

Thank you so much for stopping by and Happy Crafting!!


Tuesday, March 14, 2023

Loving Tulips Birthday Card using Karen Burniston and Power Poppy

 Hello and Welcome! Today's card features Karen Burniston's Spinner Square Pop Up along with the beautiful floral stamp set from Power Poppy called Loving Tulips.


For this card, I started with an A2 size, side fold card from a light pink cardstock. I used Lawn Fawn's new Satin Stitch patterned paper for the background and cut it out from Karen Burniston's Rectangle - Crosshatch dies in the largest size. 

From there, I used her assembly video to figure out where to put the window on the front of the card, then cut that out using the die from the Spinner Square Pop-Up die set. I added a piece of acetate in between the layers to create my window. 

I stamped the tulips using Lawn Fawn's Jet Black ink and colored them in using my Copic markers. I used the coordinating dies to cut the images out. 

I die cut the pop-up mechanism from the same cardstock as the card base, including the little pop out arm. I stamped the "with love" sentiment on the arm and attached it to the pop-up mechanism. Then I stamped the "hope your day absolutely blooms" to the inside of the card before attaching the large square. I die cut the large square from the same cardstock as the card base and then cut a smaller square using the patterned paper. From there I glued on the flowers and added it to my pop-up mechanism. 

I stamped the "Hello" sentiment on smooth black cardstock using VersaMark ink and white embossing powder and cut it out using the corresponding dies and added it to the front of the card. I also added the "I'm thinking about you" sentiment to the front as well. 

All the sentiments I used were from Power Poppy's Loving Tulips stamp set. I then die cut another rectangle same as the mechanism arm, using smooth white cardstock so that the sender has a place to write a little note or sign their name. I die cut borders to go around the window and glued them on as well. I really love how beautiful this card turned out. Thank you so much for stopping by and Happy Crafting!


Sunday, March 12, 2023

MFT Weekly Sketch Challenge 636: Sittin' Pretty

 Hello and Welcome! Today's card is for the MFT Weekly Sketch Challenge. For this card, I decided to use MFT's Sittin' Pretty stamp set. 

For this Sketch Challenge, I decided to use masking to create this scene. I started with where I wanted the little girl to sit on the steps. Then I masked her image off. 

From there I picked where to put the birds and potted plants, stamped the images in black ink and masked them off as well. Finally I stamped the door and lights and masked them off.

I used MFT's Small Brick Wall Stencil and Hero Arts ink in Wet Cement to create the brick wall. 

I removed the masking paper from all the images and colored everything in using Copic markers. 

I cut out a piece of blue patterned paper (3.25 x 3.5) that I had in my scraps stash and added it to my card. I went with an A2 sized card base using heavy weight smooth white cardstock. 

I stamped the sentiment using VersaMark ink onto black cardstock and heat embossed it with white embossing powder. 

I really like how this card turned out. It's not something I would normally do, which is really fun to try different style cards. I'm really enjoying participating in their weekly Sketch Challenge. Thank you so much for stopping by and Happy Crafting!

Friday, March 10, 2023

Easter Fun with Lawn Fawn's Eggstraordinary Easter

 Hello and Welcome! Today's card features Lawn Fawns new Eggstraordinary Easter stamp set along with their Shutter Card die to create this super cute and cheerful Easter card. 


For this card, I started with a 12 x 12 sheet of Lawn Fawn's Let it Shine Pink Sparkle patterned paper, which I die cut the main Shutter Card from. I die cut the shutter panels from some scrap patterned paper I had and I also cut the two front panels from the same paper. 

I die cut the main shutter card from the light green textured cardstock and trimmed it down to create the center panel. Using the little helper tool that comes with the Shutter Card die set, I cut the circle. I also cut a circle from smooth white cardstock. I stamped the Happy Easter sentiment on the white circle from Lawn Fawn's Magic Spring Messages and colored in the little eggs and flowers with Copic markers. 

I stamped the images from the Eggstraordinary Easter stamp set using Lawn Fawn's black ink and Neenah Classic Crest smooth white cardstock. Then I colored the images using Copic markers. I cut the images out using the coordinating dies. 

I stamped the sentiment have a colorful Easter using stamps from Eggstraordinary Easter and Easter Before n' After. 

Then I played with where I wanted the images. Once I found their placement, I glued them down using Lineco Neutral PH glue. 

For the front of the card, I cut the belly band from the same green cardstock as the inside. I used the Stitched Flower Frame to create a pretty spring flower on the front and added a couple of leaves. I added details using Copic markers, then glued the flower to the belly band. 

I stamped the Happy Easter sentiment using VersaMark ink and heat embossed with white embossing powder. 

The Shutter Card may look a little intimidating, but it's super easy to make a fun card! Thank you so much for stopping by and Happy Crafting!


Thursday, March 9, 2023

Oh Easter Tree, Oh Easter Tree How Lovely are thy Eggies!

 Hello and Welcome! Today's card is a fun Easter card using Karen Burniston's Christmas Trees Pop Stand, only as an Easter Tree! 

For this card, I started with an A2 sized top fold card using heavy weight smooth white cardstock. I die cut three rectangles of patterned paper I had in my stash, using Karen Burniston's Rectangle - Crosshatch dies in the largest size. 

From there I centered the patterned paper on my card base and taped down the die that holds the tree stand and die cut it the flaps out.

I die cut the tree out using pastel blue, purple and yellow cardstock. Then I used the tiny eggs from Karen Burniston's Spring Animals die set and cut them from blue, purple, yellow, pink and green pastel cardstock. I glued them onto the tree and added glitter gel and Glossy Accents to the eggs. I had some remaining eggs left so I added a few at the base of the tree, like they had fallen. 

I die cut two panels out using smooth white cardstock and cut the edges with MFT's Stitched Basic Edges 2 die to create a scalloped edge. 

From there, I die cut the "Happy Easter" sentiment from the Easter Charms die set twice. Once from glitter blue cardstock and once from black cardstock. I also die cut two eggs that come from the Easter Charms and the Spring Animals sets. I die cut the chocolate bunny from the Easter Charms as well. Then I glued them all together to create the top of the inside of the card. I colored the eggs with Copic markers. 

I die cut the bunny and chick from the Spring Animals as well as the baskets. Then I added the tiny eggs I had left over from the tree. 

I had a sticker sheet from a paper pack of Easter paper I bought and used them to decorate the inside of the card as well. 

I stamped the "may your basket be full of joy" sentiment from Lawn Fawn's Eggstra Amazing Easter stamp set. 

For the front of the card, I used the same patterned paper as the inside. I die cut a small rectangle using the purple cardstock and then a smaller one again from smooth white cardstock. 

Then I added more stickers from the sticker sheet to create a pretty front for my Easter card. 

I love how this card turned out and it shows you that even a Christmas die set can be used for other holidays/themes. 

As always, thank you so much for stopping by and Happy Crafting!


Foxy Fall Pop-Up Card!

 Hello Crafty Friends and welcome! I have another pop-up card for you. This time, I used an old stamp set I had from My Favorite Things call...