Monday, June 19, 2023

Karen Burniston Sneak Peek Week Day 1 - Baking Charms!

 Hello and Welcome! Are you as excited as I am for the new Karen Burniston June 2023 release? Well I know I am and I am also super excited to start my Sneak Peek week with this card using the new Baking Charms. 


For my card, I wanted to create a kitchen themed pop-up to use with the new Baking Charms die set. So I created a pop-up gnome using the Bitty Ball Pop-Up along with the Mini Ball Add-On 1 - Gnomes to create my little pop-up baker!

I added the oven mitts (which is from the new Baking Charms) to her little hands and then die cut a spatula from the new die set to add to her hand. 

I created a card base that is 5 x 5 with a 1/4 in center spine. I added a flap using the Flap and Closure die set. For the inside of the card, I used some patterned paper I had on hand to create the wood looking floor and the walls. 

From there I created a round floor mat to go under my Gnome baker using the Circles - Crosshatch die set. 


To create the kitchen cabinets, I used the Squares - Crosshatch dies to create the door on the cabinets. Then I cut a thin piece of gray cardstock to create a counter top. 

I die cut the bowl, spoon, rolling pin and whisk from the new Baking Charms and added detail to them using my Copic makers. 

I then glued them down on the counter top using my Lineco Neutral PH glue. 

Before I added my little Gnome baker, I wanted to create the front of the card. I added some small magnets to the flap and to the front of the card and glued them down. Then I covered the front with a baking themed patterned paper. I added some additional squares of paper and added the word "Sweet" using the You're Sweet die set, only cutting off the You're part. 


I stamped the sentiments "Have a" and "Birthday" using VersaMark ink and white embossing powder to black cardstock and added it to the front of the card to create the sentiment. 

Once I had everything ready, I glued down my baker Gnome and my card was finished! I was super excited about the baking charms, because in my free time I love to bake. These will be great for Christmas themed cards! 

Thank you so much for stopping by on Day 1 of Sneak Peek week. Be sure to stop by tomorrow for another peek into the Karen Burniston June 2023 New Release! 

Happy Crafting!


Thursday, June 8, 2023

Friendship Card with Lawn Fawn's Garden Before 'n Afters

 Hello and Welcome! Today's card is a cute interactive card using Lawn Fawn's Magic Picture Changer along with their Garden Before 'n Afters stamp set. 

For this card, I started with a A2 top fold card using MFT's Cardstock in Limelight. 

I used a pretty yellow patterned paper for the background from a paper pack I purchased recently called Fun on the Farm by Echo Park. I thought this splash of yellow would go well with the green cardstock. 

With a pencil, I drew the area with the picture changer so I knew where to stamp my before and after images. I tried to make sure both images were in the same position so when you pull the tab they look the same. 

Once I had my images stamped, I colored everything in with my Copic markers. 

I then die cut the frame around the picture changer using Lawn Fawn's Magic Picture Changer Add-On and following the images I stamped on the picture changing insert, I created the sky and ground to match what I had made in the picture changer. I colored this in with Copic markers as well. 

I stamped a few images from the Garden Before 'n Afters stamp set as well as the little bee from Lawn Fawn's Berry Special stamp set. I colored these in with Copic markers and die cut them out using the coordinating dies. 

Before I added the extra images, I stamped the sentiment on the front using VersaMark Ink and white embossing powder. 

Then I added the images I stamped and die cut to the front, being careful not to get glue on the picture changer mechanism. 

I did a test pull to make sure everything worked well and it did! Lastly I added a bit of scrap green cardstock to the pull arm and added the "pull" tab on the end. 

I just love how great these cards turn out, how simple they are to make and just how much fun it is to pull the tab and watch the picture change! 

Thank you so much for stopping by today and Happy Crafting!


Tuesday, June 6, 2023

Karen Burniston Designer Challenge - June 2023 - Wedding or Baby!

Hello and Welcome! It's Designer Challenge time once again and this months theme is Wedding or Baby! For my card, I used the Surprise Cube Pop-Up to create baby blocks.  

For this card, I started with a card base of 5 x 10 3/4. I created a 1/4 in folding point in the center to make room for the blocks. 

I added the flap using the Flap & Closure die set and made the "buttons" on the flap and front along with bakers twine to create a closure for the card. 

I added patterned paper I had from a baby themed patterned paper pack. 

For the blocks, I used 80lb smooth white cardstock and added blue and white to each block. I used the Alphabet dies to cut out the word baby in a sparkly blue cardstock.

I also added some baby themed die cuts to the other sides of the blocks using the Baby Charms die set.  

I had a star shaped die set and cut several different sizes of stars out in different colors of blue cardstock that I had in my scraps. 

I die cut one big star and used Honey Bee Stamps Inside: Welcome Baby Sentiments to create the sentiment on the large star. Then I used Distress Ink in Peacock Blue to add some color to the edges of the star. 

I tried to keep the background and the front of the card simple, because the pop-up blocks are really the center focal point in this card. 

I double checked twice the positioning of the blocks before gluing them into the card base, ensuring that they would fit perfectly. 

For the front of the card, I kept it simple, using the Rectangles - Crosshatch to created squares and Lawn Fawn's Little Bundle stamp set to create the baby images and sentiment. 

Thank you so much for stopping by and Happy Crafting


Monday, June 5, 2023

Baby Bear Pop-Up

 Hello and Welcome! My card today uses Karen Burniston's Katherine Label Pop-Up along with these adorable baby bear dies from Studio Light - Bear Friendz. 


For this card, I started by making a card base using 80lb smooth white cardstock. Then I dug out an old baby themed patterned paper pack and found this perfect cloud paper. I used Karen Burniston's Rectangles - Crosshatch to die cut out three rectangle panels. 

For the inside of the card, I die cut the pop-up mechanism from a scrap of blue cardstock I had on hand and glued it inside of the card. Then I die cut the label from the same patterned cardstock as the inside of the card. 

I assembled the little bear in the blanket using scraps of cardstock and added some details with my Copic markers. I checked the placement before gluing the bear down and once I had him placed where I wanted him, I glued him to the pop-up mechanism. 

I used Karen Burniston's Welcome die and Mini Alphabet dies to create the Welcome Baby sentiment. Then I added a place to sign the card using Karen Burniston's Hexagons - Crosshatch dies and some smooth white cardstock. 

I used Honey Bee Stamps Inside: Welcome Baby Sentiments to stamp and cut the little sentiment under the bear. 


For the front of the card, I used the same patterned paper. I added a little bear only holding a blanket and with a pacifier in his mouth. As I did with the bear on the inside, I added some details to the bear with Copic markers. 

I stamped another sentiment from Honey Bee Stamps and used the coordinating dies to cut it out, then placed it under the bear. 

How adorable are those little bears!! Thank you so much for stopping by and Happy Crafting!

Wednesday, May 31, 2023

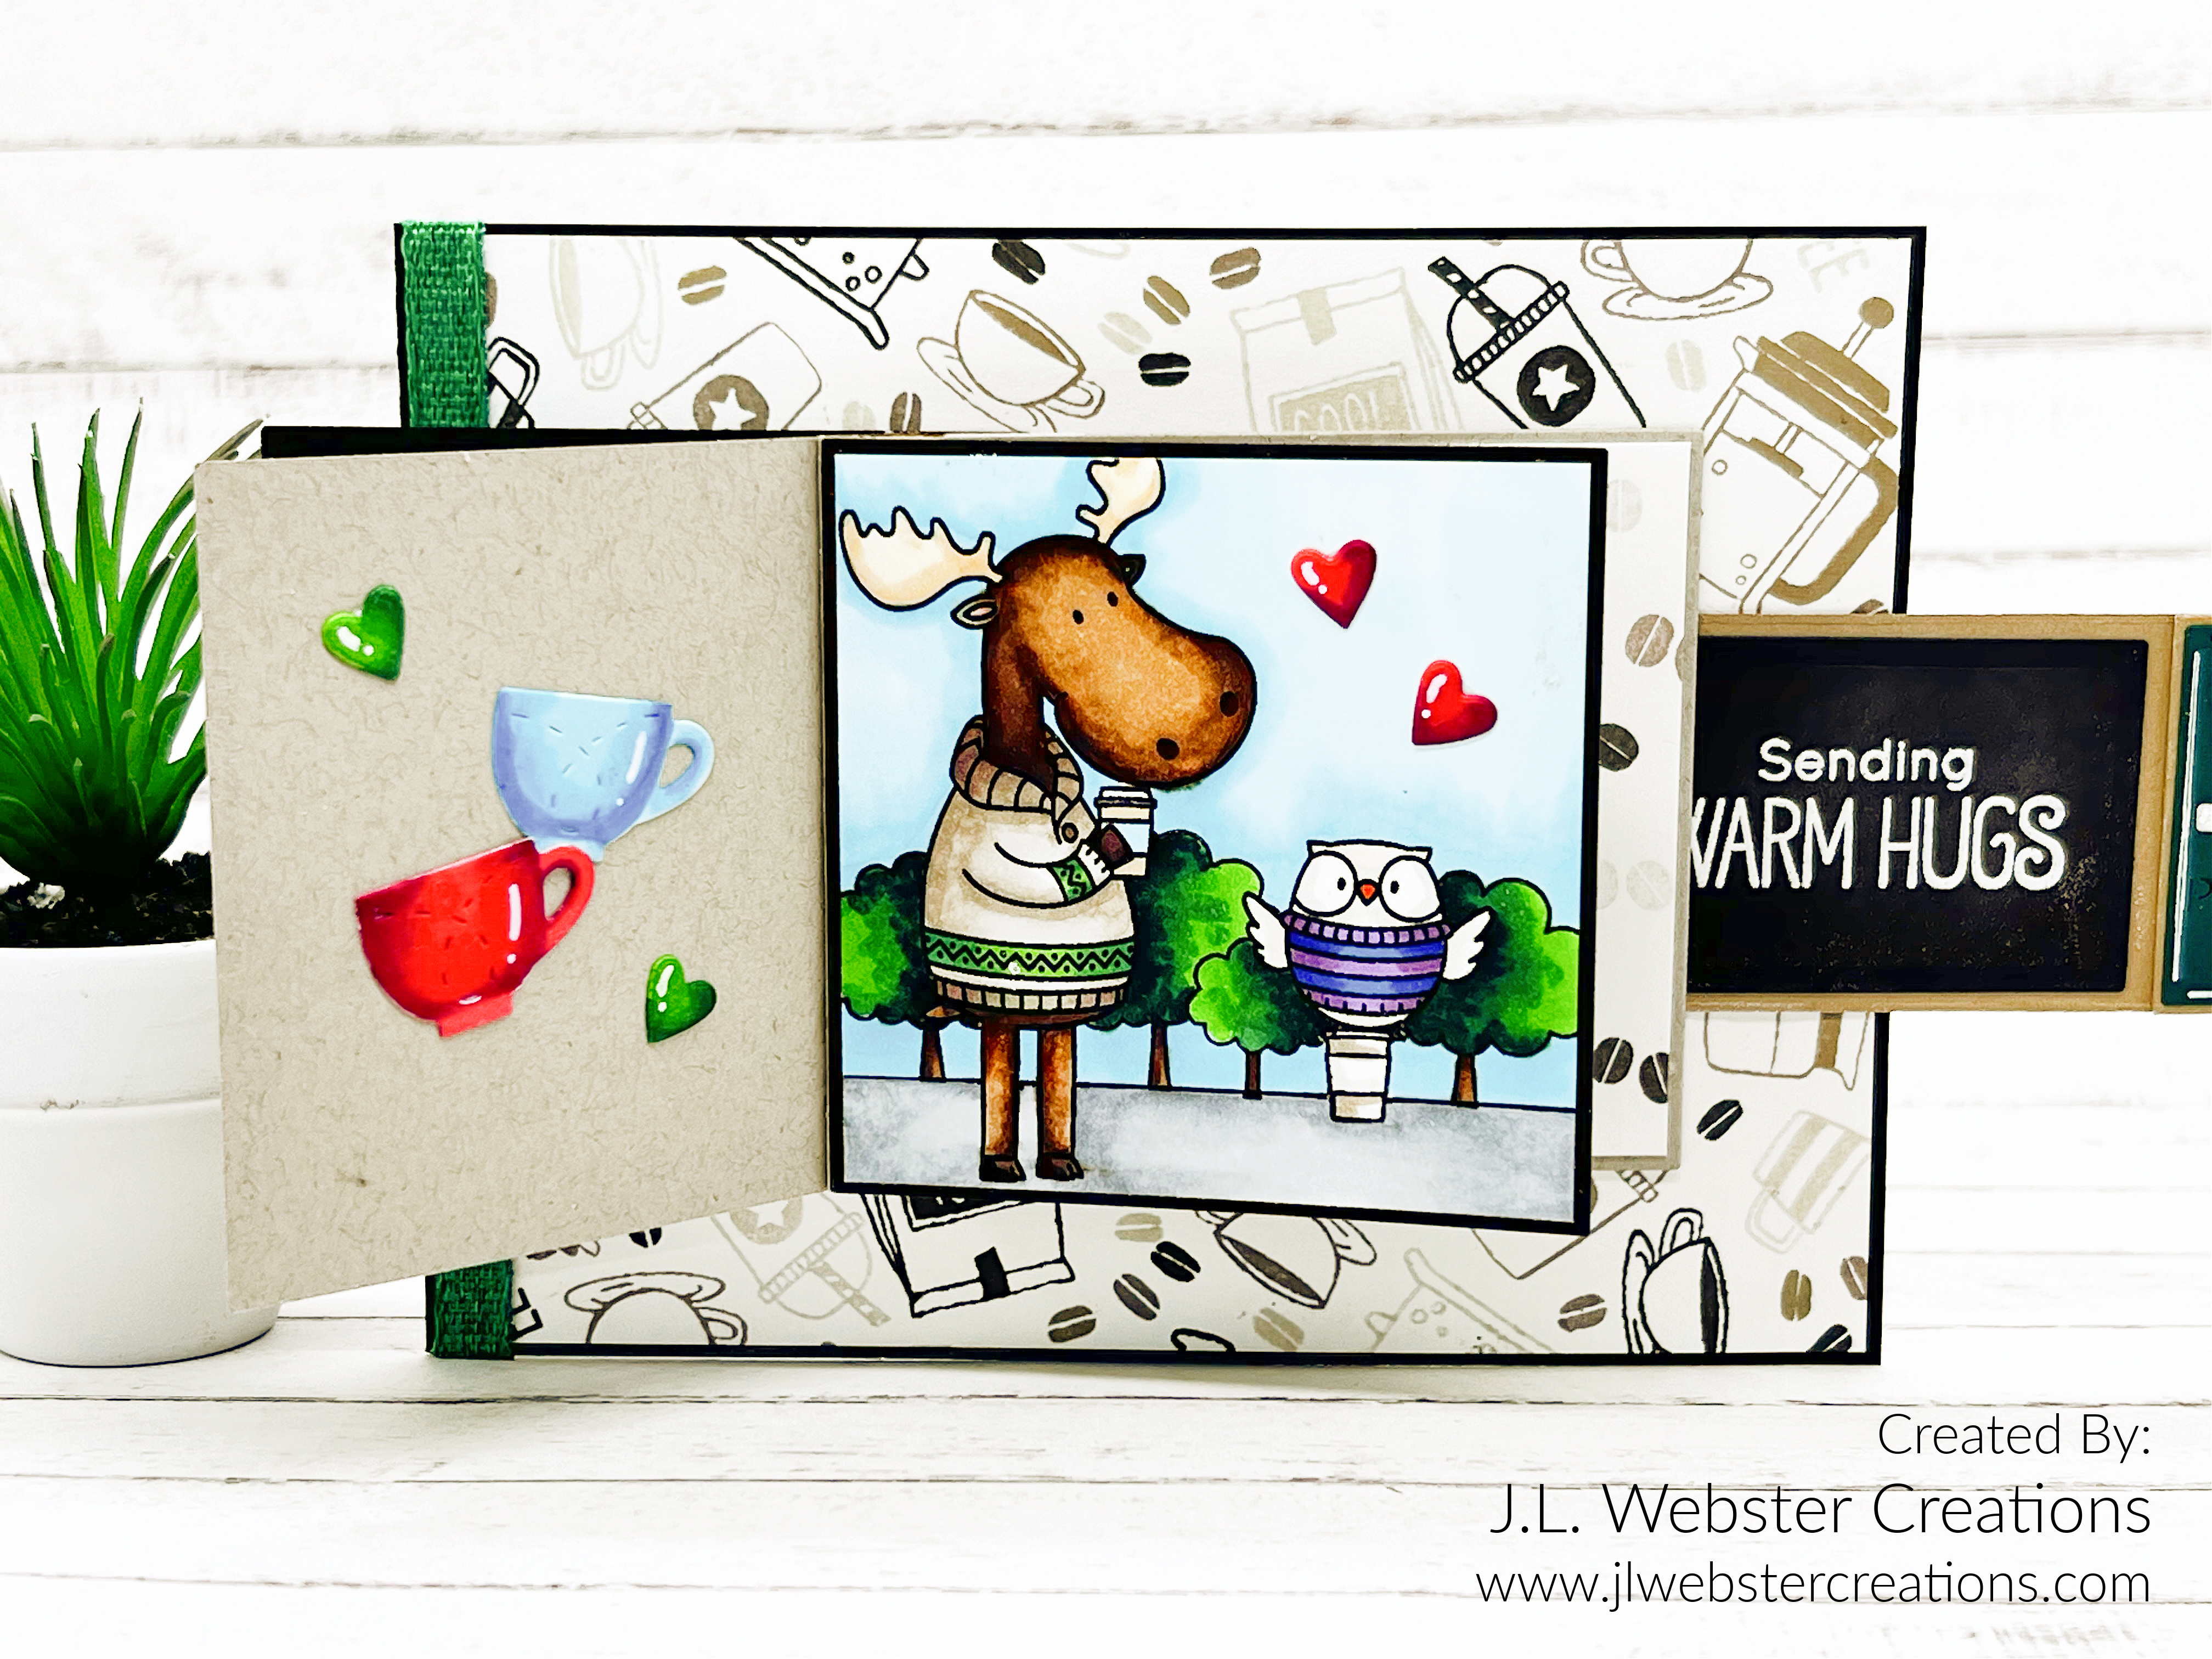
Coffee Waterfall Card

 Hello my Crafty Friends and welcome! Today's card features Karen Burniston's Waterfall Card die set, along with Concord and 9th's Coffee Blend Turnabout Stamp set and My Favorite Things Sweater Weather in the Woods. 

For this card I started with an A2 side fold card with Lawn Fawns Ground Coffee cardstock. I then cut two panels slightly smaller than my card base and used my Coffee Blend Turnabout stamp to create the background. For my inks, I used Simon Says Stamps Pawsitively Saturated Ink in Latte, Cappuccino and Mocha and I used Lawn Fawn's Crunchy Leaf. Once I had the backgrounds done, I used double sided adhesive to attach them to the card base. 

I then used Karen Burniston's Waterfall Card set and cut out the notch in the open side of the card, so you are easily able to use the pull tab. To see the entire assembly instructions for this die set, click here to see her amazing video on YouTube. 

I die cut out all the panels and mechanisms from the same cardstock as the base and a beige colored cardstock as well to add some contrast. 

I then die cut out four panels from smooth white cardstock to use with my stamped images. 

I stamped the images from MFT's Sweater Weather in the Woods using Lawn Fawn's Jet Black ink. I also used masking paper and various other stamps to create the backgrounds in my images. 

I used MFT's Coffee Order word stamp set for the second image (as shown above). Then I colored everything in using Copic markers. I added some white highlights with a Gelly Pen.

I then used Karen Burniston's Coffee Charms to add some little details to the back of each flip panel. I used Copic markers to color these.

Then I die cut a panel to add to the pull arm and stamped the "Sending Warm Hugs" sentiment on it using VersaMark Ink and white embossing powder. 

I put the entire card together, testing the pull arm to make sure it worked well. 

Then I added a green ribbon to the side for a little bit of extra color to the front. 

Thank you so much for stopping by today, I hope you have a great day and Happy Crafting friends. 


Wednesday, May 17, 2023

Cowboy Flip Frame Pop-Up Birthday Card

 Hello and Welcome! Today's card features Karen Burniston's Flip Frame Pop-Up along with My Favorite Things stamp set - Saddle Up & Celebrate. 


For this card, I started with a A2 sized card using Lawn Fawn's Ground Coffee cardstock. I used blue gingham patterned paper from Echo Park called Fun on the Farm as my background. I aged the edges of the patterned paper using Simon Says Stamp Cappuccino Pawsitively Saturated Ink and a blending brush. 

I die cut the frame for the Flip Frame Pop-Up, using some scrap kraft cardstock. I added a black background using the largest rectangle frame from the set. Then I cut out the smaller frame from Neenah Classic Crest smooth white cardstock. I stamped and masked my images the way I wanted, then colored them in with my Copic markers. 

I stamped the remaining images I wanted to use for this card on the same smooth white cardstock and colored them in with Copic markers. Then I used the coordinating dies to cut the stamped images out. 

I die cut a small rectangle from the same Ground Coffee cardstock as the card base and one from white cardstock to create an area for the sender to sign the card. 

I also created a second frame for the other side of the card using the dies from the Flip Frame set and adding wood looking details to the frame as I did with the flip frame. I did this using a Copic marker and loosely creating lines on the frame. 

I used Karen Burniston's Word Set 2 - Birthday Die Set and cut out the "make a wish" sentiment to add to the bottom of the card. 

For the front of the card, I continued the same theme, adding another flip frame and more of the images from the MFT Saddle Up & Celebrate stamp set. 

I die cut the "Happy Birthday to you" sentiment from Word Set 2 - Birthday Die Set as well and added it to the frame. 

This was my first card using the Flip Frame and it was incredibly simple to put together! For a more thorough walkthrough, click here to watch Karen Burniston's assembly video. 

Thank you so much for stopping by today and Happy Crafting!


Wednesday, May 10, 2023

End of Year Teacher Cards - Karen Burniston's Adirondack Chair

 Hello and Welcome! Before I know it, my kids will be home for summer vacation, so I thought I would get a start on some teacher cards. For this card I used Karen Burniston's Adirondack Chair Pop-Up. 

I started with an A2 sized top fold card base. I tried to keep my cardstock light so that the card wouldn't be thick. I used an 80lb smooth white cardstock as the base, I added some clouds to the back using MFT Mini Cloud Stencil and Distress Ink in Peacock Feathers. Then following Karen's instruction in the assembly video (which you can check out here), I cut a panel using a 65lb kraft cardstock and adhered it to the white card base. Before I adhered it down, I used Distress Spray in Antique Linen and Vintage Photo to create little dots of color to look like sand, I also used Simon Says Stamps Pawsitively Saturated Ink in Cappuccino and a blending brush to add some color to the edges. 

I used Karen Burniston's Tropical Scene dies and cut some sand dunes for the background, then I adhered the sand piece to the card base, then I taped down the Adirondack chair die and ran it through my die cutter. I trimmed out kraft cardstock piece so the white chair could pop up. I added a kraft cardstock piece to the back of the card as shown in the assembly video. This will cover the empty space behind the chair. 

I die cut an ocean piece using a piece of scrap blue cardstock and one of the wave dies in the Tropical Scene die set. Then I used Distress Ink in Peacock Feathers to add some dimension to the water piece. 

Now comes the fun part! Decorating! I cut out the palm trees from the Tropical Scene sand dunes in dark brown and green and added them to the background. I added some detail to the palm trees using a Copic marker. 

I then added the flamingo and flip flops from the Beach Charms die set, adding details to both using Copic markers. 

I wanted to add a blanket or towel to the back of the chair, so I used the picnic blanket die from Karen Burniston's Picnic Elements and a scrap piece of patterned paper. I trimmed the piece to fit the back of the chair and added some shading with Distress Ink in Mustard Seed. 

I added the bucket and shovel that comes with the Adirondack Chair Pop-Up, adding glossy accents to the bucket. I also added the turtle from the Sea Animals. I used Copic markers to add detail to the turtle and a size 10 white Gelly Pen to add shine lines. 

I stamped the teacher sentiment from Sugar Pea Designs - Sweet Sentiments Teacher to the top of the card. I die cut a small rectangle from Karen Burniston's Rectangles - Crosshatch using smooth white cardstock so that my daughter has a place to sign her name for her teacher. 

For the front of this card, I used two different summer themed pattern papers. I die cut a crab border using Karen Burniston's Beach Borders die set. I added the eyes and smiles using a black pen and added shine lines using a Gelly Pen. 

I die cut the word Welcome from Karen Burniston's Welcome word die twice, once from a lime green cardstock and once from heavy weight black cardstock. Then I glued them together and added it to the card. I did the same for the word summer which came from Karen Burniston's Word Set 6 - Summer, only using a bright yellow cardstock. 

I added glitter gel to both words to add some sparkle to the front of this card. This was my first time using the Adirondack chair, but I already have ideas for my next card using this die! 

Thank you so much for stopping by and Happy Crafting!


Thursday, May 4, 2023

Happy Birthday Cupcake Pop-Up

 Hello and Welcome! Today's card features Karen Burniston's Cupcake Pop-Up die set. This was a die that I had never used, so I thought that it was about time I made a cupcake pop-up! 

I started with a A2 sized top fold card base, using a textured dark blue cardstock. I cut a piece of light blue-gray cardstock to fit the inside of the card where the pop up mechanism would be die cut from. I cut this 4 1/8 x 8 and scored it in the middle at 4in. I adhered the pop-up die and held it down with repositionable tape, then die cut it out. 

Once I folded all the score lines correctly (to see how, check out Karen Burniston's Instructional video here), I glued it onto the card base. I cut two pieces of patterned paper to fit the top and bottom areas of the card, then using Karen Burniston's Border Blends - Party die set, made a little border to go between the blue cardstock and the patterned paper. 

For the cupcakes, I die cut the cupcake wrapper from a bright fushia pink cardstock and added some detail to it using Simon Says Stamp Pawsitively Saturated Ink in Sweets and Taffy. I die cut the frosting top from white cardstock and with my Copic markers, added some dimension to the frosting. 

I added some "sprinkles" to the cupcakes using some plastic fake sprinkles I got from Amazon. Then I added the bow to the cupcake wrapper and the cherry on top. I added glossy accents to the cherry and once dry, used a white Gelly Pen in size 10 to create a shine mark. 

I did the same for the two small cupcakes only used Simon Says Stamp Pawsitively Saturated Ink in Surf and Orchid. 

I die cut the "make a wish" and "celebrate" sentiments from Karen Burniston's Word Set 2: Birthday Die Set and some glitter black cardstock. 

I die cut a rectangle from scrap white cardstock using Karen Burniston's Rectangles - Crosshatch and adhered it to the bottom of the card so the sender has a place to sign or write a little note. 

For the front of the card, I used the same patterned paper and the same blue-grey colored cardstock. 

I die cut the "Happy Birthday to you" sentiment from the same word set and the same black glitter cardstock. 

Then I added three of the small cupcakes to the front. I kept the same color scheme as the inside of the card. 

This was a fairly simple card to create and the pop-up mechanism was very simple to use. The hardest part was making sure the folds were crisp and really it wasn't that difficult. I love how adorable those little cupcakes turned out and how the word set compliments the cards theme. 

Thank you for stopping by and Happy Crafting! 


Tuesday, May 2, 2023

Karen Burniston May 2023 Designer Challenge - Bejeweled!

 Hello and Welcome! It's Designer Challenge time again and our theme this month is Bejeweled! Adding some bling to my cards isn't something I normally do, so this took me out of my comfort zone a little bit and to be honest, it was fun! For my card, I used glitter gel and assorted colored gems to give my flowers some sparkle!

This card was a special order card for a very good friends 70th Birthday. For this card I used Karen Burniston's Flower Pot Pop-Up along with the Flutter Charms and the Happy Birthday die.

I started with an A2 sized card base using 80lb smooth white cardstock. I found a pretty patterned paper from Carta Bella that was a light green color. Using the Rectangles - Crosshatch, I die cut three rectangle panels from this paper. 

I found a pretty pink/peach colored cardstock in my stash of scraps and used that to cut out the flower pot and the inner panels that hold the flowers. I also used a scrap patterned paper to cut out the front of the flower pot. 

I die cut all the flowers using a heavy weight smooth white cardstock and colored them in lightly with Copic markers. I wanted the centers to have color but the tips to be white. I added a brown center and then added a little colored gem to the center of each flower. 

I die cut the leaves and added detail to them with my Copic markers. Then I die cut the tiny pink flowers from pink cardstock, added some detail to the center of each flower and used my Heartfelt Creations flower shaping board to add some dimension to each little flower. Then to finish them off I added a sparkly white gem. 

I die cut the butterfly, bee and dragon fly and added them to the flower pot. I also die cut the Happy Birthday twice, once from pink cardstock and once from black and glued them together to make the sentiment pop. Then I added glitter gel to the sentiment. 

I die cut the 70 from Spellbinders - Birthday Wishes for Everyone using purple and black cardstock and glued them together. From there I added the same glitter gel. 

I die cut a small rectangle for signing and one with a stamped sentiment on it from MFT called Anything But Basic Birthday Wishes. I added a few more flowers around this sentiment. 

This card turned out so pretty! I haven't used the Flower Pot Pop-Up in a while, but it is so worth all the effort put into it. 

The card itself is thick, so I supplied a 5x7 envelope so I know it will fit properly and without bending the card. Also, this card isn't being mailed, so the thickness doesn't matter in this case. 

Thank you so much for stopping by and Happy Crafting!


Thursday, April 27, 2023

Lawn Fawnatics Challenge #147 - City vs Country

 Hello and Welcome! Today's card is for the Lawn Fawnatics Challenge #147 - City vs Country. I chose to make a card with a country feel for it. I love summer because that means the farmers markets are open and there is nothing like farm fresh produce! So for this card, I created a mice farmers market using Lawn Fawn's Berry Special and Apple-solutely Awesome stamp sets. 


I started with a slim line sized card base in Lawn Fawn's Ground Coffee cardstock. I then cut a piece of smooth white 110lb cardstock to fit just a little smaller then my slim line card base (8 3/8 x 3 3/8). From there I started planning out where I wanted everything to go. 

For this card, I used a lot of masking paper, like a LOT! I used Altenew masking paper, which is an ok product, but not what I was expecting. I find that this masking paper can sometimes tear up the cardstock and remove your stamped images or fray them. Also, it's a pain in the butt to get off! I have even tried to stick it to my clothes a few times to make it not as sticky but it still is almost impossible to remove! If you have any suggestions with how to get this product to work better, I'm all ears! Once I finished stamping all my images and spent a large amount of time peeling off the masking paper, rubbing off the sticky areas it left and repairing what it tore, I got to coloring! I colored the images using Copic markers. 

Before coloring though, I created my background. I used MFT Mini Clouds stencil and Distress Ink in Peacock Feathers to create the cloud background. I used a piece of scrap white cardstock to create the grass and dirt areas. I used Lawn Fawn's Crunchy Leaf ink and Distress Oxide ink in Mowed Lawn and Rustic Wilderness to create the grass and dirt. 

Once I had everything colored in, I used a size 10 white Gelly Pen to create shine lines on the apples and some other items. 

I stamped the sentiment using Lawn Fawn's Jet Black ink and the sentiments stamps from both the Berry Special and Apple-solutely Awesome sets. 

I love love love how this card turned out. I love using masking to create fun cards. Now to get that masking paper to peel off easily! As always, thank you so much for stopping by and Happy Crafting! 

Wednesday, April 19, 2023

Sew Amazing Birthday Card

 Hello and Welcome! It's been a while and I apologize for being absent from my blog. Between Easter, my birthday and my kids being sick, it's been a crazy couple of weeks. But I'm finally (and most happily) back in my office working on cards. 

Today's card features Karen Burniston's Paper Frames Pop-Up. Along with this, I used Karen Burniston's Sewing Charms and Lawn Fawn's Sew Very Mice stamp set to create this super cute sewing themed birthday card. 


For this card, I started with a A2 side fold card, using smooth white 80lb cardstock as the base. I chose Lawn Fawn's What's Sewing On? patterned paper for my background, in the light green "stem stitch" paper. I also used a light yellow cardstock for the pop-up mechanism and added a splash of a darker green cardstock as well. 

I die cut the mechanism from the pale yellow cardstock, then cut the two middle pieces from white and a darker green cardstock. I glued the middle panels to the mechanism using Lineco Neutral PH glue. 

I then added my patterned paper to the inside of the card, which I die cut from Karen Burniston's Rectangles - Crosshatch die set. I decided to add two white cardstock pieces to the outer edges, and used Karen Burniston's Border Blends - Party to create a pretty separator between the white and patterned paper. 

I then stamped my mice images using Lawn Fawn's Jet Black Ink and colored them in using Copic markers. I die cut them out with the coordinating dies and set them aside. 

From there, I die cut out the Sewing Charms and put them together. Once I had everything done, I was ready to put my card together. 

I added the pieces from the Sewing Charms, the sewing machine, buttons and spools with bakers twine that I glued to them. I added the little mice and other details till I was happy with how the inside looked. I left one section empty on the pop-up so that the sender could sign their name or write a small note. 

For the front of the card, I created some layers using the Rectangles - Crosshatch and the same cardstock and patterned paper as the inside of the card. 

I die cut the word Sew from Karen Burniston's Mini Alphabet and Numbers dies. I stamped the "you are" and "amazing" from the Sew Very Mice stamp set, using VersaMark ink and white embossing powder on to black cardstock. Then I added it to the front of the card. 

I added the little mice and the buttons from the Sewing Charms. 

I just love how simple but adorable this card turned out. It's perfect for anyone who loves to sew or even cross stitch! Thank you so much for stopping by today and Happy Crafting!

Foxy Fall Pop-Up Card!

 Hello Crafty Friends and welcome! I have another pop-up card for you. This time, I used an old stamp set I had from My Favorite Things call...