Wednesday, March 8, 2023

Ready, Set, Christmas Challenge - Snow Buddies!

 Hello and Welcome! Today's card was made for the MFT Ready, Set, Christmas Challenge. This is a relatively new challenge and it's to help you get ready for the Christmas season by making a Christmas card every month! For this card, I used MFT BB Snow Buddies stamp set and corresponding dies. 


For this card, I started with a slimline sized card using a textured dark blue cardstock. Then I cut a panel (8.375 x 3.375) from smooth white cardstock and created the sky background using Distress Oxide ink in Tumbled Glass, Salty Ocean and Chipped Sapphire. I set that aside to dry. I cut another panel using smooth white cardstock and then created a snowy hill using MFT Stitched Slimline Snow Drifts Die-namics. 

I stamped the images onto Neenah Class Crest smooth white cardstock using Lawn Fawn's Black ink. Then I colored the images in with Copic markers. 

Once my background was dry, I used Copic Opaque White and some water and splattered it on to my card to create falling snow. I've never used this product before and I recently seen someone use it for an MFT card video. It works AMAZING!! I highly recommend this product! I set my background aside to dry. 

Once dry, it was time to put my card together. I stamped my sentiment first using Lawn Fawn's Black Ink and then added my snow hill and fences. From there I added the rest of my images. Once adhered to the background, I added some glitter gel to the hat pom pom's and to the snowballs and snow on the fence. 

I just love how this card turned out and now, in March, I already have a card ready for Christmas! Win win!! Thank you so much for stopping by and Happy Crafting!

Tuesday, March 7, 2023

Karen Burniston March 2023 Designer Challenge - Vacation

 Hello and Welcome! It's Designer Challenge time again and this months theme was Vacation! Who doesn't love a vacation? I live in Canada and there are so many beautiful Provincial Parks to camp in and so many cabins you can rent for a week and spend some amazing family time! So for my card, I made a cabin in the woods Vacation. 


I started with an A2 sized card in a dark brown cardstock. I cut two panels from smooth white cardstock and created my background using Distress Oxide ink. 

I used Karen Burniston's Tiny House Pop-Up to create the cabin. I cut the house part out from smooth white cardstock and with a pencil create the logs on the cabin. From there, I used my Copic markers to create the wooden logs. I added wooden window frames and door. 

I added some bushes using the tree leaves from Long Nature Edges 2 and grass using the grass add-on from the Tiny House Pop-Up. I used the stones from the Tiny House Pop-Up and created a path way to the dock. I added some detail using my Copic markers. I added some fish from Karen Burniston's Camping Charms and added detail to them using Copic markers and a white Gelly Pen. I used the Bam Box pop-up and green cardstock to create a place for the trees to pop-up. I used the Christmas Trees Pop Stand and the Evergreen Pivot Panels to create the trees in the background. Then I added details using Copic markers. For the fire pit, I used the fire pit dies that come with the Tent Pop-Up and created the fire beside the cabin. I added details again using Copic markers. I made a little folding pop-up piece for the fire pit. I tried to use a Bam Box Pop-Up but it was too big for the tiny fire. 
For the front of the card, I created a wood patterned paper background using the Rectangles - Crosshatch in the largest size. I then used the Ovals - Crosshatch to create a scene on the front. I used the Outdoor Scene dies to create the trees and created a cloud background using MFT Mini Clouds stencil and Distress Ink in Peacock Feathers. 

I used Word Set 6 - Summer to create the "Hello Summer" and "Enjoy" sentiments on the card. For the final touches to the inside of the card, I added some little flowers that I had in my stock of die cuts and I think that gave it the finishing touch of a great summer vacation cabin!

Thank you so much for stopping by and Happy Crafting!


Monday, March 6, 2023

Happy Birthday to EWE! MFT Weekly Sketch Challenge

 Hello and Welcome! Today's card was created for the My Favorite Things Weekly Sketch Challenge. I dug through my stamps and decided to use one that I haven't used for a while and Ewe Are the Best was the winner!


For this card, I started with a top fold A2 sized card using smooth heavy weight cardstock. I die cut the largest rectangle from MFT A2 Double Stitched Rectangle STAX from MFT Homespun Gingham patterned paper. I die cut another piece using the same double stitched die and smooth white cardstock. Then I turned the die to create a point and die cut the piece again to create the shape needed in the Sketch Challenge. 

I dug out my masking paper and created some masks for my stamped images and created the scene shown. I used MFT Grass Edges stencil and Mowed Lawn Distress Oxide ink to create the ground. Then I used MFT Mini Cloud Edges stencil and Peacock Feathers Distress Ink to create the sky. 

I removed the masks and colored the images in using various Copic markers. Then I added some white shine lines with a white Gelly Pen in size 10. 

I stamped the sentiment "Happy Birthday to EWE" using VersaMark Ink and white embossing powder on heavy weight smooth black cardstock. 

This is a very simple card, but so adorable! I just love the BB stamps from My Favorite Things. Thank you so much for stopping by and Happy Crafting!

Simply Celebrate Birthday Cards!

 Hello and Welcome! Lately I have been trying to use stamps and dies that I bought but haven't used yet (and there are a few). Today's card features Lawn Fawn's Simply Celebrate Critters along with their Dad Jokes stamp set. 

For this first card, I started with an A2 sized card base from smooth black heavyweight cardstock. I die cut a panel from smooth white cardstock using MFT A2 Stitched Rectangle STAX in the largest size. 

I placed a piece of removable tape across the panel, then I stamped the speech bubble on to the top part of the card background. I created a mask to cover the speech bubble and using my MFT Mini Cloud Edges stencil and Distress Ink in Peacock Feathers, created the cloud sky. I removed the tape and repositioned it on top of the line of clouds and used the MFT Small Brick Wall Stencil and Distress Oxide Ink in Candied Apple to create the brick wall. Then with my Copic markers in Neutral Grey, I created the grout between the bricks.

I stamped the cats using Lawn Fawn's Black Ink and colored them in using Copic markers. I used the corresponding dies to cut the cats out. Then I trimmed the white edge on the bottom of the cats. I glued to them the panel so they look like they are on the top of the wall. 

I removed the mask from the speech bubble and stamped the funny dad jokes and sentiments from the Simply Celebrate Critters and Dad Jokes stamp sets. 

I used Lawn Fawn's Scripty Birthday die and die cut the word twice, once from dark blue glitter cardstock and once from black cardstock. Then I glued the pieces together to give the word some dimension. I stamped the word "Wishes" from Lawn Fawn's Happy Happy Happy stamp set on black cardstock and used white embossing powder. Then glued the sentiment below.

For my second card, I started with the same A2 sized black cardstock base. Then cut a similar panel from smooth white cardstock, this time when I added the the tape, I just made the clouds. I created the wall the same as before only this time I didn't color in the grout between the bricks. 

I die cut a panel using MFT A2 Stitched Rectangles in the largest size using green cardstock, then I cut grass out using MFT Tucked and Turf - Horizontal die. I used Distress Oxide ink in Mowed Lawn and Rustic Wilderness to give the grass some detail. 

I stamped the dogs and speech bubbles using Lawn Fawn's Black Ink and colored the dogs in using Copic Markers. I stamped the sentiments into the speech bubbles and glued them to card along with the dog, carefully trimming the white bottom edge like I did with the cats. 

I die cut the word Yappy using Lawn Fawn's Oliver's Stitched ABC's using light blue glitter cardstock. Then I die cut it again from black cardstock and glued the pieces all together. 

I stamped the sentiments "wishing you a" and "birthday" from Lawn Fawn's Happy Happy Happy stamp set on smooth black cardstock and embossed it with white embossing powder. I glued the sentiments and word Yappy onto the card. 

I just love how funny and adorable these two cards turned out. The dad jokes are hilariously silly and total Dad jokes! Perfect for a masculine card. Thank you so much for stopping by and Happy Crafting!


Tuesday, February 28, 2023

Waterfall Birthday Card featuring Karen Burniston's Waterfall Card Die

 Hello and Welcome! Today's card is a new one for me, the Waterfall Card. Karen Burniston created a die set that makes making a waterfall style card super easy!! 

For this card, I started with an A2 size card base in a light blue color. I then die cut out two panels using MFT A2 Stitched Rectangle STAX in the largest size. 

For the background on those two panels, I used Concord & 9th's Birthday Basics Turnabout stamp and Distress Oxide ink in Mustard Seed, Shaded Lilac, Cracked Pistachio and Salty Ocean. I set those aside to dry overnight. 

I stamped the images using MFT Picture Perfect Party Animals and Lawn Fawn's Black Ink. Then I colored the images in using Copic markers. I added white highlight lines and some other details to the images using a white Gelly Pen (in size 10). 

I die cut colored cardstock to match the background colors using the dies in the Waterfall Card die set. Then I glued them to the mechanism that flips the pictures. For more details on how to make this card using Karen Burniston's die set, click here for her YouTube assembly video. 


I added a piece of scrap patterned paper to the pull mechanism and die cut the tab piece that says pull. I added a bit of black for the arrow. Lastly I added the sentiments from Karen Burniston's Word Set 2 - Birthday. This card was super simple to put together! I was really surprise at how easy this card was. I will definitely be making more of these because not only are they easy to assemble, but they are so much fun to pull! 


Thank you so much for stopping by and Happy Crafting!


Monday, February 27, 2023

Lawn Fawn Elephant Parade Baby Cards

 Hello and Welcome! Today's card features the brand new release from Lawn Fawn called Elephant Parade. This adorable elephant stamp set comes with everything you need to make adorable baby cards or just a card to say "I love you". 


For these four cards, I used the same images but changed the sentiment on the banner and the paper color. I sell my cards, so I try to bulk up on cards by making three or more of the same card, with just some differences. 

I started with an A2 card base for all these cards. Then I die cut the patterned paper using MFT A2 Stitched Rectangle STAX in the largest size, then I used the new Lawn Fawn Secret Garden Window to create the window on the front of the card. 

Using MFT Mini Clouds stencil and Distress Oxide ink in Squeezed Lemonade and Cracked Pistachio, I made a cloud background. 

I added foam tape to the back of the front patterned paper piece and added that to the front of the card base. I stamped the sentiment "a little bundle" and "is on the way"/"is here" from Lawn Fawn's Little Bundle stamp set. 

I stamped the images from Elephant Parade on Neenah Classic Crest Smooth white cardstock using Lawn Fawn black ink. I colored in the images using Copic markers, then used the corresponding dies to cut them out. 


I then added them to the front of cards using Lineco Neutral PH glue. I added the same patterned paper to the inside of the card with a simple "congratulations" sentiment on a smaller white piece of cardstock. 

I just love how adorable this stamp set is! I look forward to using the other two elephants soon to make another set of cards. Thank you so much for stopping by and Happy Crafting!

Friday, February 24, 2023

You're the Zest with Lawn Fawn's Zesty Lemon

 Hello and Welcome! Today's card features Lawn Fawn's Zesty Lemon die set. This was a die set I bought when it came out and have never used it, so I thought it's time to use it. 

For this card, I started with an A2 sized card base from smooth white heavy weight cardstock. I die cut a background piece using MFT A2 Stitched Rectangle STAX largest die. I used Distress Oxide ink in Salty Ocean and Tumbled Glass to create the blue background. I sprayed water on to the ink and dabbed it with a Kleenex to create some extra detail. Once it was dried, I used double sided adhesive to add it to my card. 

I die cut the lemon from a bright yellow cardstock and added Distress Oxide ink in Squeezed Lemonade around the edges. I used a lighter yellow cardstock for the back of the lemons. 

For the lemon slices, I added light yellow cardstock for the inside, then added details with Copic markers. 

I die cut the leaves from a light green cardstock and added details with Copic markers. 

I die cut the basket using Lawn Fawn's Fruit Basket from smooth white cardstock and added some shadow using Copic markers. 

I used Lawn Fawn's Oliver's Stitched ABC's and cut out the word "Zest" then added some Distress Oxide ink in Squeezed Lemonade to the bottom of the letters. 

I stamped the "You are the" sentiment from MFT More Essential Sentiments using VersaMark ink and white embossing powder. 

Once I had everything glued down where I wanted it. I added some Glossy Accents to the lemons to make it look like water drops and I added some to the lemon slice to make it look juicy. Then I added glitter gel to the word Zest. 

This is such a pretty die set. I just love how the lemons came out. Thank you so much for stopping by and Happy Crafting!

Thursday, February 23, 2023

Rockin' Birthday Card using Karen Burniston's Rockin' Rectangle!

 Hello and Welcome! Today's card features Karen Burniston's Rockin' Rectangle Pop-Up and MFT Mice Day to Celebrate stamp set. 

I started with an A2 sized card using smooth white heavy weight cardstock. I added a birthday cake patterned paper, then using the medium sized rectangle die, cut a hole to create a window in the card. 

I added a piece of acetate to the window and glued everything down. Then I created a scalloped border to go around the window using the dies that come with the Rockin' Rectangle die set. 

I die cut the mechanism using the same heavy weight smooth white cardstock as the card base and added that the card. If you would like to know how to do this step, click here to see Karen Burniston's instructional video on YouTube. 

I die cut the biggest rectangle using a bright pink colored cardstock and die cut the second rectangle down using white cardstock. Then using Distress Oxide ink in Tumbled Glass, I added some detail to the edges. 

I stamped the images from the MFT Mice Day to Celebrate on Neenah Classic Crest smooth white cardstock and colored them using Copic markers. Then I used the corresponding dies and cut the mice and birthday items out. I added them to the front and inside of the card. 

I die cut a smaller rectangle and stamped the "Happy Birthday from me to you" sentiment on it, then glued it into the card. 

I used Karen Burniston's Mini Alphabet and Numbers dies to create the 20 on top of the cupcake using red glitter cardstock. 

I cut a piece of light blue cardstock and stamped the "wish come true" sentiment on it using black ink from Lawn Fawn. Then I glued it to the front of the card. 

These little mice are so adorable. I really like this stamp set. It pairs well with the Rockin' Rectangle Pop-Up which is a great die set, because you could use it for any type of card. 

Thank you so much for stopping by and Happy Crafting!

Wednesday, February 22, 2023

Concord & 9th Birthday Basics Card

 Hello and welcome! Today's card features Concord & 9ths Birthday Basics Turnabout stamp and matching dies to create this bright 20th Birthday card. 

For this card, I started with an A2 sized card using smooth white heavy weight cardstock. Then I created a background piece using the largest die in the MFT A2 Stitched Rectangle STAX set and smooth white cardstock. 

Then I used my Concord & 9th Birthday Basics turnabout stamp and VersaMark Ink along with clear embossing powder to create the background. Once the embossing powder was set, I used Distress Oxide inks in Picked Raspberry, Squeezed Lemonade and Tumbled Glass to create the rainbow background.

I die cut the balloon from the Turnabout stamp and die set and used Distress Oxide ink in Spun Sugar to add some color to the balloon. Then I sprayed the balloon with water to add some fun detail. 

I die cut the word "happy" from blue and black cardstock and glued them together to give the sentiment some depth. 

I stamped the word "birth" from the happy birthday sentiment that comes with the Birthday Basics Turnabout stamp. I die cut the banner from different colors of scrap cardstock and added a white glitter cardstock to the word "day". I used Lawn Fawns Oliver's Stitched ABC/123 die to cut the 20 for the balloon. I used the same glitter cardstock as the word "day".  Then I die cut the 20 from black cardstock and glued them together to give the number some dimension on the balloon. 

I love how simple this card was to make but it has such a wow factor! It's bright and cheerful, perfect for wishing someone a Happy Birthday! Thank you so much for stopping by and Happy Crafting! 

Tuesday, February 21, 2023

Mer-mazing Birthday Card using Karen Burniston's Little Labels Pop-Up

 Hello and welcome! Today's card features Karen Burniston's Little Label Pop-Up die along with her new Beach Borders die set and Word Set 16 - Beach Happy Hour set. 


For this card, I started with a slimline sized card. I created the background and sea base of the card using Distress Oxide Ink in Peacock Feathers (for the sky) and Tumbled Glass and Salty Ocean for the sea. I sprayed water on the sea base and dabbed it with a Kleenex to add some water detail. 

I used Karen Burniston's Long Nature Edges to create the beach background that the pop-up mechanism is up against. I also used her Tropical Scene die set to create the waves behind the mermaids and to make the sun. 

For the clouds, I used Karen's Outdoor Scene dies. Then I added Palm Trees from the new Beach Bar Tiny House Add-On. I added some sea creatures using the new Sea Charms die set from Karen Burniston. 

I used My Favorite Things Mermazing stamp set and colored in the cute little mermaids using Copic markers. 


For the front of the card, I kept it simple using two different kinds of patterned paper and covered the seam with the crabs from the new Beach Borders die. Then I added some palm trees from the Beach Charms set. 

Lastly, I used the new Word Set 16 - Beach Happy Hour die set and die cut the word Beach. Then I die cut the "Y" from the Happy from the same die set and added it to the end of Beach. I used Word Set 2: Birthday and added Birthday Wishes, adding the e and s to the end of Wishes using the "make a wish" sentiment. 

If you haven't checked out Karen Burniston's New Release, be sure to go to her online shop and see the fantastic new dies out! Thank you so much for stopping by and Happy Crafting!


Monday, February 20, 2023

Karen Burniston - KB Riley LLC February 2023 New Release Blog Hop!


Hi Crafty Friends,
Welcome to our Karen Burniston Products - KB Riley LLC February Release Blog Hop. The Design Team have come together with Karen today for a fun blog hop to celebrate the release of 6 new dies. Sneak peeks of the new release started last week, and the dies are available to order NOW!


This release includes:
  • 1 new Charm die sets
  • 1 new Word set
  • 1 new Tiny House Add-Ons sets
  • 1 new Pop-up die sets
  • 1 new Crosshatch die sets
  • 1 new Border die set
Dies are available to order now on the website.
GIVEAWAY:
To celebrate the release Karen Burniston and each of the Karen Burniston - KB Riley LLC Design Team members will be giving away a $25 Gift Certificate to some lucky person who comments on our blog posts, so make sure you join the hop and comment on everyone's blog post. Winners will be randomly chosen from ALL of the blog hop comments received on our blog posts by Monday, 27th February 2023. Lots of chances to win some goodies, so just leave a comment on this post or any other blog hop posts to enter! Don't forget to leave some way for us to contact you, in case you are a lucky winner!
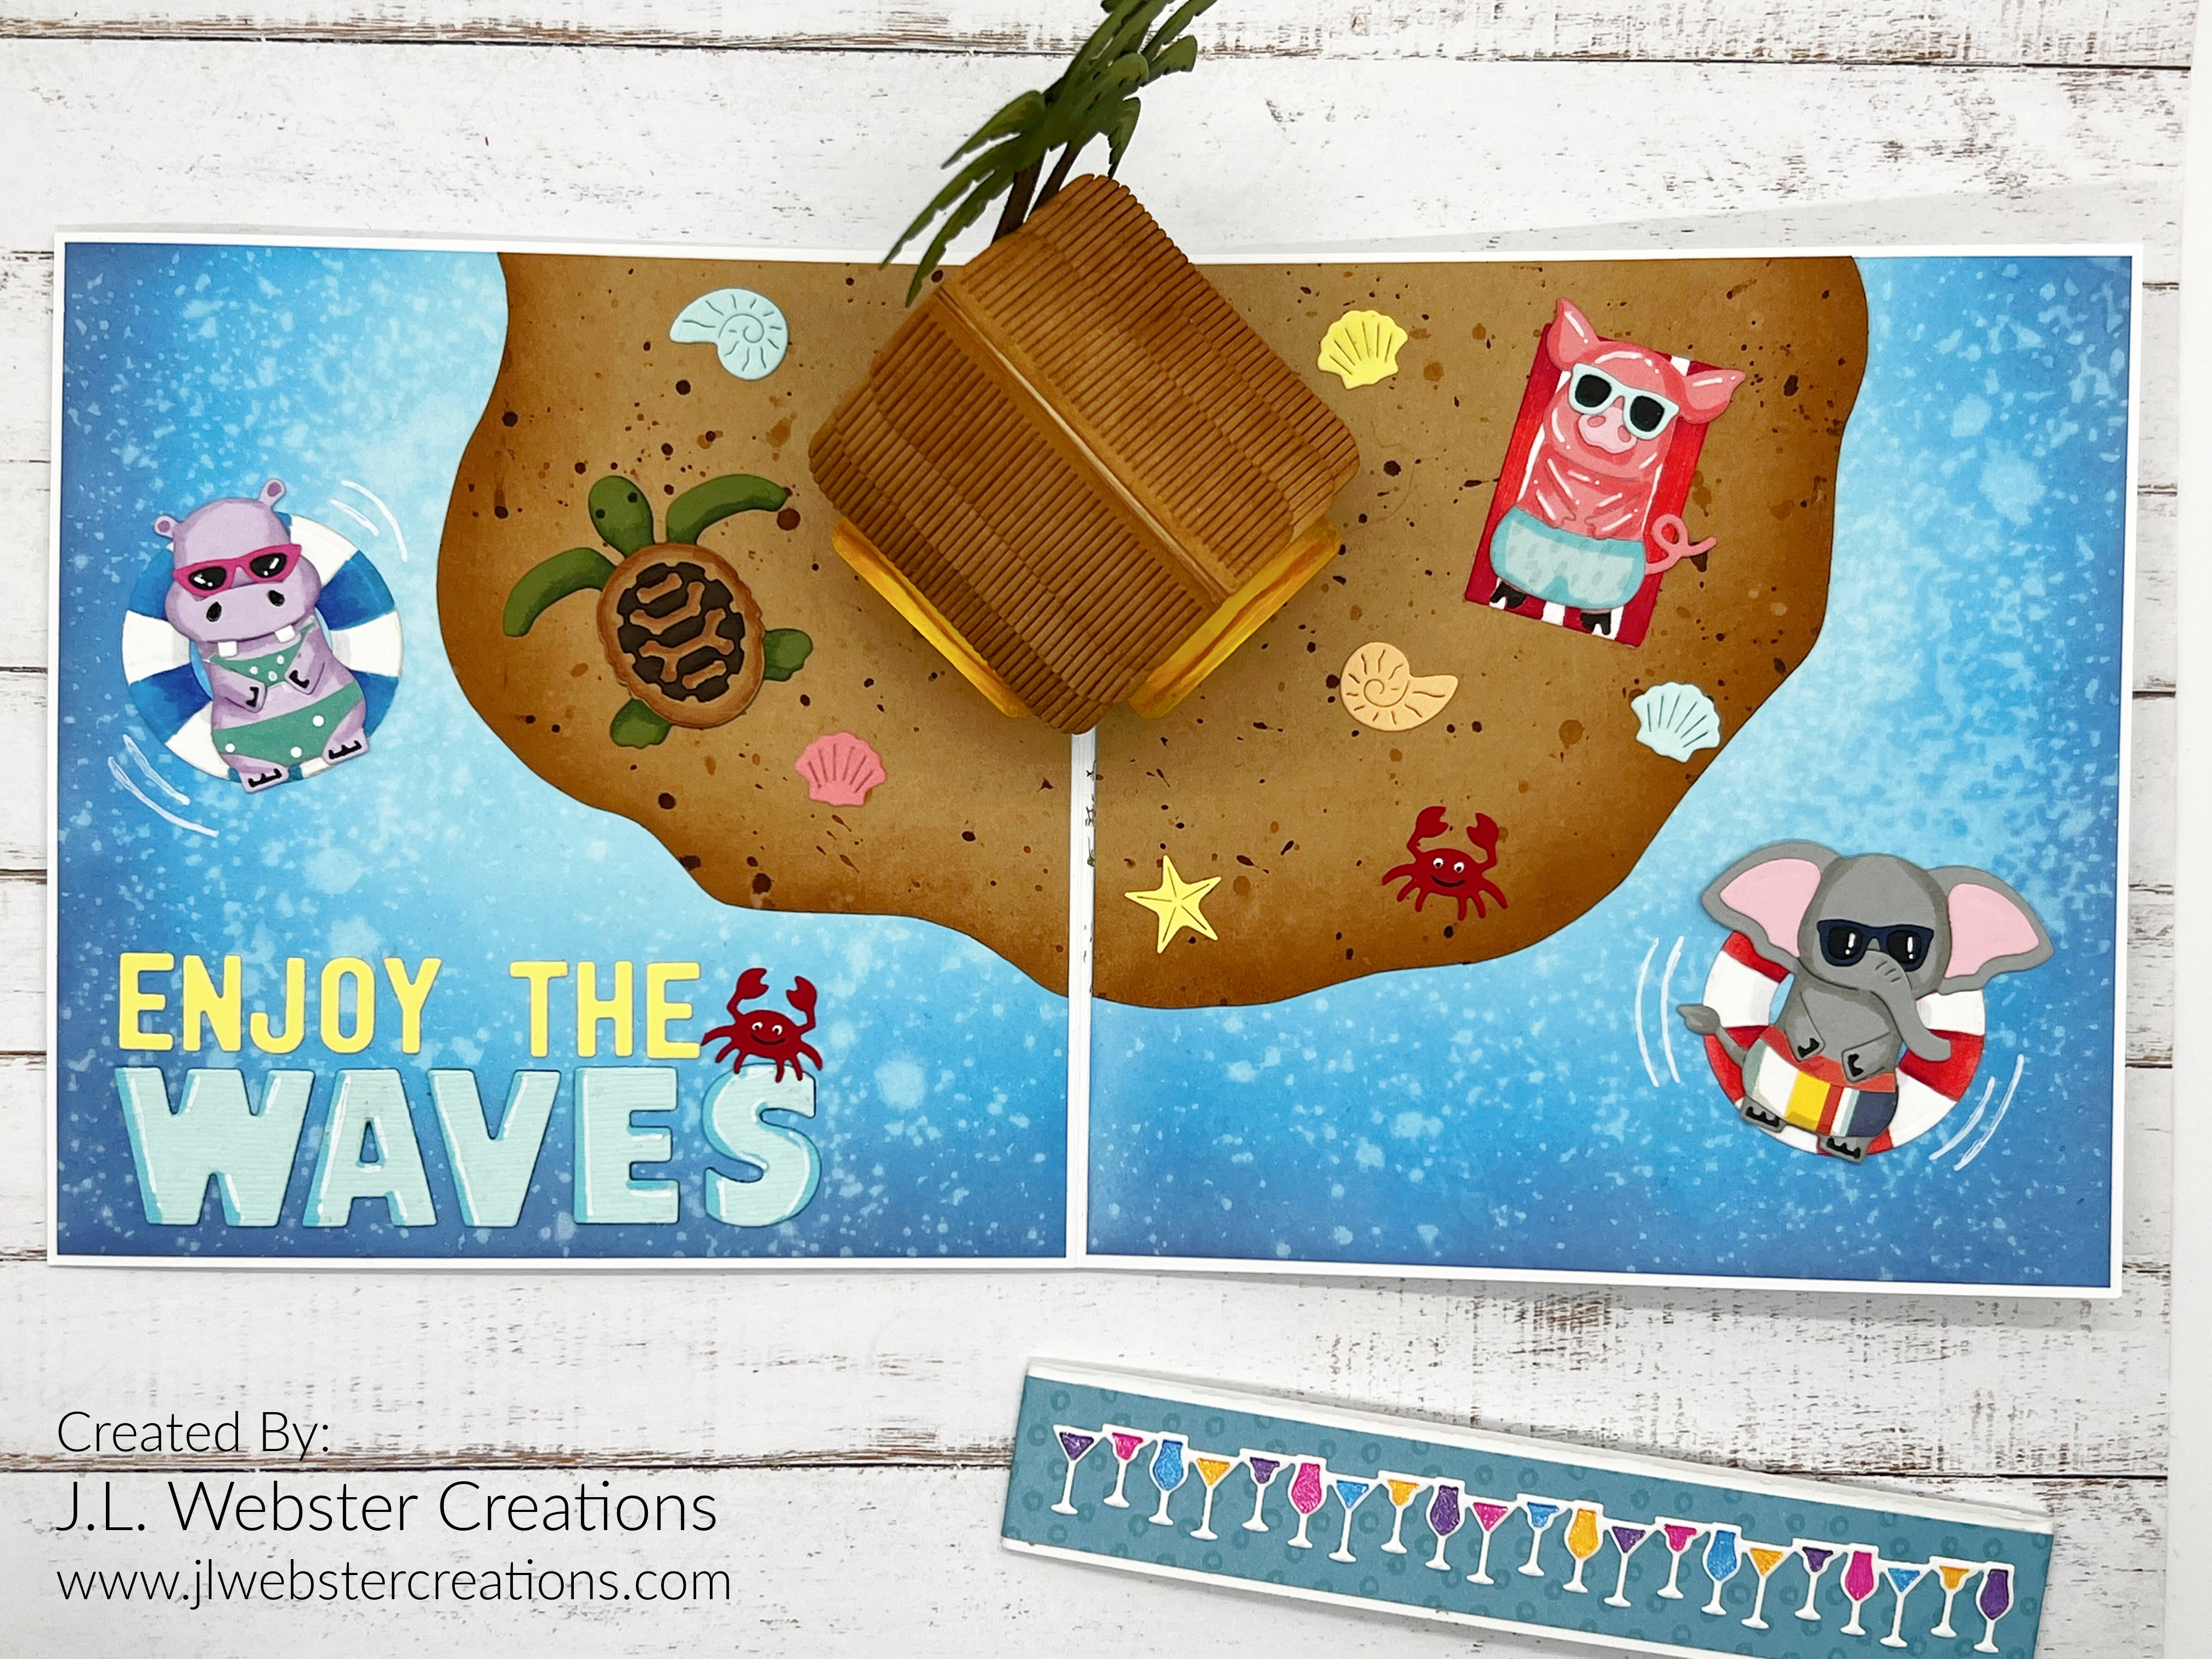
My card for the blog hop uses the brand new Beach Bar Tiny House Add-On, along with the Beach Borders and the new Word Set 16 - Beach Happy Hour. I couldn't wait to make a Beach Bar using the Tiny House Add-On. So I got my sketch pad out and came up with an idea. 
I wanted the inside to look like an island getaway with a bright and colorful beach bar front and center. I made the Beach Bar a tropical blue color and created a weathered wood paneling on the bar. I made the bar top and legs a bright yellow and also created a wood panel look on them. I used a combination of Copic markers and PrismaColor Premier pencil crayons. 
I used the thatched roof dies to create the Beach Bar roof, adding a bit of Distress Ink in Vintage Photo to the edges. 
I added a couple of cocktails to the bar part, using the side of the building to prop them up. I tried using a piece of acetate to hold the drinks up, but it wouldn't fold down properly and then I couldn't close the card, so I went with using the hut to hold them up. 
I added two of the Palm Trees that come with the Beach Bar Add-On, to the back of the bar. 

I made the card 5.5 x 5.5 and created water backgrounds for the inside of the card using Distress Oxide ink in Tumbled Glass, Salty Ocean and Chipped Sapphire. I sprayed water on the cardstock after I inked it and dabbed it with a kleenex to create water marks. 

I cut out two pieces of kraft cardstock and created an island. Once I had the island cut out, I added Distress Ink in Vintage Photo to the edges and flicked Distress Spray in Antique Linen and Vintage Photo over the island pieces to create a sand look. 

I used the smallest circle die in the Circles - Crosshatch set to create the floaty rings the hippo and elephant are on. Then I found a smaller circle die to cut out the center. With a pencil, I drew out the colored areas of each floaty and then colored them in with Copic markers. 

I die cut the Hippo, Elephant and Pig from the Safari Animals and the Chicken, Pig and Lamb die set. I die cut them a second time using a patterned paper to create swimsuits for the animals. Then I used the Tiny Accessories 1 die set to create sun glasses. 

I die cut the turtle from the Sea Animals die set and added him to the island. I added some different colored shells from the Tropical Scene die set. I then die cut the tiny crabs from the new Beach Border set and added them around the island. 

I die cut the sentiment "Enjoy the Waves" from the Mini Alphabet and Numbers and Alphabet die sets. 

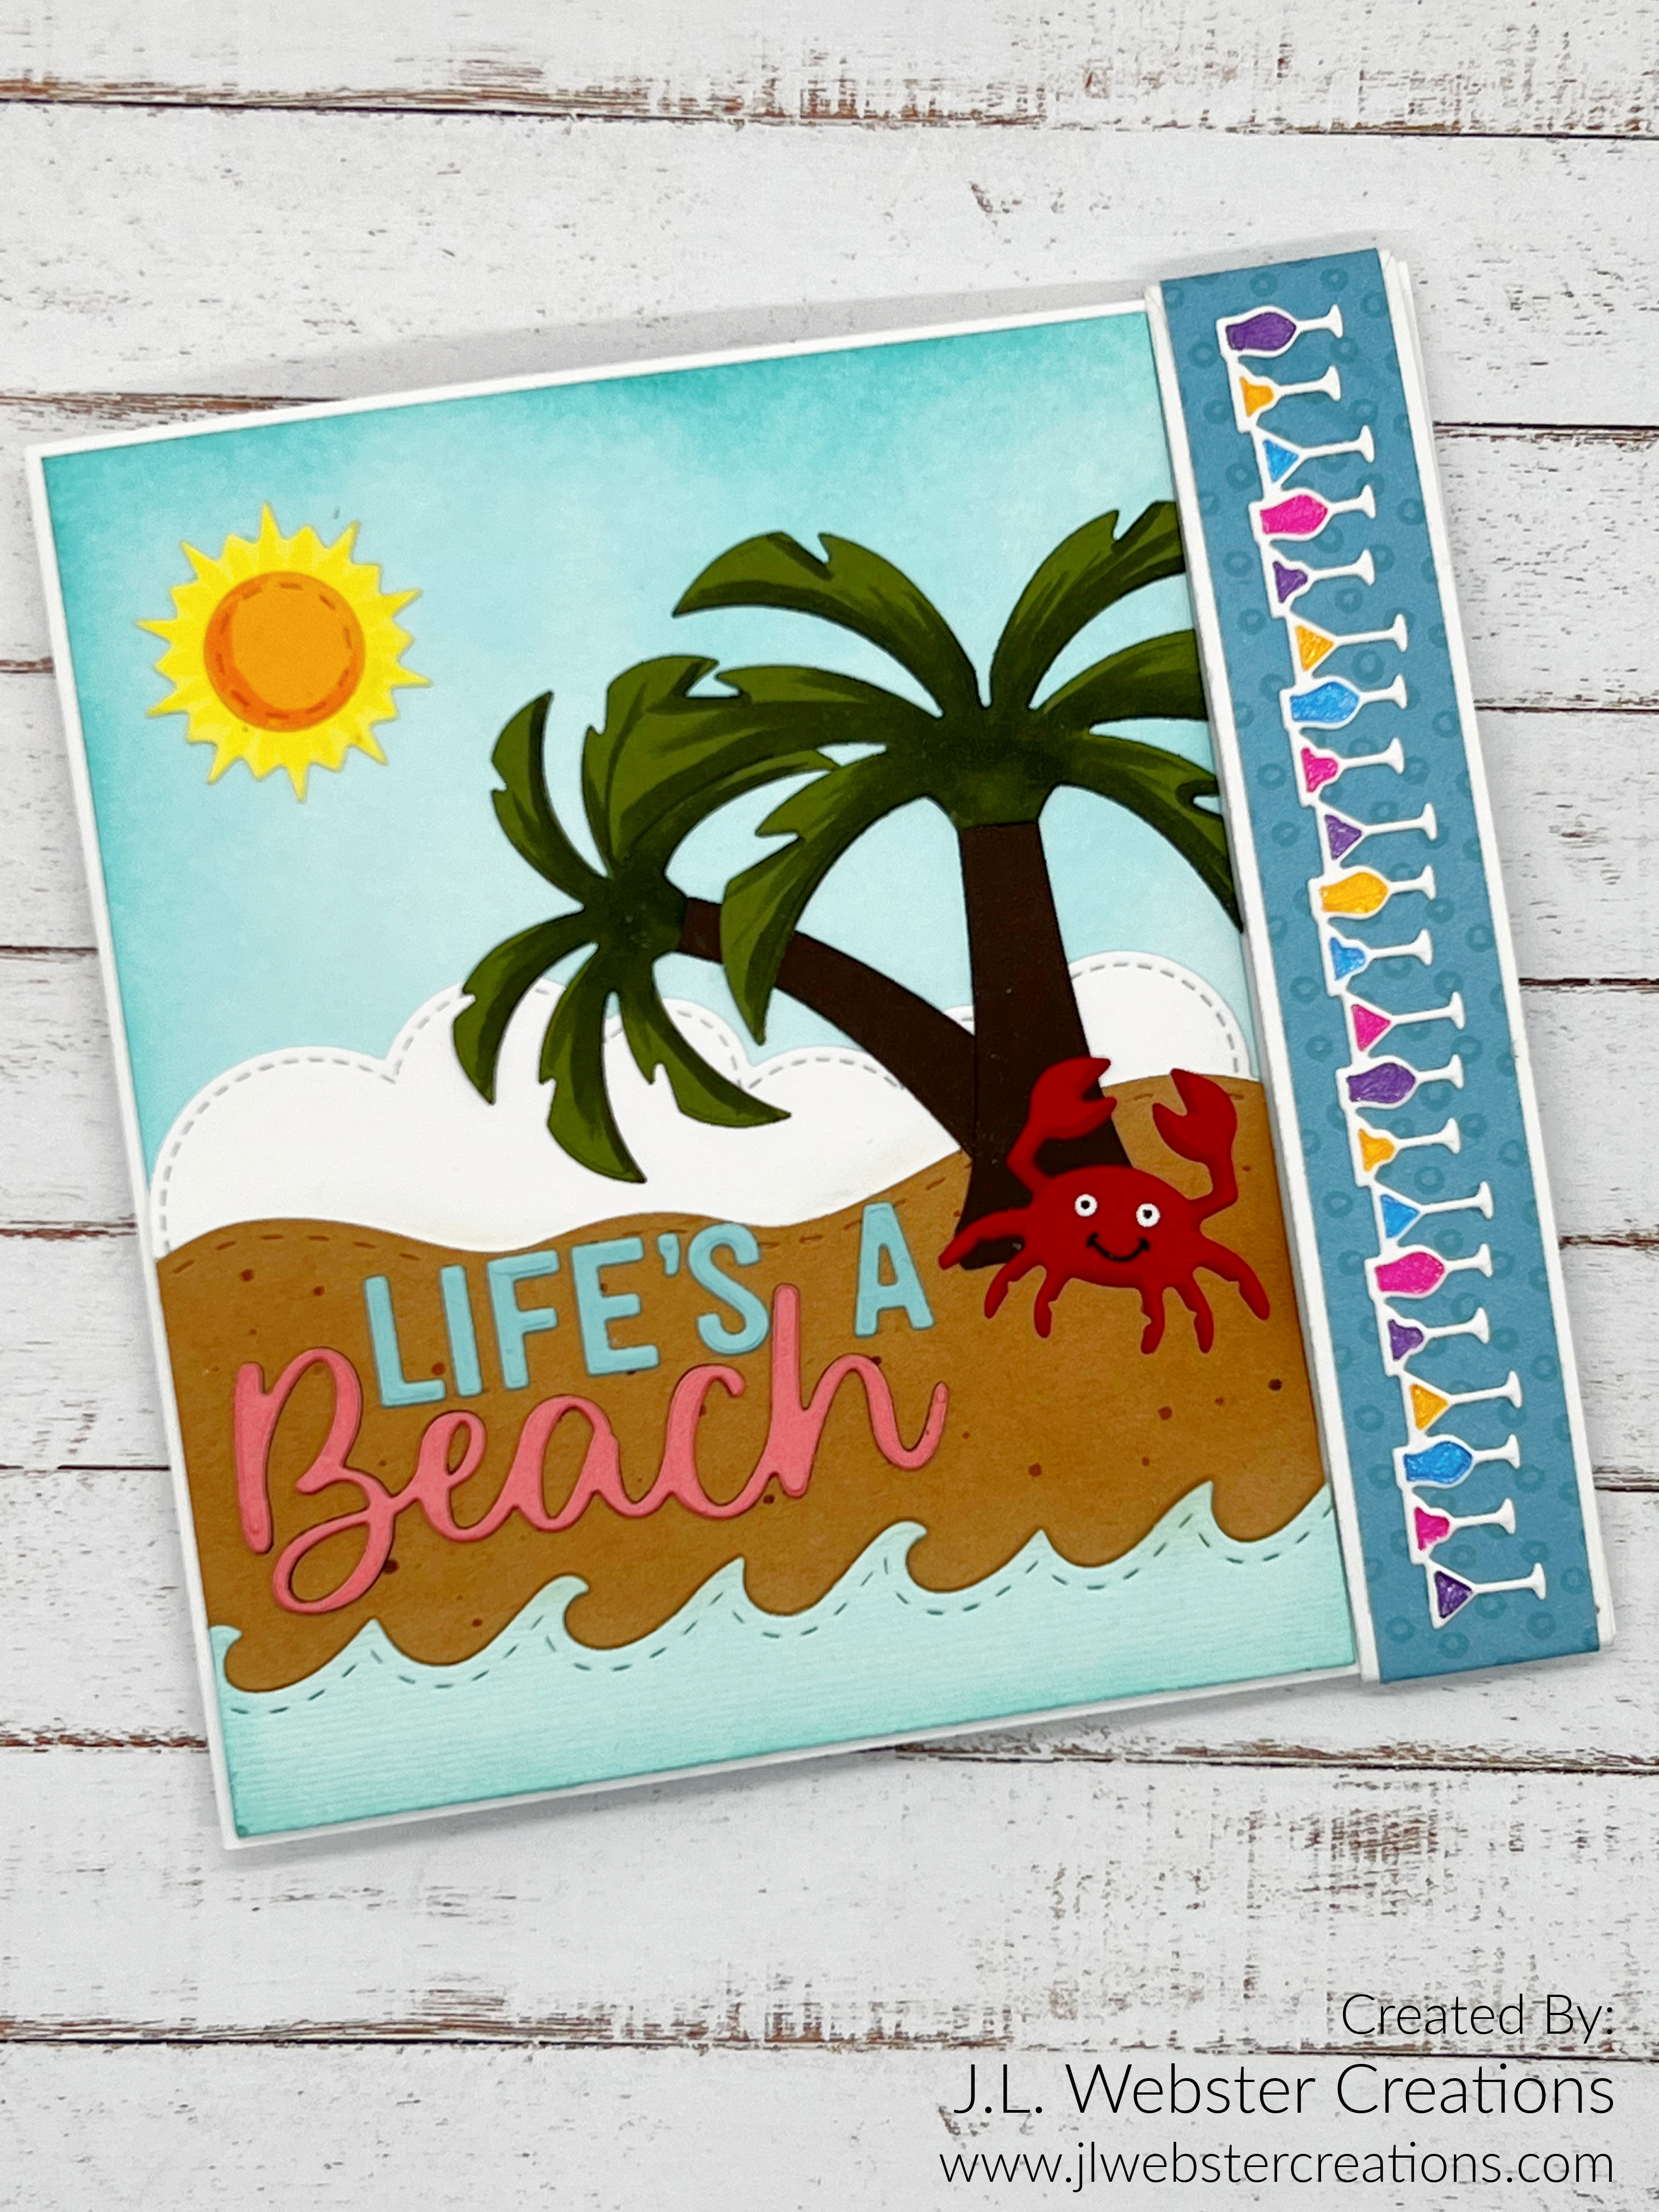
For the front of this card, I created a background that is 4.5 x 5.5 and added a 1inch strip of patterned cardstock to the right edge. I then created a band to go around the card to keep it closed using the same patterned paper. I added the drinks border from the new Beach Borders and colored the drinks in with sparkly pens in various colors. 

I created the beach scene using the Tropical Scene die set. I added the palm trees from the Palm Tree Pop-Up die set. 

I die cut the Crab from the new Sea Charms die set, trimming the charm hole from the top. 

I die cut the sentiment "Life's A Beach" using the Mini Alphabet and Numbers die and the brand new Word Set 16 - Beach Happy Hour die set. 

I die cut some clouds for the background using My Favorite Things Stitched Clouds and made the sky using Distress Ink in Peacock Feathers.
I just love how this card turned out. The little Beach Bar was simple to create and can be added to any sized card. I love the thatched roof!! 

Thank you so much for joining the Karen Burniston February 2023 New Release Blog Hop! To head to our next amazing designer, click the link below. You will find a list of our Design Team members and links to their blogs. Also please be sure to leave your name and email address so we can contact you if you are the lucky winner of the $25.00 gift certificate!!

Foxy Fall Pop-Up Card!

 Hello Crafty Friends and welcome! I have another pop-up card for you. This time, I used an old stamp set I had from My Favorite Things call...